Sunday, March 16, 2014

Pickled Gulf Shrimp with Celery Root Sauce

We love our food trailers in Austin, and now it’s easier than ever to try some of their best dishes right at home. Tiffany Harelik has written a series of cookbooks with their recipes. I received a review copy of the latest, Trailer Food Diaries Cookbook: Austin Edition, Vol. 3 , and there are also versions from Dallas-Fort Worth and Houston and a new one on the way from Portland. The Austin Edition, Volume 3 is a fun collection including Drinks, Breakfast, Appetizers and Sides, Sandwiches and Handhelds, Sauces and Jams, Main Courses, and Sweets. Most of the trailers represented are from the city of Austin, but there are a few “Road Trip” locations in Pflugerville, San Marcos, Round Rock, and San Antonio. A few things I can’t wait to try are The Carrot Top from the Blenders and Bowls trailer which is a smoothie with carrot juice and ginger; Dock and Roll Diner’s Tsunami Sauce for sandwiches with jalapenos, lime, garlic, and oils; the Cabbage and Mint Salad with Poached Shrimp and Red Chile-Caramel Fish Sauce and Fried Prawn Chips from Fresh Off the Truck; and the Pineapple Cinnamon MMMpanadas from mmmpanadas. One of our food trailers that does a great job of offering each season’s best is The Seedling Truck. They offer a “revolving menu that is dictated by local farms and purveyors.” I was delighted to find their recipes for Braised Short Ribs with Brown Butter Carrot Puree, Grilled Lamb Chops with Red Peperonata Jam, and Pickled Gulf Shrimp with Celery Root Sauce in the book. I’d made pickled shrimp once before, and I really wanted to try it again. 

The recipe in the book makes a lot of pickled shrimp which is perfect if you’re hosting a few friends. Since I hadn’t planned a party, I cut the quantities in half. I used about a pound of shrimp which I cleaned and deveined leaving the tails intact. The shrimp were poached in boiling water to which had been added a bay leaf, half a lemon, and some black peppercorns. The poached shrimp should be removed from the boiling water and placed directly into an ice bath to stop the cooking. In a separate saucepan, a cup and a half of white vinegar, a cup and a half of water, two tablespoons of sugar, two tablespoons of salt, and a couple of teaspoons of coriander seeds was warmed until the sugar and salt dissolved. The vinegar mixture was then left to cool. Once cool, the vinegar mixture was poured into a bowl with the drained, cooled shrimp, and a big handful of roughly chopped parsley was added. The bowl was refrigerated overnight. Next, the sauce was made by sauteing a peeled and chopped celery root with half a chopped onion and a chopped garlic clove. Once the vegetables became a little tender, after five minutes or so, a cup and a half of water was added with salt and pepper to taste. The mixture was simmered for about 45 minutes until the celery root was completely cooked through. The water should mostly evaporate during the cooking time. After 45 minutes, the vegetables and any remaining liquid were transferred to a blender and pureed with a few tablespoons of cream until smooth. 

This version of pickled shrimp was so much better than my previous attempt. Shocking the shrimp in ice water is a crucial step, I believe. You really want to stop the cooking to keep the texture of the shrimp at its best. Also, a good, sharp, white vinegar is the way to go. It gives the shrimp a zippy, bold flavor which is perfectly balanced by the mild, sweetness of the celery root puree. I was completely delighted by this dish. I look forward to making this for a party since it requires being made in advance, and it’s a little more interesting than shrimp cocktail. And, when celery root isn’t in season, I highly recommend trying the pickled shrimp on top of deviled eggs. 

I am a member of the Amazon Affiliate Program.

Tuesday, March 11, 2014

Lemon Croquettes with Cilantro Pistou

I love looking at photos of beautifully presented food and learning a chef's interesting techniques no matter how complicated, but beyond all of that, it was an absolute joy to spend time with Daniel Boulud’s latest book. The book is Daniel: My French Cuisine, and I received a review copy. This is a big, heavy, serious-looking book with serious-looking recipes. But, from the beginning on the How to Use this Book page, the reader is put at ease. You’re invited to prepare components of dishes or whole recipes as you wish. There’s no expectation that you’ll jump in and prepare everything in the book just as it’s shown. The book is made up of three sections. The first is a delightful tour of dishes from Restaurant Daniel. The photos are stunning, and all the instructions are right there for you to experiment with as you please. Sprinkled throughout this section, you’ll find bits of the story of Boulud’s career and upbringing in France. The second section is a group of essays written by Bill Buford about iconic French dishes. He spent time in the kitchens at Daniel to learn about some classic preparations that aren’t often mentioned these days. These are mostly grand, dated dishes like Tete de Veau en Tortue and Carnard a la Presse, but the writing is all entertainment. Buford shares the comical moments of learning these dishes along with their histories and how Boulud came to know them. The last section includes four dinner party menus that Boulud prepares at home inspired by different regions of France. The three sections are very different, but together they give you a clear picture of the kind of chef that Daniel Boulud is, the level of quality of what he produces, and his love of food. 

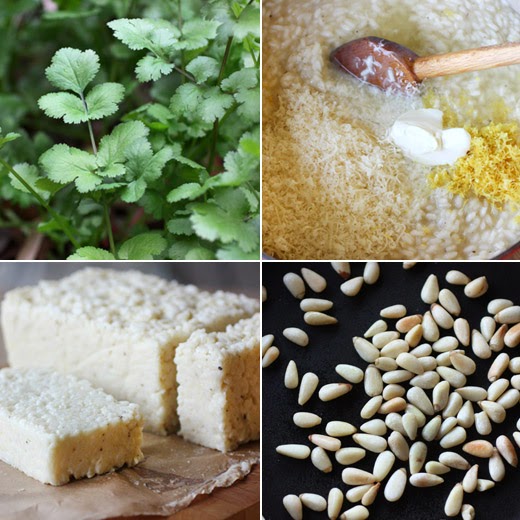
In the restaurant recipes section, there’s a Warm White Asparagus Salad with Poached Egg Dressing dish that looks like spring itself. I might try it with just one of the three accompanying sauces. Then, there’s the Hazelnut-Crusted Maine Sea Scallops with Nettles and Swiss Chard that’s gorgeous with the nettle foam and sauteed morels. And, there are parts of every dessert that I really want to attempt like Sauternes-Rhubarb Ice Cream, Apricot and Lavendar Clafoutis, and Coffee Cremeux and Espresso Ganache. So far, I’ve made two parts of the Striped Bass in a Cilantro-Tapioca Pistou with Artichokes and Lemon Croquettes. In the book, a shallow bowl is shown with the tapioca sauce in the bottom with a pretty mix of chopped artichokes and fava beans centered in the sauce, a piece of striped bass perfectly coated with cilantro pistou sits on the vegetables, and lemon risotto croquettes are perched on top with a tangle of micro cilantro and shaved artichoke slices. The risotto croquettes are perfect, and I do mean perfect, little, crispy cubes. They looked like fun to make. To start, a pretty standard risotto was made with onion cooked in melted butter. Arborio rice was added, and warmed chicken stock was ladled in a little at a time in the usual fashion. When the rice was fully cooked, shredded parmesan, a tablespoon of mascarpone, lemon zest, and lemon juice were added. It was tasted for seasoning and adjusted before the risotto was poured into a parchment-lined 8 1/2-inch by 4 1/2-inch loaf pan and left to chill in the refrigerator overnight. The next day, the risotto was unmolded and cut into one-inch cubes. The cubes were dusted with cornstarch and fried until crispy. The cilantro pistou was easy to make by pureeing lots of cilantro which is filling my herb garden right now with a couple of tablespoons of toasted pine nuts, some olive oil, and salt. 

I served the crispy, lemony croquettes with a dish of cilantro pistou for dunking. The bright, herby sauce was a light and lively contrast to the savory risotto pieces. There’s so much I’ll be turning to this book for in the future. There are plating arrangements to try and copy, flavor combinations to taste, sauces to attempt, and parts and pieces of recipes to use. Right now, I’m looking at one of the desserts from the last section of the book, the Fig Pine Nut and Mascarpone Custard Tart, and I can’t wait for fig season to get here. I’ll be glad to have this book on the shelf when it does. 

I am a member of the Amazon Affiliate Program.

Tuesday, March 4, 2014

Shitake Mushrooms with Sourdough Toast and Rosemary Blue Cheese Creme Fraiche

You know a restaurant takes sustainable sourcing seriously when its recipes are named for particular vegetable varieties grown in their own garden. That was one of things I loved about The Ethicurean Cookbook of which I received a review copy. The Ethicurean restaurant and kitchen are located in two glasshouses of the Barley Wood Walled Garden on an estate just outside Bristol in England. The restaurant is run by a group of four friends who joined together on this mission in 2010 to highlight seasonality and sustainable sourcing. Vegetables and fruits come from the Walled Garden and orchards including 70 varieties of apples, and other ingredients are carefully sourced or foraged nearby. I was confused about the recipe for Sea Robin with Fennel Butter Sauce and Herbed Pink Firs until I read through it and learned that sea robin is another name for gurnard which is a thin, mild, white fish. And, pink fir is a type of waxy potato grown in the restaurant’s garden. Of course, in the spirit of The Ethicurean, it would make perfect sense to substitute ingredients that are local and seasonal to the reader. The book is divided by season, and it’s full of stories about what’s growing at different times of the year. There are also lots of side notes about the history of some ingredients and explanations of food science. In the recipe for Caerphilly and Cider Welsh Rabbit, the authors explain that since Caerphilly is a mature cheddar with a good level of acidity and high moisture content, the casein molecules in the cheese will separate preventing it from becoming stringy when it melts. The photo of the lovely, broiled and cheese-filled sandwich next to a fresh, crisp salad looks delicious. Some other dishes that caught my eye were the Ewe’s-Curd-Stuffed Courgette Flowers with Fennel Sherbet; the Crab Salad with New Potatoes, Pickled Carrot and Smoked Paprika Mayonnaise; the homemade Vermouth; the Globe Artichokes with Hollandaise Sauce and Sumac; and the Chocolate and Salt Caramel Brownies with Cherry and Elderflower Sauce. 

Kurt and I share a fondness for blue cheese, so my first stop in the book was at the recipe titled Wild Mushrooms with Sourdough Toast and Thyme Stichelton Creme Fraiche. I made a few changes to keep the sourcing at least a little closer to home. We have fresh, locally-cultivated mushrooms that are available year-round, so I used local shitakes. I usually have thyme in my herb garden, but it died back during one of our freezes this winter. I substituted rosemary for it since I always have rosemary growing in multiple spots in our yard. And, last, rather than using Stichelton which is a British-made, raw milk, blue cheese, I used Jasper Hill Farms’ Bayley Hazen Blue which is also a raw milk blue. On little pieces of sourdough baguette, these mushroom toasts are a great appetizer. The mushrooms were sliced and then sauteed in some oil with chopped rosemary (or thyme). They were left to brown a bit before being stirred and turned. When fully cooked, butter was added to the mushrooms with a sprinkling of sea salt. The topping is an easy mix of creme fraiche,  blue cheese, and some rosemary in my case that was combined in the blender. The sauteed mushrooms were spooned onto pieces of toasted bread and topped with the blue cheese creme fraiche. My rosemary still had some flowers clinging to the sprigs which I used as garnish. 

I might have made some extra blue cheese creme fraiche and learned that it also makes a fabulous dipping sauce for roasted potato wedges. But, it was perfect with the mushroom toasts. They were crunchy and savory and a nice start to a meal on one of our chilly days. I’ll be looking back to this book for inspiration as the seasons change and different ingredients are at their best. 

Wild Mushroom with Sourdough Toast and Thyme Stichelton Creme Fraiche 
Recipe reprinted with publisher's permission from The Ethicurean Cookbook (Ebury Press).

Serves 4 

2 tbsp rapeseed oil 
300g mixed wild mushrooms, such as slippery jack, penny bun, russula, horse mushroom, sheep’s foot and puffballs, cleaned and sliced into 1cm strips 
leaves from 4 sprigs of thyme 
25g unsalted butter 
8 very thin slices of sourdough bread 
fine sea salt flaky sea salt 

For the thyme Stichelton creme fraiche: 
25g Stichelton cheese, roughly chopped 
75ml creme fraiche 
leaves from 5 sprigs of thyme 

For the thyme Stichelton creme fraiche, put all the ingredients in a blender or food processor and pulse to a semi- coarse consistency. Season with salt to taste and set aside. 

Place a large frying pan over a high heat and leave until it is very hot. Add the rapeseed oil; it should begin to smoke. Immediately add the mushrooms and thyme leaves, plus a dusting of fine salt, and toss to coat them evenly with the oil. Leave undisturbed for a minute or so, until the mushrooms colour ever so slightly, then toss and colour on the other side. Remove from the heat and add the butter to the pan. Toss until it has melted and the mushrooms are evenly coated, then check the seasoning. 

While the mushrooms are cooking, put the sourdough bread under a hot grill and toast, turning every minute, until both sides are golden brown. Thin slices of bread will curl under the grill, and the regular turning prevents this happening. Remove the sourdough from the grill and add a couple of slices to each plate. Cover with the mushrooms, season with flaky sea salt and add a heaped tablespoon of the Stichelton creme fraiche.

I am a member of the Amazon Affiliate Program.

Monday, February 24, 2014

Milk Chocolate, Nut, and Raisin Clusters

I own the fact that I have an overactive sweet tooth. It frequently takes command of my food choices. That could be why I ran to the kitchen the minute I read about these chocolate clusters. They were in the February issue of Food and Wine in a story about Patricia Wells’ updated edition of her book Food Lover’s Guide to Paris. In the magazine, there are four itineraries for food and shopping tours around Paris. I really wanted to book a flight, but since that wasn’t possible on such short notice, I made candies instead. The recipe is from Chef Alain Ducasse, and they’re sold at his new shop. First, I was surprised that this simple, homey cluster of goodness lacking any sort of chic presentation came from such an acclaimed chef. And, next, I noticed there are cornflakes in the clusters. I believe this is the first French recipe I’ve encountered that called for cornflakes. There are also feuilletine flakes, but rather than ordering those online, I went with the option of using more cornflakes. There are two problems with this recipe. One is that it was very difficult to not eat all of the mixture before even spooning it into clusters, and the other issue was refraining from eating all the finished clusters in one sitting. 

The nuts and fruit could easily be changed out to use whatever you prefer, but I followed the suggested ingredients, other than skipping the feuilletine flakes, to taste the candies as they’re made by Ducasse. Hazelnuts were toasted in the oven and then rubbed in a towel to remove the skins before being roughly chopped. I bought a new container of golden raisins, but they seemed very dry. So, I soaked my raisins in hot water for twenty minutes, drained them well, and dried them on a towel. I used all cornflakes, and chopped, unsalted pistachios. Salt was added separately. The milk chocolate I used has a high percentage of cacao for milk chocolate at 40%. Another surprising ingredient that made me curious about these clusters was the addition of some white chocolate. There was no explanation for it, but I went with the suggested amount. The chocolates were melted and then half of the mixed chocolates was poured over the mix of cornflakes, raisins, and nuts. The mixture was carefully folded to distribute the chocolate, and then the remaining melted chocolate was added and folded until everything was completely coated. I used a tablespoon-size scoop to create the clusters which sat on lined baking sheets until set. 

I’m still wondering why the white chocolate was added. Maybe it made the flavor richer or slightly sweeter? The result was without a doubt delightful. The clusters were sweet and chocolatey with just enough salt for balance, and I did put a few flakes of sea salt on top of each one. The real fun in these clusters, though, is the mix of textures. Crunchy nuts, shatteringly crisp cornflakes, and chewy raisins all covered in chocolate made my sweet tooth very happy. 


Wednesday, February 19, 2014

Kamut Crispbreads

As much as I love baking with my sourdough starter and love using all sorts of different grains in bread recipes, until recently, I’d never converted my starter to whole wheat. I knew it was an easy thing to do. You just start feeding it with whole wheat flour or a mix of whole wheat and bread flour. You can just as easily convert a starter with rye flour for rye bread, but I haven’t done that yet. The inspiration for going whole wheat with my starter came from the latest book from Chad Robertson, Tartine Book No. 3, and I received a review copy. If you’re familiar with his previous bread book, Tartine Bread, then the basic approach to bread baking will come as no surprise. He makes a leaven with a small amount of sourdough starter to prevent the final flavor from being too sour and then builds the dough from there. He works with very wet doughs and suggests baking loaves in a lidded cast iron pot. The techniques are all the same in this book for the hearth-style loaves, but this book starts fresh with a focus on different grains. Robertson had traveled to different parts of the world and took notice of the grains used by bakers in those locations. In Denmark, specific Nordic grains not found in the US were used in breads; in Sweden, bakers were using freshly-milled, biodynamic grains; and in Germany, a bakery was stone-grinding their flour daily. Back at home, he began experimenting with ways of using higher percentages of a variety of grains in breads without making the final loaves too dense. So, this new book includes loaves with mixes of whole grain flours, some made with sprouted grains both for hearth-style loaves and pan loaves, and breads made with porridge and cracked grains. And, then these different types of flour appear in crispbreads, cookies, eclairs, cakes, tarts, and scones. When I first flipped through this book, I was delighted by the look of the delicate crispbreads. The dough is rolled extremely thin either by hand or with a pasta machine, and the crisps are either topped with seeds or layered-over with herbs or thinly sliced nuts or vegetables. They’re like shards of delicious, edible, stained glass. 

In this book, the dough-making technique is explained in parts. At the beginning, the master method is explained for making a starter with a blend of whole wheat and bread flours with instructions for feeding it and making a leaven from it. Then, in the Crispbreads chapter, there’s a master method for using that leaven to make these doughs. The Crispbread doughs are not as high in hydration as those for hearth-style loaves, so it’s much easier to work with. Each Crispbread recipe includes an ingredient list for the flours used and quantities of water and leaven. The dough for the Kamut Crispbreads included whole-grain kamut flour, bread flour, wheat germ, salt, water, and leaven. It was mixed and left in the refrigerator overnight. The next day, the dough was divided into small pieces, and I used the pasta machine technique to roll each piece into long, thin ribbons. I topped the ribbons of dough with parsley leaves, thinly sliced garlic, lemon zest, and crushed red pepper. Then, the dough was folded over to encase the herbs and spices inside, and it was rolled through the machine again to seal it. The long pieces were cut into portions, brushed with melted butter, sprinkled with salt and pepper, and baked until crisp. They do brown quickly, so you need to watch and pull them from the oven before they get too dark. To further crisp them, they were placed back in the oven at a lower temperature on racks to fully dehydrate. 

I look forward to sprouting grains for the hearth-style loaves and trying some of the darker, seeded pan loaves like the Sprouted Buckwheat-Einkorn bread. I already visited the Pastry chapter and tried the Croquant D’Amandes which are kind of like almond biscotti made with hibiscus flowers, spelt flour, and kamut flour. They were crunchy, nutty, and deliciously tangy from the hibiscus, but mine turned out a bit flatter than what’s shown in the photo. The whole grain Pate a Choux dough has me very curious, and the Salted Chocolate-Rye Cookies look hard to resist. I can already tell I’ll be spending more time tracking down a variety of whole grain flours to use. 

Kamut Crispbreads 
Recipe reprinted with publisher’s permission from Tartine Book No. 3. 

Whole-grain Kamut flour (60%) 170 g 
Medium-strong bread flour (40%) 113g 
Wheat germ (7%) 20g 
Fine sea salt (2.5%) 7g 
Water (50%) 142g 
Leaven (15%) 45g 

*Herbs, edible flowers, and shaved vegetables for filling (optional) and flaky salt such as Maldon. 

(The dough is started by making a leaven from a mature starter that’s been fed with a mix of 50% whole wheat flour and 50% bread flour. The leaven is made with one tablespoon of starter, 200 grams of the 50/50 whole wheat-bread flour mixture, and 200 grams of warm water. The leaven is mixed and left at room temperature for 4 – 6 hours before proceeding with the recipe below.) 

Mix the dough with the above ingredients. Let ferment overnight, covered, in the refrigerator. The next day, divide the dough into small pieces, each about 50 grams, and shape into rounds. Let rest for 10 to 15 minutes. 

To make with a pasta machine: 
Flour your work surface and the dough. With a rolling pin, roll one piece of dough just thin enough so it will fit through the widest setting on your pasta machine. Flour the dough well, then feed it through the machine. Repeat this step, reducing the opening of the rollers a notch with each pass until you’ve reached the Number 1 setting on the pasta machine, flouring the dough each time as necessary to prevent sticking. 

As the dough gets thinner, use the backs of your hands to guide the dough through the rollers to help prevent tears. If at any time you feel your dough is too long to manage, cut it in half and roll both pieces separately. Transfer the dough to a well-floured work surface. 

To make filled crispbreads, after the final pass, transfer the dough to a well-floured surface. Roughly mark the center of your dough and, with a pastry brush, brush one half lightly with water. Lay the filling of your choice on the moistened half of the dough in a single layer, arranging it artfully, then fold the dough, encasing the filling, and pat well so that the two pieces of dough adhere to one another. 

Flour the dough well, then run it through the pasta machine again, beginning on the Number 4 or 5 setting and continuing until you’ve passed the dough through the Number 1 or 2 setting (depending on the thickness of the filling). 

Transfer the dough to a floured surface and cut each crispbread into the desired shape, transfer to a parchment-lined baking sheet, and brush with melted butter. Sprinkle with flaked salt. Bake at 425 degrees F/220 degrees C for 10 to 15 minutes, until golden brown. Remove from the oven. 

Reduce the oven temperature to 200 degrees F/95 degrees C. When the oven has cooled, remove the crispbreads from the baking sheets and return them to the oven, placing them directly on the oven racks. To allow moisture to escape, leave the oven door slightly cracked (use the handle of a wooden spoon to keep it ajar), and bake 10 to 15 minutes longer, until the crispbreads are thoroughly dehydrated. They should not have darkened in color. 

Carefully remove from the oven and transfer to a cooling rack. Once cool, break into large pieces or transfer whole to an airtight container right away so they stay crisp; they will keep for a week stored properly and can be recrisped by heating again in a moderate oven (300 degrees F/150 degrees C) for 10 to 12 minutes. 

I am a member of the Amazon Affiliate Program.

Wednesday, February 12, 2014

Frozen Green Tea Souffles

I’m not good at catching trends at the right time. I procrastinate, let the hype fade, and finally try the whatever-it-is when it’s not even cool anymore. For instance, I still haven’t tried a cronut. In the case of this recipe, my timing was off by decades for one trend and several years for the other. I pulled this out of my files, and it became a contender for dessert for New Year’s. I ended up making ice cream for that occasion, and this sat in a stack of recipes that I was thinking about for days and then weeks. I didn’t want to file it away again without giving it a try, so it found its way onto a menu right around Lunar New Year which was kind of appropriate. It’s made with matcha green tea, and that was such a trendy ingredient in desserts eight or nine years ago. I used to see green tea shortbread, green tea ice cream, and green tea cakes all over the place. The other no-longer-trendy ingredient in this dessert is a bit retro. Creme de menthe is used, and I want to say that’s a 70s thing. I have considered making grasshopper pie with creme de menthe but never actually did it. Yet. This recipe for Frozen Green Tea Souffles is from the May 2006 issue of Living magazine, and it’s available online. Little cups are over-filled with the airy and fluffy mixture and left to firm up in the freezer. They’re called frozen souffles, but they’re really more like frozen mousse since egg yolks are used rather than whites. Regardless of what they’re called and what time they belong to, they were delicious. 

I used small espresso cups for serving, but any little ramekin or cup will work. Keeping the serving size small is a good idea since these are more decadent than they look. Parchment paper was cut to size, wrapped around each cup, and secured with tape. Meanwhile, boiling water was added to a tablespoon of matcha tea, stirred together, and then refrigerated until cool. Next, sugar, egg yolks, and the cooled tea mixture were combined in the bowl of a stand mixer. That bowl was set over a pan of simmering water, and the contents were whisked for eight minutes. The bowl was then moved to the mixer, and the whisk attachment was used to lighten and cool the mixture. The last component is the whipped cream which was made with a tablespoon of creme de menthe. I whipped the cream in a separate bowl with a hand mixer and then folded the whipped cream into the egg yolk mixture. Although I used clear creme de menthe with no food coloring added, the dessert was still a nice shade of green from the tea. It was divided among the prepared cups, and the cups were placed in the freezer for at least four hours. The texture of the dessert improves if it’s left at room temperature for a few minutes before serving. And, it was garnished with a dusting of matcha. 

I had a slight concern heading into this that the mint flavor would overpower that of the delicate tea. Happily, I was wrong about that. There was just enough mint to know it was there, but the flavor of the tea wasn’t lost at all. It was a nice mix of the two in this light-as-air dessert. Being late to food trends isn’t so bad when the flavor stands the test of time. 


Wednesday, February 5, 2014

Quinoa, Almond, Cauliflower, Popped Sorghum

I’m always intrigued to learn new cooking techniques and flavor combinations, and that’s what great chefs offer. In the book Coi: Stories and Recipes by Daniel Patterson, of which I received a review copy, he shares not just the beautiful food as it’s presented at the restaurant but also what inspired it and how the dishes evolved. It’s not your standard cookbook with ingredient lists next to numbered instructions. This is a book of stories about food, cooking, foraging, sourcing, ingredients, flavors, and seasons. There are stories that introduce each dish and then a description of how the dish is created. For exact ingredient measurements, you flip to the back of the book. It puts more emphasis on the thought behind the food and gives you a broader understanding of the process and the goal. Regarding innovations in food, cooking, and presentation, while reading this book I was reminded of my reaction to the documentary El Bulli: Cooking in Progress. Months were spent testing dishes with complicated techniques and unbelievable styles of presentation. It was a form of art. But, I couldn’t help wondering what a restaurant might be like that instead spent that time working with seasonal, perfectly fresh ingredients and finding nuances in flavor based on how things had been grown or raised. So, I was thrilled to read Patterson’s explanation of his approach to haute cuisine. Rather than turning to expensive ingredients just for the sake of their price and cache, he writes: “I find it much more challenging-and rewarding-to construct an extraordinary dish out of ordinary ingredients… The farmers’ markets and the different farms that we work with directly bring us flavors from diverse ecosystems and soil types, which allow us greater range of expression than if we used products from only one area or farm. This way of sourcing ingredients provides both challenges and inspiration.” He's creating innovative food but with a focus on seasonality and place. Of course, not all of these dishes can be easily replicated at home. Some do require special equipment or more time to prepare than you usually wish to spend, but there’s something to learn on every page. And, most dishes could be simplified in ways to make them more doable at home. 

Did I mention this is beautiful food? The Inverted Cherry Tomato Tart with Black Olive, Basil is a perfect rectangle of crisp tuile made with black olives that sits on tomato mousse with peeled cherry tomatoes under that which sit on a layer of basil pesto. In the description of how the dish came about, other similar tarts are mentioned all inverted with a piece of tuile on top. I want to try them all or make up some of my own. The Crayfish and Spring Vegetable Stew with Spicy Crayfish Jelly isn’t made as a stew at all. All the components are prepared separately to keep the flavors “cleaner, brighter, and more energetic.” It’s artfully arranged with peas, fava beans, artichoke hearts, fennel, crayfish tails, and fava flowers. The dish New Olive Oil, Brassica, Charred Onion Broth is all about capitalizing on the flavor of just-pressed olive oil which is used in a puree of potatoes and dandelion greens, and the smoky, charred onion broth, used as a sauce here, is something I can’t wait to try. The dish I had to experiment with first, though, was the Quinoa, Almond, Cauliflower, Popped Sorghum. I don’t hide the fact that I have a serious popcorn problem. I love it and can never get enough. I knew that popping amaranth seeds is possible. I’ve tried it. The seeds are tiny, and they do pop but don’t amount to much. What I didn’t know is that you can pop sorghum kernels. I had never heard of this amazing fact before reading this book. I immediately got my hands on some whole grain sorghum and popped it. It’s delightfully small, but otherwise looks just like popcorn. The flavor is similar but different and maybe less buttery than popcorn. The rest of the dish is just as simple as popping sorghum. Quinoa was cooked, and red and white quinoa is suggested. I always have a blend of red, black, and white quinoa which I used. If using separate red and white quinoa, it would be fine to simplify by cooking them together rather than separately as directed. Next, cauliflower was roasted, and I used a pretty, locally-grown, green cauliflower. After roasting, the cauliflower was simmered on top of the stove until completely tender and then pureed with a little milk. I left the puree a little thicker than suggested and didn’t use a siphon for serving. A quick salad was made with the cooked and cooled quinoa, toasted almonds, some thinly sliced, raw cauliflower florets, and snipped chives. Just a touch of rice vinegar was added for seasoning along with some olive oil. To serve, the cauliflower puree was layered on the bottom covered by quinoa salad with popped sorghum on top. 

The almonds and minced chives were additions to this dish after it had been tried on the menu without them. It was perfect with the crunchy, toasted nuts and mild onion flavor of chives. It goes without saying that I enjoyed the popped sorghum element as well. I look forward to several more discoveries as I try more things from this lovely book. 

Quinoa, almond, cauliflower, and popped sorghum 
Recipe reprinted with publisher’s permission from Coi: Stories and Recipes. 

Yields 4, with extra cauliflower puree 

Ingredients 
Cauliflower puree 
- 1 x 250-g cauliflower
- 25 g pure olive oil 
- 100 g water 
- milk, as necessary 
- salt 

Popped sorghum 
- 50 g vegetable oil 
- 100 g sorghum
- salt 

To serve 
- 20 g white quinoa 
- 20 g red quinoa 
- 25 g toasted almonds 
- 1 small spoonful snipped chive 
- rice wine vinegar 
- fruity olive oil 
- popped sorghum 
- salt 

Recipe 
Cut small florets out of a head of cauliflower – they should be spoon-size when shaved. Cut the rest of the cauliflower into medium-size pieces and toss with the olive oil and salt. Put into a pan and roast in the oven at 400°F (200°C) until tender, stirring occasionally so they are lightly browned and barely tender. Pull out of the oven and onto the stove top, and add the water. Simmer until the water is absorbed and the cauliflower has collapsed. Blend until smooth, thinning with milk as necessary, and adjust seasoning with salt. The texture should be smooth and luscious, thick but just pourable. Pour into a siphon and charge twice. Keep warm. (This makes a terrific puree even without the siphon, it’s just a little more dense.) 

Cook white and red quinoa in separate pots of salted water, and simmer until tender. Start with 5 parts water and 1 part quinoa, and keep the simmer brisk and below a boil. Cook until the little white string-looking thing appears around the ball of the grain, and the texture is just tender. The texture of the quinoa is crucial – the grains should be cooked but perceptibly individual. Strain, rinse under cold water and drain. 

Heat the vegetable oil in a large pan until almost smoking. Add a thin later of sorghum and cover. Shake the pan occasionally, keeping the heat a little higher than you would with corn. When the popping sound diminishes considerably, empty the sorghum into a colander with holes just smaller than the size of the popped sorghum, and shake the colander to get rid of any broken or unpopped seeds. Season the popped sorghum with salt. 

Toast almonds deeply and cut into pieces slightly smaller than the popped sorghum. To serve, make a salad of the white and red quinoa, toasted almonds, shaved raw cauliflower (use small inside florets) and snipped chive. Season with rice wine vinegar, fruity olive oil, salt and pepper. Don’t make the salad acidic – use the vinegar only to brighten up the earthy/nutty tones. Dispense a bit of the cauliflower puree in the bottom of the bowl. Cover with the salad, and top with popped sorghum. 

I am a member of the Amazon Affiliate Program.

Blogging tips