I have a little problem. I'm addicted to cookbooks, food writing, recipe collecting, and cooking. I have a lot of recipes waiting for me to try them, and ideas from articles, tv, and restaurants often lead to new dishes. I started losing track of what I've done. So now I'm taking photos and writing about what I've prepared—unless it's terrible in which case I forget it ever happened.
I’m so easily tempted by cake. The combination of tender, sweet crumb and rich frosting on top is always decadent and usually a sign of a celebration. The new book Layered: Baking, Building, and Styling Spectacular Cakes by Tessa Huff has you covered for every type of cake you could want to bake, and I received a review copy. These are all very pretty, polished cakes, and there are instructions for achieving each type of finishing touch shown throughout the book. But, don’t be intimidated by the professional look of these cakes. There are photos and instructions for piping, swirling, and smoothing frosting. There are also options for applying frosting and decorations in different ways, and you’re encouraged to mix and match flavors and toppings however you wish. Many of the cakes are constructed from six-inch layers, but there are some eight-inch cakes as well. They’re organized by category like Classic Cakes, Chocolate Cakes, Casual Cakes, Whimsical Cakes, Adventurous Cakes, and Holiday Cakes. The instructions give you a sense of ease about bringing these lovely creations to life, and you can always simplify the presentation or reduce components. There are several I wanted to bake right away like the Cookies and Cream Cake with chocolate layers and white chocolate-cream cheese frosting with crushed chocolate sandwich cookies, the Lemony Zucchini Cake with goat cheese frosting between layers and a lemon glaze drizzled on top, and the Oatmeal Cookie Cake with oatmeal cookie dough frosting as a filling. Some of the more intricate cakes include a Strawberry Confetti Cake with both strawberry and vanilla layers, strawberry cream, confetti buttercream, and homemade sprinkles; a Raspberry Stout Cake with raspberry cheesecake filling and raspberry chocolate bark on top; and a Pumpkin Vanilla Chai Cake with pumpkin ganache, pumpkin chai buttercream, and homemade spiced marshmallows on top. I want to try all of the techniques used, and I really want to taste all of these cakes. First, I chose something a little simpler. The Cinnamon Roll Cake sounded like a sweet tooth’s dream, and there was no need for a piping bag to frost this one.
This cake was made from two eight-inch layers, and the cake batter was made with sour cream, milk, butter, cream cheese, sugar, vanilla, and eggs plus an egg yolk. I sensed this was going to be a delicious cake with all that richness baked into it. In addition to the cake batter, a mixture of melted butter, brown sugar, and cinnamon was prepared for swirling into the layers. One quarter of the cake batter was added to each prepared pan, one quarter of the cinnamon mixture was drizzled over each, a skewer was used to swirl the cinnamon mixture into the batter, the remaining batter was added to each pan, the remaining cinnamon mixture was drizzled over each, and the swirling was repeated. While the layers baked, a cinnamon crumble was made with flour, brown sugar, butter, honey, and cinnamon. Clumps of crumble were baked until set and golden. Next, frosting was made with cream cheese, butter, confectioners’ sugar, milk, and vanilla. There was to be a fourth component of cinnamon syrup to drizzle on top of the assembled cake, but my sweet tooth hit a wall at that point. The cake was already going to be so delicious I decided to skip the syrup topping. So, in my case, assembly involved placing the bottom layer on a platter, topping with cream cheese frosting, scattering the baked cinnamon crumble over that layer, adding the second cake layer, and topping with more cream cheese frosting.
I have to tell you, even without the cinnamon butter swirl that went into each layer, these would have been the tastiest vanilla cakes I’ve ever made. That cinnamon swirl made them perfect for a cinnamon roll cake. I already mentioned my sweet tooth surrendered before I got to the cinnamon syrup step for finishing, but I also wondered about the cinnamon crumble to be added between layers. I’m glad I went for it with the crumble because it added crunchy cinnamony-ness to the middle of the cake. And, cream cheese frosting is never anything but great. This was deliriously decadent, and now I can’t wait to try more cakes from this book.
MAKES ONE TWO-LAYER 8-INCH (20-CM) CAKE; SERVES 10 TO 12 My husband, Brett, and his siblingswere often treated to cinnamon rolls on the weekends. Brett is the youngest child by many years and always got to select which roll he wanted first. Being the big sweet tooth that he is, he remembers always picking the one from the middle of the pan—the one with the most frosting. Clever kid! I developed this cake with him and the roll in the middle of the pan in mind. The cream cheese in this Cinnamon Roll Cake makes it extra rich and velvety, while the ribbons of cinnamon throughout give it a punch of flavor. Serve it as a special weekend breakfast treat or to celebrate with any cinnamon roll enthusiast.
Cinnamon Swirl Cake: Butter or nonstick cooking spray, for the pans 2 1⁄4 cups (295 g) cake flour, plus more for the pans 2 teaspoons baking powder 1⁄2 teaspoon salt 1⁄4 cup (60 ml) sour cream 1⁄2 cup (120 ml) whole milk 1 cup (2 sticks / 225 g) unsalted butter, at room temperature 4 ounces (115 g) cream cheese, softened 1 1⁄2 cups (300 g) granulated sugar 2 teaspoons vanilla bean paste 3 large eggs 1 large egg yolk 4 tablespoons (1⁄2 stick / 55 g) butter, melted 1⁄4 cup (55 g) firmly packed brown sugar 2 teaspoons ground cinnamon
Cinnamon Crumble: 1/2 cup (65 g) all-purpose flour 1/3 cup (75 g) firmly packed brown sugar 4 tablespoons (1⁄2 stick / 55 g) unsalted butter, at room temperature 1 tablespoon honey 2 teaspoons ground cinnamon
Make the CINNAMON SWIRL CAKE: 1. Preheat the oven to 350°F (175°C). Grease and flour two 8-inch (20-cm) cake pans and set aside. 2. Sift together the flour, baking powder, and salt and set aside. 3. Stir together the sour cream and milk and set aside. 4. In the bowl of a stand mixer fitted with the paddle attachment, beat the butter and cream cheese on medium speed until smooth. Add the granulated sugar and mix on medium-high until light and fluffy, 3 to 5 minutes. Stop the mixer and scrape down the bowl. 5. Turn the mixer to medium-low and add the vanilla, then add the eggs and egg yolk one at a time. Stop the mixer and scrape down the bowl. 6. Turn the mixer to low and add the flour mixture in three batches, alternating with the milk mixture, beginning and ending with the flour mixture. Mix on medium for no more than 30 seconds after the last streaks of the dry ingredients are combined. 7. In a small bowl, mix together the melted butter, brown sugar, and cinnamon. 8. Pour one-quarter of the batter into each of the prepared pans. Spoon one-quarter of the cinnamon mixture on top of the batter in each pan and use a wooden skewer or the tip of a knife to gently swirl it. Divide the remaining batter between the pans. Divide the remaining cinnamon mixture between the pans and gently swirl it. Bake for 24 to 26 minutes, or until a toothpick inserted into the center of the cakes comes out clean. Let them cool on a wire rack for 10 to 15 minutes before removing the cakes from their pans.
Make the CINNAMON CRUMBLE: 9. While the oven is still at 350°F (175°C), line a baking sheet with parchment paper. 10. In a medium bowl, mix together the flour, brown sugar, butter, honey, and cinnamon with a wooden spoon until combined. The mixture should resemble little clumps of sand. Sprinkle them over the lined baking sheet and bake for 8 to 10 minutes, stirring halfway through, or until golden brown. Let the crumble cool before use.
Make the CREAM CHEESE FROSTING: 11. In the bowl of a stand mixer fitted with the paddle attachment, beat the cream cheese and butter together on medium speed until smooth. With the mixer on low, gradually add the confectioners’ sugar, milk, and vanilla until incorporated. Turn the mixer up to medium- high and mix until the frosting is fluffy.
Make the CINNAMON SYRUP: 12. Just before assembling the cake, in a saucepan, place 2 tablespoons water with the sugar, cinnamon, and salt. Heat over medium-high until the sugar has completely dissolved and the mixture starts to simmer. Remove the pan from the heat and stir in the butter until melted. Mix in the flour until combined. 13. Let the syrup cool slightly, then use it immediately before it thickens.
ASSEMBLE THE CAKE 14. Once the cakes have completely cooled, level them and choose which layer will be at the bottom. Place it on a cake plate or serving dish. Spread on half of the cream cheese frosting with an offset spatula. Sprinkle it with the cinnamon crumble pieces. Drizzle half the cinnamon syrup over the top. Top with the second layer of cake and repeat with the remaining frosting. Use a spoon and a zigzag motion to drizzle the remaining cinnamon syrup across the top layer of cake, letting it drip over the edges. Discard any extra syrup.
I am a member of the Amazon Affiliate Program. Tweet
The dish I’m showing today would be perfect for celebrating Midsummer. I’ve never been to Sweden or any part of the Nordic region, but I’d love to visit during the Midsummer festival and enjoy daylight all night long. As usual, I’ve been virtually traveling with a cookbook, and this time it’s The Nordic Cookbook by Magnus Nilsson. I received a review copy of this hefty book that covers traditional and contemporary foods from Finland, Sweden, Norway, Denmark, the Faroe Islands, Iceland, and Greenland. Nilsson set out to show the similarities as well as the differences between each part of the Nordic culture. Several dishes are found in multiple locations and go by different names in each place, and some are unique to one area. He accepted that the book could never be a complete record of all the recipes from this large area, but it was intended to inform the reader about this food culture and provide guidance in creating some of that food. It also includes beautiful photos of the areas that were visited during the research phase. There’s a simplicity to the ingredients and most preparations, and flavors are brightened by vinegars, horseradish, and herbs. I loved all the potato recipes including several potato salads, soups, creamed potatoes, gratins, potato cakes, and Potatoes Hasselbacken. Why have I never made those? I learned the dish was invented in the 1950s at a restaurant that became a cooking school called Hasselbacken. There are meat and poultry dishes, sausage and charcuterie, breads and waffles and dumplings, cakes and pastries, and a chapter for little cookies and other sweets that I imagine would be perfect on a holiday cookie tray. I really enjoyed reading about all the various fish dishes with fresh, pickled, smoked, and dried variations. I really like pickled shrimp, so I had to try the Poached and Pickled Salmon since fresh wild salmon season is in full swing.
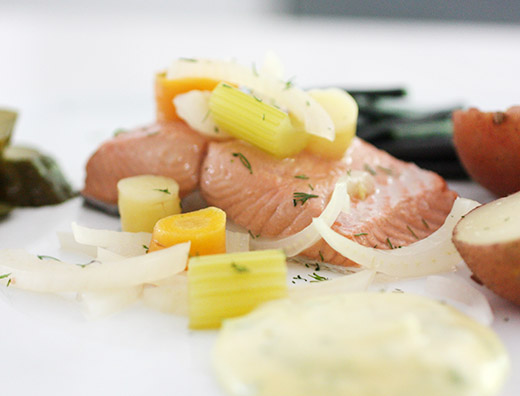
In the end, the dish is a bit of a decomposed salad, and you can mix and match whatever items you’d like to serve with the salmon. Making the salmon itself was as easy as it gets. Fresh salmon fillets were cut into portions and placed in a heat-proof dish. Water was brought to a boil with salt, red wine vinegar, white vinegar, chopped carrots, sliced fennel, sliced onion, chopped celery, thyme springs, bay leaves, parsley stalks, and peppercorns. I'm thrilled to finally get to use my own thyme growing right outside once again. After boiling for a minute, the hot water, with vegetables and herbs, was poured over the salmon, and it was left to cool to room temperature. This steeping step was how the salmon was cooked. Once cool, the salmon was left in the liquid with the vegetables and herbs and refrigerated overnight. The next day, I made a homemade mayonnaise with dill to serve with the salmon. Fresh, new potatoes and purple long beans from Boggy Creek Farm were my cooked accompaniments to the salmon. And, I sliced some lacto-fermented cucumber pickles I had in the refrigerator as well. The chilled salmon was served with the carrot and fennel alongside the boiled potatoes and blanched beans with a dollop of dill mayonnaise and some pickle slices. Each bite of salmon and potato was swiped through the rich mayonnaise.
The flavor of the salmon was mildly pickled, and I might add more vinegar to the steeping liquid next time. But, the mayonnaise was bright and lively with the vinegar in it and the dill. Those fresh, boiled potatoes went so well with the other parts of the dish. And, it could be presented in different ways. The salmon could be flaked rather than left as a fillet, or all the parts could be combined for a less-deconstructed salad. However it’s served, it’s a great way to celebrate summer.
Poached and Pickled Salmon Recipe reprinted from The Nordic Cookbook by Magnus Nilsson with publisher's permission (Phaidon, $49.95 US/$59.95 CAN, October 2015)
This is a real summer dish, often served with Boiled Potatoes, Dill Mayonnaise, and Quick Pickled Cucumber. The pickled vegetables are delicious and should also be served with the fish. The salmon is not pickled in the sense that herrings are pickled and won’t keep for very long but should be eaten within a week if stored in the refrigerator. In a restaurant, where you would fillet a whole salmon to make this dish, it’s a good idea to cook the salmon bones and head together with the pickling liquor. If you do so, it will produce a light and very delicious jelly when it cools down. If you decide to try this at home, then add the bones, head and any salmon scraps you have to the pickling liquor, but leave out the vegetables. Bring it slowly to a simmer, then let it sit for 5 minutes before proceeding as described below. If you like the idea of the jelly, but you have no fish bones, then add 2 leaves of gelatin per 1 litre/34 fl oz (4 1/4 cups) of finished pickling syrup.
800 g/1 3/4 lb salmon fillet, cut into 4 pieces 50 g/2 oz (1/4 cup) sugar 2 tablespoons salt 100 ml/3 1/2 fl oz (1/3 cup plus 1 tablespoon) red wine vinegar 100 ml/3 1/2 fl oz (1/3 cup plus 1 tablespoon)
Attika (12%) vinegar or white distilled vinegar 2 carrots, cut into 5 mm/1/4 inch slices 1 red onion, thinly sliced 1 small fennel bulb, sliced 1 celery stalk, chopped 1 sprig thyme 2 bay leaves 12 white peppercorns 1 handful parsley stalks
Place the salmon pieces in a pot and keep at room temperature to warm up slightly.
Pour 2 litres/3 1/2 UK pints (8 1/4 cups) water into another pot and add the sugar,salt and vinegars. (Remember that it needs to be saltier than you would think because it is supposed to season the salmon. 2 tablespoons fine salt could be a starting point point but you will have to taste your way forward.) Bring to the boil, then add the vegetables and aromatics and continue boiling for 1 minute. Pour the pickling liquor over the pieces of salmon in the other pot and leave to cool to room temperature.
Refrigerate the salmon in the pickling liquor overnight. Serve the salmon cold.
Dill Mayonnaise I hate mayo that is not thick enough; it should be stiff! If not, it goes very liquid from dilution as soon as it comes in contact with any type of moist food you are eating or mixing it with. Add more oil if it isn’t really thick. If you are using it in a sauce that has more liquids in it, or a salad, it could be on the verge of splitting from containing a lot of oil when you mix it with the remaining ingredients. The water content in the thing you are mixing the mayo with will make it perfect as it dilutes it a bit.
Preparation time: 20 minutes Serves: 4
2 egg yolks 1 tablespoon Dijon mustard 2 tablespoons white vinegar 250 ml/8 fl oz (1 cup) neutral oil salt and white pepper, to taste a handful of chopped dill leaves
Put the egg yolks in a bowl. Whisk in the mustard and vinegar then season with a pinch of salt and a little white pepper. Add the oil, a drop at a time, beating slowly but constantly, until no oil remains and the mayo is nice and thick. Stir in chopped dill. Season to taste.
I am a member of the Amazon Affiliate Program. Tweet
You might not immediately think that summer and soup go together, but give me a chance to explain. I’m declaring this a perfect soup for summer because it’s so easy to make, because the ingredients can all come from the pantry or freezer, and because it would be as good chilled as it is hot. This was a treasure I discovered in my recipe files. I keep physical files of magazine pages I’ve cut out over the years. All the pages are filed according to type of recipe like soup, cake, pasta, etc. It had been ages since I’d gone through them. A couple of times a year, I flip through the recipes to pull out ones that I’ve since tried from other sources and to find inspiration from ideas I’d forgotten. This soup was a long-overlooked gem, and it’s from the October 2012 issue of Food and Wine. In its original format it’s even easier than how I prepared it, but I’ve never met a recipe I couldn’t make more complicated. In the magazine, it was made with store-bought hummus. Instead, I used canned chickpeas, lemon, and garlic. But, what I realized is that this soup is ideal for the night you return from a trip or return from a day in the outdoors or return home after having so much summer fun you don’t want to cook anything difficult. It’s a puree of roasted red peppers from a jar, chickpeas from a can, lemon and garlic from the panty, and store-bought chicken stock. The toppings are chopped roasted red peppers, cooked rice, and optional sliced chicken from the freezer.
Piquillo peppers are suggested in the original recipe, but they’re not always easy to find. I used regular, jarred roasted red peppers. They were drained and all but one was added to the blender pitcher. The extra pepper was diced for topping the finished soup. I also rinsed and drained one can of chickpeas and added that to the blender pitcher as well. The juice of one lemon and three chopped cloves of garlic were added along with two cups of chicken stock, and the mixture was pureed. I prefer the blender for pureed soups for a smoother texture than a food processor would create. I had some Texas-grown, long-grain rice that I cooked while warming the soup puree. Salt and black pepper were added to the soup, and I added Espelette pepper for a little spice as well. I had some leftover grilled chicken from the freezer than I thawed and sliced for topping the soup.
I mentioned this would be a good cold soup, and I think that’s due to the lemon. In a cold version, some crab meat or pickled shrimp would make good topping options, although those would make this less pantry- and freezer-friendly. Still, however you top it, this soup is meant for summer.
Baking books can be dangerous for me. Dangerous in that I’m tempted to bake my way through them, marking more pages than I leave unmarked and wanting to start multiple recipes at the same time. Little Flower Baking was definitely in this category. It’s the latest from Christine Moore of LA’s Little Flower Cafe, and I received a review copy. The style of baking here is familiar and comforting with a few surprising flavors and twists. The scones include versions like Peach Ricotta, Plum Ginger, Strawberry Basil, and Curry Pineapple. I was dizzy from the pies, fruit-filled tarts, layer cakes and simpler cakes, muffins, vegan and gluten-free options, and then came the cookies chapter. I absolutely have to try the Chocolate Peanut Butter Cookies made with two different types of dough that get smooshed together to form each cookie. And, the Chai Sugar Cookies and White Chocolate Chai Cookies have my complete attention as well. I actually went straight to the kitchen when I saw the Pink Peppercorn Hibiscus Shortbread and made these lovely wedges cut from a round that was topped with a mix of sanding sugar and ground dried hibiscus flowers. They were so pretty with the sparkling, red-pink sugar on top. I haven’t even started telling you about the Savories chapter yet. The Savory Muffins each have a whole egg baked into them and cheddar melted on top, and the Potato Tart looks delicious with the slices circling the top and baked until golden. But my weakness for all things pretzel could not be overcome when I saw the Buttermilk Pretzel Rolls.
This was the puffiest, funnest dough to work with, quite possibly, that I’ve ever encountered. At first, I worried that the amount of yeast in the recipe was a typo because two tablespoons for this quantity of dough seemed like a lot, but the result was just as it should be. The dough was made with the yeast, buttermilk, vegetable oil, water, bread flour, brown sugar, granulated sugar, and salt. There’s not enough sugar for the dough to be truly sweet, but there is a hint of sweetness and the sugar adds to the browning of the rolls. The dough was mixed in a stand mixer for almost 20 minutes until smooth. It is a sticky dough that requires a bowl scraper to transfer it to an oiled bowl to rise. It was left to rest for about an hour. Now, in addition to the pretzel roll recipe in the book, there’s also a pretzel dog recipe. It’s kind of like a pig in blanket with pretzel dough criss-crossed around a hot dog. I had to try a few of those too. I divided the dough to make several plain rolls, and then I used some remaining dough to blanket little chicken breakfast sausages for mini chicks in blankets. There’s one of those in the photo below. For the rolls, the dough was portioned, rolled into six-inch long pieces, and then knotted into a round shape. Both the rolls and chicks in blankets were then poached in boiling water mixed with baking soda and brown sugar. After a few seconds of poaching, the rolls were placed on baking sheets, brushed with vegetable oil, and sprinkled with extra coarse salt. They were baked for about 24 minutes total.
The rolls emerged from the oven a deep, golden, pretzel-brown, and the texture was delightfully tender. And, the chicks in blankets? They couldn’t have been more fun to dip into grainy mustard before biting into the salt-topped blankets. I may need to step away from the kitchen before every surface is covered with scones and cookies, but I’ll be back to bake more from this book soon.
Buttermilk Pretzel Rolls Recipe reprinted with publisher's permission from Little Flower Baking. The aroma of soft pretzels and roasting chestnuts from a street cart in New York City meant a great day at Central Park or a museum visit. Memories from childhood are so powerful and comforting. Making these pretzel rolls every day in the cafe keeps those memories alive.
Makes 16
Dough 2 tablespoons (18g) active dry yeast 1 1⁄2 cups (333g) warm water, 95 to 110 degrees F 1⁄2 cup + 2 tablespoons (140g) buttermilk 2 tablespoons + 1 teaspoon grapeseed oil 5 cups (600g) bread flour, plus more for dusting 1⁄3 cup (71g) golden brown sugar, packed 2 teaspoons granulated sugar 1 tablespoon sea salt 1⁄2 cup (100g) grapeseed oil, plus more to coat bowl 3 tablespoons pretzel salt or coarse sea salt
Poaching Liquid 6 tablespoons (108g) baking soda 1 cup (213g) golden brown sugar, packed 3 cups (666g) water
Place yeast and warm water in a small bowl and whisk until yeast dissolves. Set aside until foamy, about 5 minutes. Add buttermilk and oil. Set wet mixture aside.
In the bowl of a stand mixer fitted with the dough hook, combine flour, sugars, and salt on lowest speed for 15 seconds. Add wet mixture all at once and mix on lowest speed until dough is smooth and tacky, 15 to 20 minutes.
Lightly coat a medium bowl with grapeseed oil. Transfer dough to the oiled bowl. Flip the dough so it is coated with oil. Cover with plastic wrap and let sit at room temperature until doubled in volume, about 1 hour.
Line 2 sheet pans with parchment paper and brush paper with oil. Turn dough onto lightly floured surface.
Divide dough into 16 even portions, each about the size of a tennis ball. Roll each portion into a 6- to 7-inch rope. Tie each rope into a simple knot. Set pretzel rolls onto the sheet pans.
Preheat oven to 375°. To make poaching liquid, combine baking soda, brown sugar, and water in a large saucepan over medium heat. Bring the mixture to a gentle boil.
Set up a small bowl with 1⁄2 cup grapeseed oil, a pastry brush, and a small bowl of pretzel salt.
Once poaching liquid foams, begin poaching. Use a slotted or perforated spoon to submerge 3 pretzel rolls for 8 seconds. Remove from saucepan and place onto sheet pan, leaving at least 1 1⁄2 inches of space between each roll. Brush each roll with oil and sprinkle with a pinch of pretzel salt. Continue to poach the remaining pretzel rolls in same manner.
Bake poached pretzel rolls until golden, about 12 minutes. Rotate pan and continue baking until darker golden brown, about 12 more minutes.
I am a member of the Amazon Affiliate Program. Tweet