I have a little problem. I'm addicted to cookbooks, food writing, recipe collecting, and cooking. I have a lot of recipes waiting for me to try them, and ideas from articles, tv, and restaurants often lead to new dishes. I started losing track of what I've done. So now I'm taking photos and writing about what I've prepared—unless it's terrible in which case I forget it ever happened.
Apple fritters, apple dumplings, or a buttery apple-filled coffee cake would have been delicious, but I wanted to keep things a little less indulgent at least until Valentine’s Day. So, I found a great way to use the apples I’ve been getting from my CSA in Martha Stewart's Healthy Quick Cook. These are easy, little tarts to make with store-bought phyllo dough, and I even found whole wheat phyllo dough to make them that much more virtuous. The phyllo tart shells are baked empty to keep them very crisp, and the cooked apples with their syrup get spooned into the shells just before serving. The recipe was kept simple and low-calorie for a dessert by using minimal amounts of butter and sugar. I did complicate matters just slightly by adding two additional ingredients with rosemary and lemon zest.
Once the phyllo was thawed by leaving it in the refrigerator overnight, the sheets needed to be cut into squares. I doubled the recipe to make eight tart shells instead of four and used six sheets of phyllo which were stacked and cut into seven inch squares. I’m terrible at eye-balling a straight, even-sided square, so I used my trusty, kitchen ruler. Ordinarily, when using phyllo, each piece is brushed with melted butter before another layer is added, but here, the butter was only used on the second of three layers. A scant bit of sugar was sprinkled on each layer, and three squares were stacked for each tart. The stacked layers of dough were then gently fitted into ring molds that had been sprayed with oil. I used English muffins rings. Then, the tart shells were baked for about ten minutes until crisp and golden. Meanwhile, apples were chopped and combined with lemon juice and apple juice, and I left the peels on them. Butter was melted in a skillet, one tablespoon of sugar was added to caramelize, and a splash of cognac gave it another layer of flavor. Out of instinct, I added some sea salt to the caramel. Then, the apples and juices were added to the pan and were left to cook while the sauce reduced, and that’s when I added a sprig of rosemary. The cooked apples and sauce were spooned into the tart shells, and I garnished with chopped rosemary and some lemon zest.
If you don’t have ring molds or English muffin rings handy, you can also just make little stacks of crumpled phyllo sheets to be baked and then topped with the apples. On television years ago, I saw Michel Richard prepare a recipe involving just that with multiple layers of apples and phyllo pieces served with custard. But, if you have a way to form cup shapes with the layers of phyllo, they hold the filling perfectly. I loved how they shattered into flaky bits when cutting into them with a fork. And, the caramel sauce with lemon and subtle rosemary flavor made the apples special without being too rich.
Last weekend, when it was about 75 degrees outside which is just the way I like it at the end of January, we stood outside around the grill and watched as these potatoes crisped over the open flame. If I were making these potatoes again today I’d opt for a grill pan inside on top of the stove since right now, it’s 50 degrees cooler than it was last weekend. The potatoes would still be great grilled inside, and the sour cream drizzle, chile powder, and chopped cilantro have a lot to do with their flavor. Although, if you do have the opportunity to place these on a charcoal grill, the added smokiness they'll attain will make them even better. I received a review copy of a new, little book from Sur la Table called Everyday Grilling. It includes 50 recipes covering everything from appetizers to salads, sandwiches, vegetables, main dishes, and desserts, and there are some great grilling tips too. An enticing photo sits next to each recipe, and I was immediately drawn to the grilled mozzarella and anchovies in chard leaves, the grilled cauliflower steaks with tahini sauce, and the grilled eggplant cannelloni with ricotta. There’s a stir-grilled chicken, mushroom, and baby bok choy dish prepared in a grill wok, and plank grilling recipes for salmon, shrimp, and papaya. There’s even a grilled banana split for dessert. The grilled fingerlings with their toppings looked like they’d be great as a side dish or as party food. The fingerling shape makes them naturally pick up-able, and the toppings are like those of a simplified stuffed baked potato.
I used French fingerlings but any oblong, little potato would work. They were par-boiled on the stove first. The goal of the initial cooking is to get the potatoes just tender but not completely cooked through. Then, they were drained, sliced in half, brushed with olive oil, seasoned with salt, and placed on a hot grill for about five minutes per side. Last, they were topped with sour cream that had been thinned with water to make it pourable. The chile powder sprinkle could be whichever kind you prefer, and I used a mix of ancho and chipotle powders. Last, chopped cilantro was added, and last weekend I had plenty of cilantro in my herb garden but I haven’t checked its status since the arctic blast arrived.
Pre-cooking the potatoes made them fluffy on the inside, and grilling made the cut surface crisp while lending flavor from the grill smoke. These were easier to prepare than potato skins or twice-baked potatoes, and the toppings were simple, fresh, and well-matched. It’s a fun, useful book, and I’ll be turning to it for grilling ideas year-round as long it’s warmer than 25 degrees outside.
You might not think there would be much to learn at a cooking class about cookies, but that really depends on who’s teaching the class. I signed up for a cookie class at Central Market Cooking School last December that was taught by Alice Medrich, and I walked away with a few pages of notes. She was demonstrating cookies from her new book Chewy Gooey Crispy Crunchy Melt-in-Your-Mouth Cookies which combines some of her all-time, favorite recipes with updates for what everyone likes to cook today. I shared some photos from the class on my Facebook page as well. Throughout the class, little, eye-opening details, the kinds of things that don’t always get mentioned, were pointed out and explained. She talked about how a home cook needs to decode a recipe. When a cookie recipe states to whip or cream something “just until,” it’s important to pay close attention and not overdo it. There are times when the butter and sugar should not be creamed to a point where it’s too light and fluffy as that can add too much air to the dough. She continued to talk as she worked, and turned a square baking pan upside down, cut a piece of foil, and wrapped it over the bottom of the pan. Then, she flipped the pan over and placed the foil inside it. I’d never thought of doing that to get the foil to the right size and shape to line the inside of a pan for brownies. Then, she spoke of flavors and adding different spices to brownies or chocolate cookies. Rather than mixing the spice into the batter or dough, it can be sprinkled on top after baking. That way, you have a different flavor experience. You smell the spice as soon as you lift the item toward your mouth, and it’s more pronounced. Also, then you can flavor one batch several different ways. So, the evening progressed with several different cookie recipes being prepped and then tasted. Every cookie we were served was fantastic, but the one I couldn’t stop thinking about over a month later was the peanut butter cloud.
This is in Medrich’s new book, and it’s a simple meringue cookie with a swirl of peanut butter running through it. Ordinarily, a meringue serves as a vehicle for other flavors, but here, the added peanut butter was mixed into the sweet, crisp, light as air cookie and chopped salted peanuts were sprinkled on for added crunch. Egg whites were whisked in a mixer with cream of tartar and eventually, sugar was added. During the class, Medrich pointed out that if you add the sugar too early while whisking the egg whites, you’ll get a glossy but limp meringue. For firmer meringue, add the sugar, after the whites have become opaque, very slowly over a two minute period. Then, dot the top of the meringue with well-stirred, natural peanut butter, and just barely fold it into the egg whites. The peanut butter should be streaked throughout the meringue. I piped the meringue into small cookie-cloud shapes onto baking sheets and topped them with the chopped nuts. The cookies baked at 200 degrees F for one and a half hours, and then they remained in the oven after it was turned off until they were cool.
The crackly texture and the sweetness of the meringue mixed with peanut butter and salted chopped peanuts just worked so well together. Thankfully, my home-baked versions stood up to my memory of them from the class. And, now I need to finish reading through the book to get several new ideas for what to bake next.
It’s the start of a new year and time to eat a little lighter, but we do like our scones. I’m a little surprised that this is only the fifth time I’ve posted about scones because Kurt and I both enjoy them in all flavors, shapes, and sizes. They can be decadent though. So, I was happy to try this slimmed down recipe from Flour since I’m becoming convinced this book can do no wrong. Joanne Chang set out to make less indulgent scones that didn’t rely on extra sugar for flavor. Instead, these are packed with dried fruit and frozen cranberries, and the not-too-sweet dough is made with a little canola oil instead of a lot of butter. They’re also topped with a vanilla glaze which gives them instant visual appeal. I even went one step further and used some whole wheat flour in place of some of the all-purpose. The result was a scone that’s good enough to look forward to each morning without a trace of guilt.
These scones were also very easy to make. There was no butter to cut into the flour, and the dough wasn’t even rolled out or cut to form the scones. To start, I mixed whole wheat flour with all-purpose flour, sugar, baking powder, baking soda, salt, and cinnamon in a big bowl. Then the fruit was added, and that included dark raisins, golden raisins, chopped dried apricots, I used chopped dried pineapple instead of dried apples, dried cranberries, chopped candied ginger, and I used frozen cranberries since fresh ones are no longer available. In a small bowl, eggs, yogurt, and buttermilk were whisked together, and then that was stirred into the flour mixture. The dough was scooped one-half cup at a time onto a baking sheet, and the scones were ready to bake. There was a note in the recipe stating that once the scones are scooped onto a baking sheet, they can be frozen and then baked directly from the freezer. So, I made them in advance and baked them from the freezer so we could have freshly baked scones for breakfast. They just require about five extra minutes in the oven if frozen. After baking and cooling, a confectioners’ sugar and vanilla glaze was spooned over each one.
The mix of fruit was delightful with the cranberries’ tartness and the ginger’s zing. The crumb of the scone was lighter, less dense, and a little like a cross between a scone and a muffin. Obviously, they’re not as rich as an ordinary scone, but when we’re feeling like being less decadent, I now have a trusted alternative to enjoy.
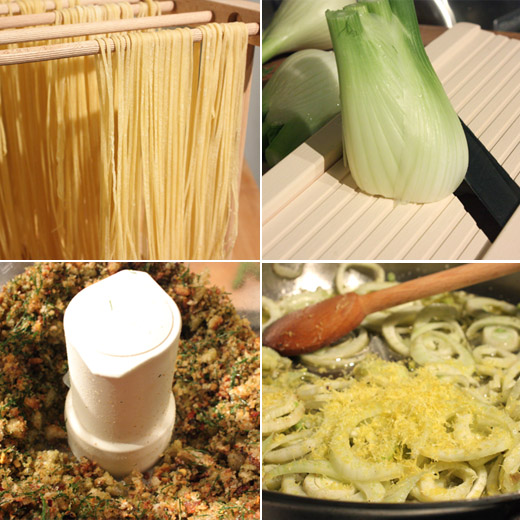
It’s true that I have trust issues with recipes. If I’m skeptical, I may proceed as instructed, but I try to be prepared should I feel the need to change course. So, although I was intrigued by a pasta recipe that suggested a topping of breadcrumbs in place of parmesan, I had a wedge of parmigiano reggiano ready and waiting just in case. This came from Delicious magazine a few months ago, and I can’t seem to locate the recipe online so I’ll include it below. Spicy breadcrumbs were made by toasting chunks of day-old bread that had been tossed with olive oil and dried chile flakes and then processing them to crumbs once cool. They were tasty breadcrumbs, and they were certainly going to add a flavorful, crispy element to the pasta dish, but I wasn’t convinced they could completely replace the experience of a good parmigiano reggiano. I had just received some fennel from my CSA, and making fresh pasta is one of my most favorite kitchen tasks, so with some back-up parmesan to shred over each plate of pasta should it be necessary, I was ready to experiment.
I made the fresh pasta from Stir: Mixing It Up in the Italian Tradition since this has become my go-to pasta recipe. I cut the fresh pasta sheets into thin spaghetti and let the strands dry for a bit while working on the breadcrumbs. Half a loaf of day-old bread, and I used some leftover Norwich sourdough which had been stored in the freezer since Christmas, was cut into chunks and tossed with extra virgin olive oil, salt, and red chile flakes. The bread chunks were toasted on a sheet pan in the oven until dry and crisp, and they were left to cool. Then, they went into a food processor with some fronds from the fennel and were pulsed until crumbly. Next, the fennel bulbs were prepped by slicing them thinly with a mandoline or Benriner. Lemon rind was supposed to have been cut into thin ribbons, but Kurt isn’t a fan of big pieces of citrus rind in savory dishes, so I zested the lemon with a microplane instead. Last, garlic was minced, and cooking could commence. While water for the pasta boiled, olive oil was heated in a large saute pan. The fennel and garlic were gently cooked over medium heat so as not to brown the fennel but just to allow it to soften. The lemon zest was added, and after a short dunk in the boiling water, the drained pasta was added with lemon juice and more olive oil. Everything was tossed about in the pan to combine and warm through, and then it was served topped with the breadcrumbs.
This dish ended up delivering two surprises. First, I had assumed the fennel would retain its anise bite since it was so gently cooked. Although it didn’t even brown in the pan, it did soften and become sweeter and was not at all like sharp, raw fennel. The bright lemon juice and zest mingled nicely with it. The other surprise was that the breadcrumbs were delicious and satisfying in a way that I didn’t expect at all. With the salt, chile flakes, and fennel fronds, the crunchy bits of bread were all the dish needed. At the end of the meal, the wedge of parmigiano reggiano had gone completely untouched.
Spaghetti with Fennel, Chile, Lemon, and Breadcrumbs adapted from Delicious magazine
half a loaf of day-old bread such as a sourdough rustic loaf or ciabatta
2 teaspoons dried chile flakes
1/2 cup extra virgin olive oil
3 garlic cloves, minced
2 organic lemons (organic is important here since the peel will be used)
3 fennel bulbs
12 ounces long strands of thin pasta (make fresh pasta if you have time)
Salt and pepper to taste
-Pre-heat oven to 400 degrees F. Cut or pull the bread into chunks and place on a baking sheet. Toss the bread chunks with two tablespoons of the olive oil, the dried chile flakes, and a big pinch of salt. Spread the pieces into an even layer and bake for about 10 minutes until golden and crisp. Then, set aside and allow to cool.
- Zest one lemon and then cut both in halve to be juiced. Remove and discard the outer leaves of the fennel and reserve 1/2 cup of the fronds. Thinly slice the fennel, and using a Benriner is the quickest way to do it.
- Place the fennel fronds and cooled bread chunks in a food processor and pulse until crumbly.
- Boil a large pot of salted water for the pasta, and time the cooking of the pasta for it to be ready when the fennel and lemon zest have cooked (fresh pasta will cook must faster than dried). Meanwhile, heat three tablespoons olive oil in a large saute pan over medium heat. Add the sliced fennel to the saute pan, and cook while stirring for a couple of minutes. Add the minced garlic and continue to cook for three minutes until the fennel begins to soften. Add the lemon zest, reduce heat to low and cook for another five minutes or so. The goal is for the lemon and garlic flavors to meld with the fennel, but the fennel should only gently cook and not brown. When the pasta has cooked, drain it and add it to the saute pan. Add the juice from the two lemons and the remaining olive oil, and toss to combine.
- Serve the pasta and fennel topped with a generous handful of the breadcrumbs, and I promise you won’t need a single shred of parmesan.
I’m submitting this to Yeastspotting where you’ll find some seriously well-made bread.
After growing up in Illinois where icy, cold wind can whip right across the flat, open land and chill you to the core, I can’t really complain about winter in Austin, Texas where I live now. That is, I can’t complain about the temperatures. What I can and do frequently complain about is winter allergy problems. January is ‘cedar fever’ time, thanks to the abundant pollen from mountain cedar, or ash juniper, trees. Coughing, sneezing, congestion, and lack of sleep become a way of life, and I’m willing to try any and every home remedy I can to combat those issues. One common allergy remedy is avoiding dairy. That seems simple enough except for the fact that I really enjoy eating cheese, and I bake quite a lot with things like butter, cream, and milk. However, when I’d suffered allergy symptoms to the point of almost losing my voice, I decided to put more serious effort into avoiding dairy until the worst part of the season passed. I remembered from reading In the Kitchen with A Good Appetite that author Melissa Clark’s husband doesn’t eat much dairy, and she had created a frozen treat for him using coconut milk. If I could still have something a lot like ice cream for dessert, while not having cream, I could do this dairy-free thing for a short while.
Not only is this an ice cream kind of dessert with no cream, it also has no eggs. It’s made with coconut milk which is naturally rich, but the end result is still a bit lighter than an average ice cream recipe. You begin by warming coconut milk and sugar in a saucepan until the sugar dissolves. Then, chopped bittersweet chocolate, cocoa powder, dark rum, and a little salt were added, and that was whisked until the chocolate was melted and the mixture was smooth. Once again, I used a mix of regular cocoa powder and some black onyx cocoa powder which gives the mixture a good, dark color. The coconut mixture was then transferred to a measuring pitcher and chilled before being refrigerated for a few hours. Once completely cold, it was churned in an ice cream maker.
The chocolate coconut sorbet was creamy and richly chocolate-flavored. There’s a suggestion in the recipe to serve it with shredded coconut and a chocolate sauce to make it reminiscent of a Mounds bar, but instead, I topped it with toasted, shredded coconut, chopped almonds, and pieces of candied orange peel. All those crunchy, chewy toppings made it an especially fun dessert, and the almonds took it in more of an Almond Joy direction in the end. And, you know, I didn’t miss the dairy one bit.
I suppose I can’t say that I’d never made popovers before. I did make mini popovers in a mini muffin tin a couple of years ago, and technically, you can make even full-sized popovers in a regular muffin tin. But, what I’m showing here today were my first, proper popovers made in a popover pan. I had clipped this recipe from Food and Wine back in September of 2009, and one thing led to another as it often does in my kitchen, and I only recently acquired a popover pan so I could try this. The effort is so minimal and the result so lovely, there are sure to be many, many popovers in my future. How often do you just whisk a few ingredients together with no need for a mixer and no complicated steps and end up with golden, crisp little breads that are so airy, light and delicious on the inside? The orange zest was an added benefit to their flavor, and adorned with a simple berry jam, they made my morning for a few days in a row.
You start with two bowls. In one of them, whisk together eggs, sugar, orange zest, milk, and melted butter. In the other bowl, whisk together flour, baking powder, and salt. Then, whisk the wet ingredients into the dry, but just until only small lumps remain in the batter. That’s it. The cups of the popover pan were brushed with melted butter, and the pan was warmed in a 425 degree F oven for five minutes before each cup was filled halfway. The popovers baked for 30 minutes and puffed and browned.
The flavor, the texture, and even the aroma while these baked, were more complex than the process of making them. I was amazed that such a simple technique produced these delicate yet crisp morning treats. They were divine warm from the oven, and re-heating them the next day and the day after that worked fine too. Now, I can set about altering the flavor or making some just plain or trying a savory version. My new pan will definitely be getting a lot of use.





 . These are easy, little tarts to make with store-bought phyllo dough, and I even found whole wheat phyllo dough to make them that much more virtuous. The phyllo tart shells are baked empty to keep them very crisp, and the cooked apples with their syrup get spooned into the shells just before serving. The recipe was kept simple and low-calorie for a dessert by using minimal amounts of butter and sugar. I did complicate matters just slightly by adding two additional ingredients with rosemary and lemon zest.


 . It includes 50 recipes covering everything from appetizers to salads, sandwiches, vegetables, main dishes, and desserts, and there are some great grilling tips too. An enticing photo sits next to each recipe, and I was immediately drawn to the grilled mozzarella and anchovies in chard leaves, the grilled cauliflower steaks with tahini sauce, and the grilled eggplant cannelloni with ricotta. There’s a stir-grilled chicken, mushroom, and baby bok choy dish prepared in a grill wok, and plank grilling recipes for salmon, shrimp, and papaya. There’s even a grilled banana split for dessert. The grilled fingerlings with their toppings looked like they’d be great as a side dish or as party food. The fingerling shape makes them naturally pick up-able, and the toppings are like those of a simplified stuffed baked potato.


 since I’m becoming convinced


 since this has become


 that author Melissa Clark’s husband doesn’t eat much dairy, and she had created a frozen treat for him using coconut milk. If I could still have something a lot like ice cream for dessert, while not having cream, I could do this dairy-free thing for a short while.


