which combines some of her all-time, favorite recipes with updates for what everyone likes to cook today. I shared some photos from the class on my Facebook page as well. Throughout the class, little, eye-opening details, the kinds of things that don’t always get mentioned, were pointed out and explained. She talked about how a home cook needs to decode a recipe. When a cookie recipe states to whip or cream something “just until,” it’s important to pay close attention and not overdo it. There are times when the butter and sugar should not be creamed to a point where it’s too light and fluffy as that can add too much air to the dough. She continued to talk as she worked, and turned a square baking pan upside down, cut a piece of foil, and wrapped it over the bottom of the pan. Then, she flipped the pan over and placed the foil inside it. I’d never thought of doing that to get the foil to the right size and shape to line the inside of a pan for brownies. Then, she spoke of flavors and adding different spices to brownies or chocolate cookies. Rather than mixing the spice into the batter or dough, it can be sprinkled on top after baking. That way, you have a different flavor experience. You smell the spice as soon as you lift the item toward your mouth, and it’s more pronounced. Also, then you can flavor one batch several different ways. So, the evening progressed with several different cookie recipes being prepped and then tasted. Every cookie we were served was fantastic, but the one I couldn’t stop thinking about over a month later was the peanut butter cloud.
This is in Medrich’s new book, and it’s a simple meringue cookie with a swirl of peanut butter running through it. Ordinarily, a meringue serves as a vehicle for other flavors, but here, the added peanut butter was mixed into the sweet, crisp, light as air cookie and chopped salted peanuts were sprinkled on for added crunch. Egg whites were whisked in a mixer with cream of tartar and eventually, sugar was added. During the class, Medrich pointed out that if you add the sugar too early while whisking the egg whites, you’ll get a glossy but limp meringue. For firmer meringue, add the sugar, after the whites have become opaque, very slowly over a two minute period. Then, dot the top of the meringue with well-stirred, natural peanut butter, and just barely fold it into the egg whites. The peanut butter should be streaked throughout the meringue. I piped the meringue into small cookie-cloud shapes onto baking sheets and topped them with the chopped nuts. The cookies baked at 200 degrees F for one and a half hours, and then they remained in the oven after it was turned off until they were cool.

It’s the start of a new year and time to eat a little lighter, but we do like our scones. I’m a little surprised that this is only the fifth time I’ve posted about scones because Kurt and I both enjoy them in all flavors, shapes, and sizes. They can be decadent though. So, I was happy to try this slimmed down recipe from Flour since I’m becoming convinced this book can do no wrong. Joanne Chang set out to make less indulgent scones that didn’t rely on extra sugar for flavor. Instead, these are packed with dried fruit and frozen cranberries, and the not-too-sweet dough is made with a little canola oil instead of a lot of butter. They’re also topped with a vanilla glaze which gives them instant visual appeal. I even went one step further and used some whole wheat flour in place of some of the all-purpose. The result was a scone that’s good enough to look forward to each morning without a trace of guilt.
These scones were also very easy to make. There was no butter to cut into the flour, and the dough wasn’t even rolled out or cut to form the scones. To start, I mixed whole wheat flour with all-purpose flour, sugar, baking powder, baking soda, salt, and cinnamon in a big bowl. Then the fruit was added, and that included dark raisins, golden raisins, chopped dried apricots, I used chopped dried pineapple instead of dried apples, dried cranberries, chopped candied ginger, and I used frozen cranberries since fresh ones are no longer available. In a small bowl, eggs, yogurt, and buttermilk were whisked together, and then that was stirred into the flour mixture. The dough was scooped one-half cup at a time onto a baking sheet, and the scones were ready to bake. There was a note in the recipe stating that once the scones are scooped onto a baking sheet, they can be frozen and then baked directly from the freezer. So, I made them in advance and baked them from the freezer so we could have freshly baked scones for breakfast. They just require about five extra minutes in the oven if frozen. After baking and cooling, a confectioners’ sugar and vanilla glaze was spooned over each one.
since I’m becoming convinced this book can do no wrong. Joanne Chang set out to make less indulgent scones that didn’t rely on extra sugar for flavor. Instead, these are packed with dried fruit and frozen cranberries, and the not-too-sweet dough is made with a little canola oil instead of a lot of butter. They’re also topped with a vanilla glaze which gives them instant visual appeal. I even went one step further and used some whole wheat flour in place of some of the all-purpose. The result was a scone that’s good enough to look forward to each morning without a trace of guilt.
These scones were also very easy to make. There was no butter to cut into the flour, and the dough wasn’t even rolled out or cut to form the scones. To start, I mixed whole wheat flour with all-purpose flour, sugar, baking powder, baking soda, salt, and cinnamon in a big bowl. Then the fruit was added, and that included dark raisins, golden raisins, chopped dried apricots, I used chopped dried pineapple instead of dried apples, dried cranberries, chopped candied ginger, and I used frozen cranberries since fresh ones are no longer available. In a small bowl, eggs, yogurt, and buttermilk were whisked together, and then that was stirred into the flour mixture. The dough was scooped one-half cup at a time onto a baking sheet, and the scones were ready to bake. There was a note in the recipe stating that once the scones are scooped onto a baking sheet, they can be frozen and then baked directly from the freezer. So, I made them in advance and baked them from the freezer so we could have freshly baked scones for breakfast. They just require about five extra minutes in the oven if frozen. After baking and cooling, a confectioners’ sugar and vanilla glaze was spooned over each one.


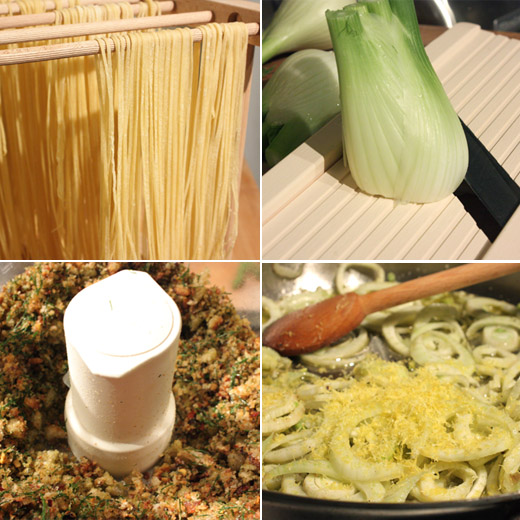
 since this has become my go-to pasta recipe. I cut the fresh pasta sheets into thin spaghetti and let the strands dry for a bit while working on the breadcrumbs. Half a loaf of day-old bread, and I used some leftover Norwich sourdough which had been stored in the freezer since Christmas, was cut into chunks and tossed with extra virgin olive oil, salt, and red chile flakes. The bread chunks were toasted on a sheet pan in the oven until dry and crisp, and they were left to cool. Then, they went into a food processor with some fronds from the fennel and were pulsed until crumbly. Next, the fennel bulbs were prepped by slicing them thinly with a mandoline or Benriner. Lemon rind was supposed to have been cut into thin ribbons, but Kurt isn’t a fan of big pieces of citrus rind in savory dishes, so I zested the lemon with a microplane instead. Last, garlic was minced, and cooking could commence. While water for the pasta boiled, olive oil was heated in a large saute pan. The fennel and garlic were gently cooked over medium heat so as not to brown the fennel but just to allow it to soften. The lemon zest was added, and after a short dunk in the boiling water, the drained pasta was added with lemon juice and more olive oil. Everything was tossed about in the pan to combine and warm through, and then it was served topped with the breadcrumbs.

2 teaspoons dried chile flakes
1/2 cup extra virgin olive oil
3 garlic cloves, minced
2 organic lemons (organic is important here since the peel will be used)
3 fennel bulbs
12 ounces long strands of thin pasta (make fresh pasta if you have time)
Salt and pepper to taste
-Pre-heat oven to 400 degrees F. Cut or pull the bread into chunks and place on a baking sheet. Toss the bread chunks with two tablespoons of the olive oil, the dried chile flakes, and a big pinch of salt. Spread the pieces into an even layer and bake for about 10 minutes until golden and crisp. Then, set aside and allow to cool.
- Zest one lemon and then cut both in halve to be juiced. Remove and discard the outer leaves of the fennel and reserve 1/2 cup of the fronds. Thinly slice the fennel, and using a Benriner is the quickest way to do it.
- Place the fennel fronds and cooled bread chunks in a food processor and pulse until crumbly.
- Boil a large pot of salted water for the pasta, and time the cooking of the pasta for it to be ready when the fennel and lemon zest have cooked (fresh pasta will cook must faster than dried). Meanwhile, heat three tablespoons olive oil in a large saute pan over medium heat. Add the sliced fennel to the saute pan, and cook while stirring for a couple of minutes. Add the minced garlic and continue to cook for three minutes until the fennel begins to soften. Add the lemon zest, reduce heat to low and cook for another five minutes or so. The goal is for the lemon and garlic flavors to meld with the fennel, but the fennel should only gently cook and not brown. When the pasta has cooked, drain it and add it to the saute pan. Add the juice from the two lemons and the remaining olive oil, and toss to combine.
- Serve the pasta and fennel topped with a generous handful of the breadcrumbs, and I promise you won’t need a single shred of parmesan.
I’m submitting this to Yeastspotting where you’ll find some seriously well-made bread.

 that author Melissa Clark’s husband doesn’t eat much dairy, and she had created a frozen treat for him using coconut milk. If I could still have something a lot like ice cream for dessert, while not having cream, I could do this dairy-free thing for a short while.
Not only is this an ice cream kind of dessert with no cream, it also has no eggs. It’s made with coconut milk which is naturally rich, but the end result is still a bit lighter than an average ice cream recipe. You begin by warming coconut milk and sugar in a saucepan until the sugar dissolves. Then, chopped bittersweet chocolate, cocoa powder, dark rum, and a little salt were added, and that was whisked until the chocolate was melted and the mixture was smooth. Once again, I used a mix of regular cocoa powder and some black onyx cocoa powder which gives the mixture a good, dark color. The coconut mixture was then transferred to a measuring pitcher and chilled before being refrigerated for a few hours. Once completely cold, it was churned in an ice cream maker.
that author Melissa Clark’s husband doesn’t eat much dairy, and she had created a frozen treat for him using coconut milk. If I could still have something a lot like ice cream for dessert, while not having cream, I could do this dairy-free thing for a short while.
Not only is this an ice cream kind of dessert with no cream, it also has no eggs. It’s made with coconut milk which is naturally rich, but the end result is still a bit lighter than an average ice cream recipe. You begin by warming coconut milk and sugar in a saucepan until the sugar dissolves. Then, chopped bittersweet chocolate, cocoa powder, dark rum, and a little salt were added, and that was whisked until the chocolate was melted and the mixture was smooth. Once again, I used a mix of regular cocoa powder and some black onyx cocoa powder which gives the mixture a good, dark color. The coconut mixture was then transferred to a measuring pitcher and chilled before being refrigerated for a few hours. Once completely cold, it was churned in an ice cream maker.

I suppose I can’t say that I’d never made popovers before. I did make mini popovers in a mini muffin tin a couple of years ago, and technically, you can make even full-sized popovers in a regular muffin tin. But, what I’m showing here today were my first, proper popovers made in a popover pan. I had clipped this recipe from Food and Wine back in September of 2009, and one thing led to another as it often does in my kitchen, and I only recently acquired a popover pan so I could try this. The effort is so minimal and the result so lovely, there are sure to be many, many popovers in my future. How often do you just whisk a few ingredients together with no need for a mixer and no complicated steps and end up with golden, crisp little breads that are so airy, light and delicious on the inside? The orange zest was an added benefit to their flavor, and adorned with a simple berry jam, they made my morning for a few days in a row.
You start with two bowls. In one of them, whisk together eggs, sugar, orange zest, milk, and melted butter. In the other bowl, whisk together flour, baking powder, and salt. Then, whisk the wet ingredients into the dry, but just until only small lumps remain in the batter. That’s it. The cups of the popover pan were brushed with melted butter, and the pan was warmed in a 425 degree F oven for five minutes before each cup was filled halfway. The popovers baked for 30 minutes and puffed and browned.
The flavor, the texture, and even the aroma while these baked, were more complex than the process of making them. I was amazed that such a simple technique produced these delicate yet crisp morning treats. They were divine warm from the oven, and re-heating them the next day and the day after that worked fine too. Now, I can set about altering the flavor or making some just plain or trying a savory version. My new pan will definitely be getting a lot of use.


1.) Sommelier June Rodil
2.) Team June
and check back to find out who the winner will be.
Thank you Keeper Collection for organizing such an enjoyable and informative day full of such fantastic wines.
I had a couple of little butternut squashes that I’d been neglecting, and a turnip collection sat hopeful but lonely in the vegetable bin. It was time to find a good winter dish where they’d be put to use. That didn’t take long once I grabbed my copy of Plenty . The recipe really is called the ultimate winter couscous, but I don’t think that means you have to stick to it too precisely. You could use any type of winter squash, and turnips weren’t even mentioned in the ingredient list, but I was sure they’d be fine. What was in that list was carrots, parsnips, shallots, dried apricots, chickpeas, chopped preserved lemon, harissa, and lots of spices. The vegetables were to be roasted until tender and sweet, and I could imagine the smell of the spices filling the kitchen before the oven was even warmed. I think this is the ultimate winter dish because it really couldn’t go wrong. It was full of warm spice flavors, sweet roasted charm, and perky acidity and heat.
First, big chunks of all the vegetables needed to be roasted, and I used carrots, parsnips, turnips, and butternut squash. Shallots were added to the roasting pan along with cinnamon sticks, star anise, bay leaves, ground ginger, ground turmeric, hot paprika, chile flakes, olive oil, and salt. After roasting for a bit, chopped dried apricots, chickpeas, and a little water were added to the pan. Just before the vegetables were ready, couscous was added to boiling water with saffron and olive oil. After the couscous had absorbed the water, butter was added, and the couscous was mixed and fluffed. When the roasting pan was removed from the oven, a big spoonful of harissa and some chopped preserved lemon rind were stirred into the vegetables. The couscous was served topped with the roasted vegetables and some chopped cilantro leaves.
. The recipe really is called the ultimate winter couscous, but I don’t think that means you have to stick to it too precisely. You could use any type of winter squash, and turnips weren’t even mentioned in the ingredient list, but I was sure they’d be fine. What was in that list was carrots, parsnips, shallots, dried apricots, chickpeas, chopped preserved lemon, harissa, and lots of spices. The vegetables were to be roasted until tender and sweet, and I could imagine the smell of the spices filling the kitchen before the oven was even warmed. I think this is the ultimate winter dish because it really couldn’t go wrong. It was full of warm spice flavors, sweet roasted charm, and perky acidity and heat.
First, big chunks of all the vegetables needed to be roasted, and I used carrots, parsnips, turnips, and butternut squash. Shallots were added to the roasting pan along with cinnamon sticks, star anise, bay leaves, ground ginger, ground turmeric, hot paprika, chile flakes, olive oil, and salt. After roasting for a bit, chopped dried apricots, chickpeas, and a little water were added to the pan. Just before the vegetables were ready, couscous was added to boiling water with saffron and olive oil. After the couscous had absorbed the water, butter was added, and the couscous was mixed and fluffed. When the roasting pan was removed from the oven, a big spoonful of harissa and some chopped preserved lemon rind were stirred into the vegetables. The couscous was served topped with the roasted vegetables and some chopped cilantro leaves.


(from Donna Hay magazine)
2 eggs, plus 2 extra yolks
½ cup sugar
¼ cup pure maple syrup
1 cup milk
1 cup half and half
superfine sugar for sprinkling (*Note: I’ve found that organic sugar doesn’t caramelize as well for a brulee, so I use conventional superfine sugar.)
vanilla pastry:
1 2/3 cups all-purpose flour
1 tablespoon sugar
¼ teaspoon baking powder
13 tablespoons cold butter, cut into cubes
1/3 cup iced water
1 teaspoon pure vanilla extract
-Start with the vanilla pastry. Place flour, sugar, and baking powder in the bowl of a food processor and pulse to combine. Add the butter cubes and pulse until the mixture is crumbly. With the motor running, slowly pour in the ice water and vanilla and process until the mixture forms a dough. Transfer to plastic wrap and chill for at least 30 minutes.
-Pre-heat oven to 325 degrees F. Roll out the pastry on a lightly floured surface and then place in an eleven inch, round tart pan. Place tart pan on a large baking sheet to make it easier to move tart pan in and out of oven, cover the surface of the pastry with parchment paper, and fill the tart with pie weights or dried beans. Blind bake for 15-20 minutes, remove from oven, remove parchment and pie weights, and then set aside.
- In a medium bowl, whisk together eggs, egg yolks, sugar, and maple syrup. Combine milk and half and half in a small saucepan over low heat. Heat milk mixture until just boiling, and then slowly pour it into bowl with egg mixture while whisking constantly. Allow to cool just a bit before pouring the custard into the blind baked crust, and place the tart back in the oven for 20-25 minutes or until just set in the center. Remove from oven and let cool.
-Sprinkled cooled tart with superfine sugar while pre-heating the broiler. Place tart under the broiler, and leave oven door ajar so you can watch as the sugar browns. Turn the tart to brown as evenly as possible. Or, use a kitchen blow torch to brown the sugar. Serve while still warm and enjoy the wonderfulness of maple syrup for dessert.


 by Novella Carpenter
I'm a little late in reading Novella Carpenter's excellent memoir about how she and her boyfriend created an urban farm in a less-than-stellar part of Oakland. Rather than start from the moment she became a gardener and backyard chicken fanatic, she starts the book from when she's already relatively experienced in producing her own food. Her writing really carries the book; there have been dozens of similar books about people discovering their love of growing and producing food that have come out in recent years, but hers has been the most enjoyable to read.
by Novella Carpenter
I'm a little late in reading Novella Carpenter's excellent memoir about how she and her boyfriend created an urban farm in a less-than-stellar part of Oakland. Rather than start from the moment she became a gardener and backyard chicken fanatic, she starts the book from when she's already relatively experienced in producing her own food. Her writing really carries the book; there have been dozens of similar books about people discovering their love of growing and producing food that have come out in recent years, but hers has been the most enjoyable to read.
Rocky Comfort by Wayne Holmes
Talk about off the radar. Wayne Holmes is a noted storyteller and author who grew up in the same small town in southwest Missouri that I did. He is still living outside Aurora, pop. 7,000, where he wrote this memoir of what it was like growing up in rural Missouri during the Depression.
by Wayne Holmes
Talk about off the radar. Wayne Holmes is a noted storyteller and author who grew up in the same small town in southwest Missouri that I did. He is still living outside Aurora, pop. 7,000, where he wrote this memoir of what it was like growing up in rural Missouri during the Depression.
It was an honor to be hand-gifted this book from Wayne at my grandmother's 80th birthday party last year, where I got a chance to ask him some food-related questions about his youth. This was a time when, if you didn't have much money, you lived off the land, which means you ate off the land. His family regularly ate possum, rabbits and squirrel they killed, and his retelling of killing a jackrabbit for Thanksgiving reminded me of why I so loved the Laura Ingalls Wilder books that were written about a time only 70 years before Holmes was born. He captures the language and spirit of Missourians in a way I've never read before ("Even the littlest squirrel or rabbit will make the gravy stink," he writes about killing young wild animals.) and that made me find a new appreciation for the state I call home but don't know if I'll ever live in again.
High Flavor, Low Labor: Reinventing Weeknight Cooking by J.M. Hirsch.
Cookbook-wise, I've been enjoying this book from J.M. Hirsch, who is the Associated Press food editor. He's a gifted recipe writer and, because he is a busy working parent, too, he knows the pressures that families face when trying to come up with weeknight meals. The book has tons of quick, easy and (here's the tricky part) inventive recipes that I feel like cooking after a long day of work.
Thank you for participating, Addie. Check back to see who answers the question next time and what other books are recommended.
by J.M. Hirsch.
Cookbook-wise, I've been enjoying this book from J.M. Hirsch, who is the Associated Press food editor. He's a gifted recipe writer and, because he is a busy working parent, too, he knows the pressures that families face when trying to come up with weeknight meals. The book has tons of quick, easy and (here's the tricky part) inventive recipes that I feel like cooking after a long day of work.
Thank you for participating, Addie. Check back to see who answers the question next time and what other books are recommended.

 , and there was something different and kind of ingenious about this bread book. After all the the interesting tips and information about making a wild yeast starter and crafting dough and the different types of breads and how to bake them, there’s a section full of suggestions for using day old bread. Seeing several dishes made with bread made the thought of having a house full of home-baked loaves even more delightful. The various, seasonal kinds of bruschetta, sandwiches, uses of breadcrumbs and croutons, and the delicious photos of all those things give you one reason after the next to bake more bread. So, I just had to decide which bread to make first. The beginning of the book is devoted to describing how to make a basic country loaf, and then all of the other breads are some sort of variation on it. I was distracted at first by the brioche dough and the beignets made from it, but I chose to begin with a whole wheat bread packed with flax and sunflower seeds. If you don’t have a sourdough starter in your possession, Robertson suggests a simple enough way of making one, and he recommends feeding it with half white and half whole wheat bread flours. My starter is always fed with white bread flour, so I began by separating some starter and feeding it with the recommended mix of flours for a day before beginning this bread dough.
There were two key elements to the bread making process in this book. One of those was the baking method which I’ll explain more below, and the other was the goal of achieving a not so sour taste in the bread by only using a scant tablespoon of the mature starter when making the leaven. The night before the dough was to be made, one tablespoon of starter was mixed with warm water and white and whole wheat flours and left at room temperature until the next morning. For whole wheat dough, the leaven was then added to more warm water, all-purpose flour, and whole wheat flour, and it was mixed and left to rest for about an hour. Robertson explains that a whole wheat dough requires a longer rest after mixing that a white flour dough. After resting, salt was added, the dough was transferred to a clean bowl for the three hour bulk fermentation, and it was left until the turning began. Every 30 minutes, the dough was folded or “turned.” For the flax and sunflower seed bread variation, one cup of sunflower seeds was toasted, and one cup of flax seeds was soaked in boiling water. I would have expected the seeds to be added with the salt before the bulk fermentation began, but instead they were added after the second turn or one hour into it. Now, soaking the flax seeds causes them to become a little sticky and mixing all those little seeds into the dough takes a bit of squeezing and folding and mixing by hand. That seemed like a lot of working of the dough at that point of the bulk fermentation, so I may try adding them earlier next time. The next steps involved dividing the dough in two and giving both pieces a bench rest, and then each piece was shaped into a boule, rolled in one cup of raw sunflower seeds, and placed in bowls lined with towels that had been coated with all-purpose and rice flour for the final rise. I placed mine in the refrigerator for about twelve hours before baking. And, the baking involved that other interesting technique I mentioned. Rather than introducing steam in the oven with a spray bottle of water or by pouring water into a pan placed on the oven floor, a cast iron pan with a lid was used. The pan was heated in the oven with its lid, the dough was placed in the hot pan and carefully slashed, the lid was placed on top, and the bread began baking at 450 degrees F. After 20 minutes, the lid was removed, and the bread finished baking.
, and there was something different and kind of ingenious about this bread book. After all the the interesting tips and information about making a wild yeast starter and crafting dough and the different types of breads and how to bake them, there’s a section full of suggestions for using day old bread. Seeing several dishes made with bread made the thought of having a house full of home-baked loaves even more delightful. The various, seasonal kinds of bruschetta, sandwiches, uses of breadcrumbs and croutons, and the delicious photos of all those things give you one reason after the next to bake more bread. So, I just had to decide which bread to make first. The beginning of the book is devoted to describing how to make a basic country loaf, and then all of the other breads are some sort of variation on it. I was distracted at first by the brioche dough and the beignets made from it, but I chose to begin with a whole wheat bread packed with flax and sunflower seeds. If you don’t have a sourdough starter in your possession, Robertson suggests a simple enough way of making one, and he recommends feeding it with half white and half whole wheat bread flours. My starter is always fed with white bread flour, so I began by separating some starter and feeding it with the recommended mix of flours for a day before beginning this bread dough.
There were two key elements to the bread making process in this book. One of those was the baking method which I’ll explain more below, and the other was the goal of achieving a not so sour taste in the bread by only using a scant tablespoon of the mature starter when making the leaven. The night before the dough was to be made, one tablespoon of starter was mixed with warm water and white and whole wheat flours and left at room temperature until the next morning. For whole wheat dough, the leaven was then added to more warm water, all-purpose flour, and whole wheat flour, and it was mixed and left to rest for about an hour. Robertson explains that a whole wheat dough requires a longer rest after mixing that a white flour dough. After resting, salt was added, the dough was transferred to a clean bowl for the three hour bulk fermentation, and it was left until the turning began. Every 30 minutes, the dough was folded or “turned.” For the flax and sunflower seed bread variation, one cup of sunflower seeds was toasted, and one cup of flax seeds was soaked in boiling water. I would have expected the seeds to be added with the salt before the bulk fermentation began, but instead they were added after the second turn or one hour into it. Now, soaking the flax seeds causes them to become a little sticky and mixing all those little seeds into the dough takes a bit of squeezing and folding and mixing by hand. That seemed like a lot of working of the dough at that point of the bulk fermentation, so I may try adding them earlier next time. The next steps involved dividing the dough in two and giving both pieces a bench rest, and then each piece was shaped into a boule, rolled in one cup of raw sunflower seeds, and placed in bowls lined with towels that had been coated with all-purpose and rice flour for the final rise. I placed mine in the refrigerator for about twelve hours before baking. And, the baking involved that other interesting technique I mentioned. Rather than introducing steam in the oven with a spray bottle of water or by pouring water into a pan placed on the oven floor, a cast iron pan with a lid was used. The pan was heated in the oven with its lid, the dough was placed in the hot pan and carefully slashed, the lid was placed on top, and the bread began baking at 450 degrees F. After 20 minutes, the lid was removed, and the bread finished baking.

The current issue of Saveur is #135, and this recipe is from issue #60, so it’s been filed away for a few years. I’m so glad I recently unearthed it though, because it’s from a great story about the food at the exclusive China Club in Beijing. I cut out a few of the recipes from that story, and I have the page with deep fried prawns with garlic chile sauce waiting to be tried next. This Sichuan classic shown here today is a quick stir fry of chicken, dried chiles, and peanuts or kung pao chicken as we usually see it listed here, and this is always my choice on a take-out menu. Slowly but surely, I’m overcoming my fear of the wok and more precisely of stir frying. I loved the simplicity of making this since the most complicated part of the process was opening all those bottles of soy sauces, oil, vinegar, and shaoxing. This really was faster than waiting for take-out.
You start with boneless chicken breasts and cube the meat to be mixed with cornstarch and soy sauce. That was left to marinate while everything else was prepped. Meanwhile, I steamed some rice to serve on the side. A sauce was made by stirring together soy sauce, rice wine, sugar, chicken stock, Chinese black vinegar or the mix of brown rice vinegar and balsamic I used, sesame oil, and dark soy sauce. I didn’t make up the substitution of balsamic for Chinese black vinegar; that’s suggested in the recipe. Also, a garlic clove was peeled and sliced, scallions were sliced, and ginger was peeled and minced. Then, if you have your dried chiles stemmed and chopped in half crosswise, you’re ready to stir fry. Oil was heated to the smoke point in a wok, and the dried chiles were added. They were quickly followed by the chicken, garlic, scallions, and ginger. After a few minutes, the soy sauce mixture was added and allowed to thicken. The peanuts were added, and the dish was ready.


 . It’s similar to a holiday cake that gets soaked in a liquor-filled glaze only this is much simpler. In this case, you only apply the glaze once rather than several times over days or weeks, and the cake batter is one of the easiest ever to whisk together. The rum and orange juice and zest in the cake and the finely chopped pecans that end up coating it give it fantastic flavor before the rum glaze is even applied. Rum cakes that are soaked multiple times can end up tasting very boozy and I do quite like the taste of rum, but it’s not overwhelming here. In the glaze, the rum melds with melted butter and brown sugar into a lovely butterscotch with just a hint of rum. Soaking the cake with the glaze also extends the life of the cake. It gets better as it sits, and it lasts a few days longer than it would otherwise. To gild each serving a bit more, I whipped cream with Grand Marnier to top the cut pieces.
This simple whisked batter started with flour, sugar, baking powder, and salt being combined in a large bowl. In a separate bowl, milk, orange juice, vegetable oil, eggs, orange zest, and rum were whisked together and then added to the dry ingredients. The batter was stirred to combine and then carefully poured into a bundt pan that had been buttered and sprinkled with toasted and chopped pecans. You want to pour the batter slowly to as not to dislodge the pecans. The cake baked for about an hour, was left to cool, and was placed on a serving platter, and that’s where I learned a lesson. You should place the cake on a rimmed platter. I somehow believed that the cake would absorb every single bit of the glaze, and I foolishly chose a flat platter. The glaze was made by melting butter in a saucepan, adding sugar and water and stirring while simmering for five minutes. The rum was added off the heat. The cooled cake, on a platter with a rim, is then pierced all over with a wooden skewer before you slowly spoon the glaze over top. Most of the glaze will be absorbed, but some does collect around the base of the cake and that could work its way to the edge of a platter without a rim and dribble all over your dining room table. Whip some cream with a little sugar and Grand Marnier to serve with the cake.
. It’s similar to a holiday cake that gets soaked in a liquor-filled glaze only this is much simpler. In this case, you only apply the glaze once rather than several times over days or weeks, and the cake batter is one of the easiest ever to whisk together. The rum and orange juice and zest in the cake and the finely chopped pecans that end up coating it give it fantastic flavor before the rum glaze is even applied. Rum cakes that are soaked multiple times can end up tasting very boozy and I do quite like the taste of rum, but it’s not overwhelming here. In the glaze, the rum melds with melted butter and brown sugar into a lovely butterscotch with just a hint of rum. Soaking the cake with the glaze also extends the life of the cake. It gets better as it sits, and it lasts a few days longer than it would otherwise. To gild each serving a bit more, I whipped cream with Grand Marnier to top the cut pieces.
This simple whisked batter started with flour, sugar, baking powder, and salt being combined in a large bowl. In a separate bowl, milk, orange juice, vegetable oil, eggs, orange zest, and rum were whisked together and then added to the dry ingredients. The batter was stirred to combine and then carefully poured into a bundt pan that had been buttered and sprinkled with toasted and chopped pecans. You want to pour the batter slowly to as not to dislodge the pecans. The cake baked for about an hour, was left to cool, and was placed on a serving platter, and that’s where I learned a lesson. You should place the cake on a rimmed platter. I somehow believed that the cake would absorb every single bit of the glaze, and I foolishly chose a flat platter. The glaze was made by melting butter in a saucepan, adding sugar and water and stirring while simmering for five minutes. The rum was added off the heat. The cooled cake, on a platter with a rim, is then pierced all over with a wooden skewer before you slowly spoon the glaze over top. Most of the glaze will be absorbed, but some does collect around the base of the cake and that could work its way to the edge of a platter without a rim and dribble all over your dining room table. Whip some cream with a little sugar and Grand Marnier to serve with the cake.