Thursday, January 31, 2013

Homemade Ginger Ale

Do you know the difference between salsify and scorzonera? Actually, I wasn’t even familiar with scorzonera until I read Roots: The Definitive Compendium with more than 225 Recipes by Diane Morgan, but I love learning new things about food. I learned scorzonera, also called black salsify, is very closely botanically related to salsify, and both have long, slender roots with similar flavors while scorzonera is milder. Twenty-eight types of roots are covered in the book with information about where they were originally grown, how they’re eaten, and their nutritional profile. And, following this information for each root, there are recipes. As I started reading the book, I was immediately fascinated by the Red Velvet Cupcakes with Orange Buttercream which are made with pureed beets and no food coloring. I made them in a rush and barely got just a quick photo to post on Instagram before taking them to a party where they disappeared in record time. Then while reading about galangal, I learned that “kha” in Tom Kha Gai is galangal in Thai. I never knew that, and I can’t wait to make this version of the soup. There are pretty dishes to make with cross-sectional cuts of lotus root, and a Three-Layer Parsnip Cake with Cream Cheese Frosting which would be a lot like a carrot cake. There’s also a Composed Jicama, Avocado, and Grapefruit Salad with Cilantro Drizzle that would be perfect for in-season avocados and grapefruit right now. And, of course, there are several dishes for that most popular of all roots, the potato. I can tell this book and I will be spending a lot of time together. In the Ginger chapter, you can learn to make your own Sushi-Style Pickled Ginger, a Brown Sugar-Ginger Ice Cream, and Candied Young Ginger. But first, I had to try the Homemade Ginger Ale. 

To start, you need to peel and grate enough ginger fill one-half cup. The grated ginger is then combined with brown sugar and water in a saucepan, and the mixture is brought to a boil and then simmered to dissolve the sugar. It’s then removed from the heat and allowed to steep and cool for about half an hour. Once cool, the syrup is strained through a sieve and chilled in the refrigerator. To complete the ginger ale, the syrup is mixed with club soda, lime juice, and lemon juice. 

Homemade soda is the best since you can control the level of sweetness. This ginger ale has good, spicy flavor with nice brightness from the lemon and lime. Naturally, I added rum to mine, but you knew I’d say that, didn’t you? Now, I want to go try a few things from the Sweet Potato chapter and then start asking around to find out if anyone is growing burdock root locally.

Homemade Ginger Ale 

Recipe reprinted with publisher's permission from Roots: The Definitive Compendium with more than 225 Recipes

Who knew it could be so simple to make ginger ale at home? Here’s an all-natural version, blissfully free of high-fructose corn syrup and preservatives. When I compared this homemade ginger ale to a national brand, it proved unrivaled in spicy, aromatic ginger flavor. Although the ginger syrup recipe makes enough for just four servings, it is easily doubled. Store the remainder in the refrigerator to use whenever you crave a tall, sparkling glass of refreshing ginger ale. 

Makes 1 Cup/240 ML Ginger syrup; Enough for 4 Drinks 

Ginger Syrup
1/2 cup/55 g grated fresh ginger 
1 cup/200 g firmly packed light brown sugar 
1 cup/240 ml water 

Ice cubes 
4 cups/960 ml club soda 
1/4 cup/60 ml fresh lime juice 
1 tbsp plus 1 tsp fresh lemon juice 
4 lime wedges 

1. To make the ginger syrup, in a small saucepan, combine the ginger, brown sugar, and water and bring to a boil over high heat, stirring constantly until the sugar dissolves. Reduce the heat and simmer for 5 minutes to completely dissolve the sugar and infuse the syrup. Remove from the heat and let the ginger steep in the syrup until cool, about 30 minutes. Strain the syrup through a fine-mesh sieve placed over a container with a tight-fitting lid and then cover and refrigerate until well chilled. (The syrup will keep in the refrigerator for up to 2 weeks.) 

2. Fill four 16-oz/480-ml glasses two-thirds full of ice. Pour ¼ cup/60 ml of the syrup, 1 cup/240 ml of the club soda, 1 tbsp of the lime juice, and 1 tsp of the lemon juice into each glass and stir to combine. Garnish each glass with a lime wedge and serve immediately.

I am a member of the Amazon Affiliate Program.

Monday, January 28, 2013

Wild Rice and Mushroom Soup

Last fall, I read The Man Who Changed the Way We Eat: Craig Claiborne and the American Food Renaissance after receiving a review copy and learned all about Craig Claiborne’s life. I didn’t realize that his approach to food writing was so revolutionary at the time. After studying at the Ecole Hoteliere de Lausanne in Switzerland, he sought out “the sublime” in cuisine, service, and dining experiences, and that’s what inspired his writing. He found disappointment in a lot of restaurants, but when his expectations were met, he was thrilled to share what he’d found. He had sophisticated taste that required teaching his readers about unfamiliar foods while not alienating them. After writing pieces for Gourmet, he became the food editor at The New York Times in 1957. His first NY Times Cookbook was published in 1961, and I have the revised edition from 1991. I’d never sat down with this cookbook before since there isn’t a lot of introductory info or many recipe headnotes. But, after reading about Claiborne’s life, I was interested in finding out what recipes were in this book I’d had for several years. There are complicated and fancy things like Truffled Pate and Lobster L’Americaine, but there are also plenty of simple salads, pastas, vegetable dishes, and homey desserts. Most of the recipes have no notes or explanations about their origin, but the wild rice and mushroom soup did. It’s actually called Julie Wilson’s Wild Rice and Mushroom Soup, and Claiborne wrote that it’s “one of the greatest soups ever created.” He also pointed out that it’s a “bit time-consuming,” and he was right about that, but it was definitely worth the effort. I marked this page back in October and just got around to trying this lovely soup. There’s a version of this recipe online at the NY Times, and the quantities are slightly different from those in the book, but otherwise it’s the same. 

This soup can easily be vegetarian if vegetable stock is used, but the recipe was written with chicken stock. There are a few steps that require waiting or simmering, but those things can be happening at the same time. You start by rehydrating dried mushrooms with hot water. While those sit for at least 20 minutes, you can start cooking the wild rice which takes almost an hour. I found some nice, long grains of wild rice from Minnesota, and it was cooked in boiling water with a little butter. Next, onion, garlic, and leeks can be chopped while waiting on the mushrooms and rice. Once the dried mushrooms were hydrated, they were drained into a bowl so the soaking liquid could be saved. The mushrooms were rinsed under running water to remove any grit, and they were squeezed dry before being chopped. Tough stems were discarded. The soaking liquid was poured through a sieve lined with cheesecloth and reserved. Moving right along, olive oil was heated in a Dutch oven, and the onion, garlic, and leeks were sauteed until tender. The chopped, dried mushrooms were added followed by flour. This mixture was cooked for a few minutes before white wine, stock, salt and pepper, some Tabasco (I prefer Crystal), and the mushroom soaking liquid were added. This was brought to a boil and then left to simmer for an hour. Yes, this soup takes some time. At this point, it could be refrigerated until the next day. After simmering, the soup was pureed in batches in a blender. It went back into the Dutch oven and half-and-half was added. As it was re-warmed, fresh mushrooms were sliced and sauteed in butter. Once cooked, they were sprinkled with lemon juice and sherry. The cooked, fresh mushrooms were added to the pureed soup along with the cooked wild rice. Thyme and parsley were added, and the soup was ready to be served. 

Wild rice has always been one of my favorite grains, and I don’t cook it often enough. I love the chewy texture, and it’s a perfect match with mushrooms. This is a hearty and slightly decadent soup, but it’s a meal of a soup. There are layers of flavor from the dried mushrooms to the wine to the herbs added at the very end. I’m glad to have learned more about Craig Claiborne’s life, and I look forward to cooking more things he recommended.

I am a member of the Amazon Affiliate Program.

Wednesday, January 23, 2013

Dark and Stormy Fresh Ginger Gingerbread

On a day when I wanted to make dessert but didn’t want it to be an all-day project, this was the perfect cake. It’s from Sinfully Easy Delicious Desserts which is full of great desserts that don’t take all day to make. I was drawn to the idea of a quick gingerbread made with fresh ginger, and the variation suggested in the side-bar sealed the deal. That variation was to replace some of the water in the recipe with dark rum to match the flavors in a Dark and Stormy cocktail. So, not only was this cake whipped up in record time by mixing everything in a food processor, adding a little Gosling’s Black Seal rum took me back to that pretty, pink sand and that sparkling, blue water of Bermuda on a January day. Alice Medrich also offers all sorts of great ideas for garnishing desserts, and there’s even a page of “Things to do with gingerbread” that lists accompaniments like lemon whipped cream, dessert chutney, and fruits in syrup. Sticking with the Dark and Stormy theme, I topped mine with grated lime zest and poured a little more rum over the mascarpone whipped cream. 

The only slightly time-consuming task here was peeling some fresh ginger. You need to peel and slice enough to fill one-half cup. Then, the fresh ginger was finely minced in the food processor. Next, brown sugar, cinnamon, ground dried ginger, allspice, cardamom, salt, molasses, butter, an egg, rum, water, flour, and baking soda were added. In all of about 15 seconds, the batter was done. The cake baked in an eight-inch square pan for about 30 minutes. I whipped mascarpone and cream with a scant bit of sugar and washed a lime for zesting. Once the cake was cool, it was ready to be topped with the lime zest, some whipped cream, and a drizzle of more black rum. 

Ginger and molasses have become a couple of my favorite ingredients in recent years, and they’re especially good in the wintertime. They’re also quite good with the flavor of rum. Admittedly, our winter hasn’t been too harrowing, but still, a dessert that brought back memories of Bermuda was a welcome idea.

I am a member of the Amazon Affiliate Program.

Thursday, January 17, 2013

Seared Scallops and Potato Celery Root Puree

This is a Goldilocks story. I was looking for something to make for a weekend dinner that would be kind of a special meal. I had just finished reading, and cooking a few other things from, the brand new Barefoot Contessa Foolproof book. In it, there’s a Seared Scallops and Potato Celery Root Puree dish that sounded delicious. Even though the dish seemed perfectly lovely, I wanted something just slightly more dressed up, more special, more this-isn’t-your-usual-weekend-dinner-at-home. A few days later I was flipping through Stir: Mixing It Up in the Italian Tradition which is full of great ideas and has never disappointed. There, I found a very similar dish called Scallop and Pureed Celery Root Gratinee. This was a dolled up version of the same thing with just a few differences. It was topped with crispy breadcrumbs, finely diced Granny Smith apple, and a celery emulsion. It was beautiful in the photo. But, I realized I didn’t really want to fuss with a celery foam. I can be hard to please. I picked my favorite parts of each dish from both books, and voila. I went with Ina’s version of the puree which included leeks and potato and was cooked in cream. Then, after pureeing it, I pushed it through a fine-mesh strainer just like Barbara Lynch suggested for a velvety smooth finish. I topped the seared scallops with buttery breadcrumbs and diced apple as shown in Stir, but instead of a celery foam, I used finely diced celery. The last detail was Ina’s drizzle of olive oil. And, dinner was just right. 

This is what the cooking entailed: Chopped leeks were sauteed in butter, and diced peeled potato and celery root were added along with cream and salt and pepper. I used two and half tablespoons of butter, two chopped leeks, two Yukon gold potatoes, one celery root, and one and a half cups of cream. This was brought to a boil and left to simmer for about 25 minutes until the potatoes and celery root were very tender. The cooked vegetables and cream were transferred to a food processor and pureed until smooth. Then, I scooped the puree into a fine-mesh strainer and pushed it through using a metal spoon. The strained puree was kept warm in a saucepan over low heat. The scallops were patted dry, seasoned with salt and black pepper, and seared in grape seed oil over medium-high heat for about three minutes per side. To top the scallops, panko breadcrumbs were toasted in melted butter, Granny Smith apple and celery were finely diced, and chives were chopped. Once plated, Ina recommends drizzling the scallops with basil oil, but I used a plain, extra virgin olive oil. 

I never would have thought to pair Granny Smith apple with scallops, but it was a fantastic idea. The tartness of the apple functioned just as a squeeze of lemon would but added a little crunchiness as well. During dinner, we argued as to whether the apple, celery, and breadcrumb toppings were better with the scallops or the potato and celery root puree. They were great with both, and I wouldn’t change a thing when I make this again. 

I am a member of the Amazon Affiliate Program.

Monday, January 14, 2013

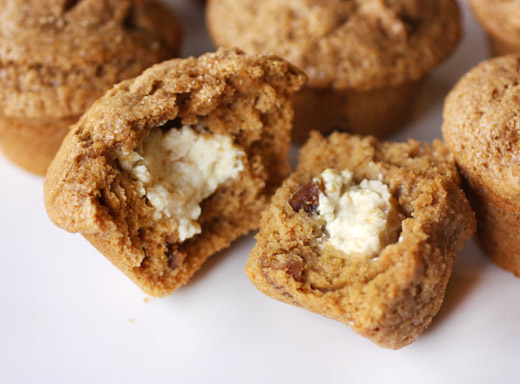
Fig Muffins with Goat Cheese Filling

There was a time when I could eat the same thing for breakfast every morning, or every weekday morning anyway, for an entire year if not longer. I’d pour the same cold cereal into a bowl every Monday through Friday without any interest in mixing it up. Something happened to change my thinking on that lately. Now, I can only go for about a week with the same thing for breakfast each morning, and then I have to have something different. I never go all out and cook eggs or anything like that on a weekday morning, but I’ve been switching around my breakfast with homemade granola and yogurt, whole grain toast, bagels, and most recently these muffins. Whatever I’m choosing for breakfast, I like for it to include some whole grains and fruit, and these muffins fit that demand perfectly. They’re from Ancient Grains for Modern Meals by Maria Speck, and they’re made with white whole wheat flour, dried figs, and olive oil, with a goat cheese and lemon zest filling. If you’re not familiar with white whole wheat flour, it’s not a refined flour but is made from a white wheat rather than hard red wheat berries. It looks the same as all-purpose flour but has the nutritional profile of regular whole wheat flour. 

To start the muffins, the filling was made and set aside. Room temperature goat cheese was mixed with lemon zest, some honey, and vanilla extract. The muffin batter was made by sifting white whole wheat flour with baking powder, baking soda, and salt. A well was made in the middle of the flour mixture. In a separate bowl, eggs were whisked, and brown sugar, vanilla extract, olive oil, and buttermilk were added. The wet ingredients were poured into the well in the flour mixture, and the batter was stirred together with a rubber spatula. Chopped dried figs were folded into the mix. The batter was spooned into a buttered muffin tin, and each cup was filled to about half. The goat cheese filling was then spooned into the center of each muffin cup, and the remaining batter covered the filling. Just before going into the oven, each muffin was sprinkled with turbinado sugar. 

This was a great way to start the day. The chewy, sweet figs were delicious with the tangy goat cheese filling. Just because I’m switching up my breakfast choices more frequently now, that doesn’t mean I can’t circle back to repeat one now and then. These muffins will undoubtedly make repeat appearances. 

I am a member of the Amazon Affiliate Program.

Tuesday, January 8, 2013

Tlacoyos with Swiss Chard, Potatoes, Mushrooms, and Salsa Borracha

I had heard lots of good things about Hugo Ortega's Street Food of Mexico and was curious to learn more about the chef and the new book. I made my way to the Texas Book Festival on a chilly Saturday morning in late October of last year for his talk and cooking demo. He spoke about traditional Mexican home cooking as well as the variety of food offered by street vendors in different areas of Mexico. He mentioned how cooking locally and seasonally was a given with the food of his upbringing, and he explained traditional cooking techniques and ingredients and some contemporary updates that can be made these days. For instance, although lard is often used in traditional recipes, he suggests olive oil as a substitute in most of the dishes in the book. I was impressed with the dishes he prepared that morning and couldn’t wait to read the review copy of the book I had received. In the book, you’ll find snacks, tacos, salsas, tortas, ceviches, sweets, and drinks along with stories about how the dishes are prepared by street vendors. Although the food is finished quickly and served to people on the go from vendors, the prep starts in advance so all the parts can be easily combined just before serving. The meats are slowly cooked, the salsas are made fresh, and the masa is portioned and shaped in advance. It’s fast food that isn’t. And, the recipes are very doable at home. The book also offers a visual feast of photos of the dishes, the ingredients, and street scenes in Mexico shot by Penny De Los Santos. After learning about masa and all the different things made with it, I had to decide whether to start with little indented masa bowls called sopes or sweet potato masa cakes for garnachas or thicker gorditas. I’ll get back to the others soon enough, but I decided to try tlacoyos first which are oval masa cakes with a filling of refried beans. They can be topped with any taco filling you like and whichever salsa you prefer, but I went seasonal with Swiss chard, mushrooms, and potato, and a salsa made from dried chiles, orange juice, garlic, and beer.

I made the salsa first since it can sit in the refrigerator for a few days. Dried pasilla chiles were to be used but I only found guajillos the day I was shopping, and I tend to use those two dried chiles interchangeably. The chiles were stemmed and seeded and then left to soak in a mixture of orange juice, beer, and garlic. After about an hour, the chiles and soaking liquid were transferred to a blender to puree. Trust me, use the blender here. My food processor was sitting right there as the chiles were ready to be pureed, so I tried it unsuccessfully. I ended up pouring everything into the blender and washing extra dishes. With this much liquid, the blender is a better choice, and it will produce a smoother puree. Next, I turned to the recipe for refritos. I had some black beans that I had already cooked in my freezer, so I started with those. My thawed beans were pureed in a food processor while finely chopped onion was sauteed in olive oil. Once the onion was translucent, the bean puree was added and simmered for 15 minutes. The refritos were cooled and refrigerated until the next day. For the tlacoyos, I mixed masa flour with a little salt and water and divided the dough into portions. Each ball of dough was flattened, a spoonful of refritos was placed on the dough, and the dough was rolled to enclose the beans. Then, the cakes were formed by pressing the dough into an oval. Mine weren’t very tidy. The dough cracked here and there, and the bean filling squished out in places. I decided not to worry about it. After all the cakes were formed, they were cooked for a few minutes on each side in a cast iron skillet with a little oil. The topping was a quick saute of onion and garlic to which sliced mushrooms, chopped Swish chard, roasted potato chunks, and peeled and chopped roasted poblanos were added. I served the tlacoyos with the “drunken” salsa and some crumbled cotija cheese. 


There are several other things I can’t wait to try from this book like the green tomatillo salsa, the pickled peppers, the cemitas which are sesame seed buns for tortas, the aguachile with shrimp and lime juice, meringue-filled pastries, and rum raisin ice cream. The freshness and flavors and all the great colors in these dishes jump off the pages and make me hungry.

Tlacoyos
Recipes reprinted with publisher's permission from Hugo Ortega's Street Food of Mexico by Hugo Ortega, Bright Sky Press, 2012.

Masa Cakes Stuffed with Refried Beans | Makes 4-8 servings

Tlacoyos are masa cakes stuffed with refried beans — pinto or black. They are usually prepared the night before and the ladies (page 18-19) pack them in baskets to sell the next day. If making ahead, place the raw tlacoyos on a sheet pan lined with a piece of parchment paper; cover with another piece of parchment paper and plastic wrap. Cook on a hot comal right before serving. The papas, champinones y acelgas taco filling (page 96) is another great vegetarian option that can be used as a topping for this recipe.

For the tlacoyos:
1 lb masa (fresh or prepared from mix, page 24)
1/2 cup refritos (page 132)
1 tbsp corn oil

For the tlacoyos (make ahead up to 1 day):
Divide the masa into eight equal masa balls; cover with a moistened kitchen towel while working. Using the palm of your hand, flatten each masa ball into a patty, about 4 inches in diameter and 1/4 inch thick. Place 1 tablespoon refritos in the center and enclose the beans inside each patty by rolling it into a cylinder. Place each cylinder on a clean surface and pat down into an oval shape, about 1/4 inch thick. Store in refrigerator until ready to cook.

Before serving:
Place comal over low heat, preheat 5 minutes. Drizzle with corn oil and wipe off excess with a paper towel. Working two at a time, place each tlacoyo onto the hot comal and cook 3 to 5 minutes on each side. Remove from comal and top each with potatoes, Swiss chard and mushroom mixture, salsa, and garnish with cotija.

Tacos de papas, acelgas y champiƱones
Potatoes, Swiss Chard and Mushroom Tacos | Makes 4-8 servings

This vegetarian taco is fulfilling as well as hearty. This recipe shows that tacos are very versatile for any eating lifestyle. This vegetarian Mexican saute can also be used as a substitute for the chicken in the tacos de chile relleno (page 77).

1/3 cup olive oil
1/2 medium white onion, sliced
6 garlic cloves, peeled, minced
1/2 lb white button mushrooms, cleaned, sliced or a mixture of your choice
1/2 large bunch Swiss chard, washed, stemmed
2 chilaca or poblano peppers, roasted, seeded, peeled, deveined, cut into strips
1 large yellow potato, roasted, cut into 1/2-inch cubes
1 tsp kosher salt
8 regular-sized tortillas or masa cakes (page 74), warm
1 recipe Hugo's salsa Mexicana or Salsa Borracha, optional to accompany

Place cast iron skillet over medium heat, add olive oil to skillet and preheat 2 minutes. Add onion and cook until translucent, about 3 minutes. Add garlic and cook 2 minutes more. Add mushrooms and cook until browned, about 5 minutes. Add Swiss chard and allow it to wilt, about 5 minutes. Add peppers and cook for 6 minutes. Add potato and continue to cook 2 minutes. Stir gently as not to mash the potato. Add salt. Divide evenly among the tortillas. Serve with salsa.

Salsa borracha
Drunken Red Chile Salsa | Makes 1 1/2 cups

Traditionally, salsa borracha is made with pulque, a milk-colored alcoholic beverage made from the fermentation of the maguey and agave plant. Due to its scarcity, I used my favorite Mexican beer instead, giving it a delicious, tangy taste. This particular salsa will keep in the refrigerator up to three days. Store in airtight jar or plastic container.

6 long dried pasilla peppers, toasted, stemmed
1 cup fresh orange juice
3/4 cup beer or 1 1/2 cups pulque if available
5 garlic cloves, peeled
1 tsp kosher salt

Place peppers in a deep bowl. Add orange juice, beer or pulque if using, and garlic. To completely submerge peppers in liquid, place a small bowl over peppers to act as weight. Allow peppers to soften in liquid, about 1 hour. Strain, reserving 1 cup liquid, discard the rest. Transfer peppers, garlic and reserved liquid to a blender and add salt. Puree into a smooth, thick consistency. 

I am a member of the Amazon Affiliate Program.

Friday, January 4, 2013

Sticky Toffee Pudding

I always assumed there was a complicated secret to making sticky toffee pudding. I had never attempted it and was sure it would be messy and annoying to prepare. But, this is exactly the kind of dessert I love: a tender cake with chewy dates, a buttery toffee caramel sauce, and some whipped cream for serving. It also happens to be a classic dessert for colder weather since the cake and sauce are served warm. I decided to throw caution to the wind and give it a try for Christmas dinner, and now I’m wondering why I thought this was going to be so difficult. The cakes are easy to make in ramekins. The sauce was a simple mix of ingredients that simmered on top of the stove. And, whipping cream and toasting walnuts for garnish isn’t too hard to do. The recipe I used is from Lost Desserts by Gail Monaghan. Some of the desserts in the book are less lost than others. There are things I’d never encountered before like Siedel Torte, Pruneaux au Pichet, and Crepes Verlaine. Then, there are more familiar although somewhat old fashioned things like Carrot Cake, Baked Alaska, and Schrafft’s Famous Butterscotch Sundae. I’m certain that sticky toffee pudding isn’t one that’s lost because I ordered a delicious version of it at King’s Highway at the Ace Hotel in Palm Springs last May. I guess that was also proof that it doesn’t have to be served in cold weather. At any rate, it does make an excellent dessert for Christmas or any other special wintertime meal.

To start the cakes, or puddings, you chop the dates and remove the pits as you go. They were then covered with boiling water, and vanilla, instant espresso powder, and baking soda were added. Eight ramekins were buttered and the oven was preheated. In a stand mixer, softened butter and granulated sugar were creamed, and eggs were added. Flour and baking powder were sifted together and slowly added to the egg mixture while mixing. Last, the date mixture was folded into the batter, the batter was divided among the ramekins, and the puddings baked for 20 minutes. The cooled puddings were removed from the ramekins and stored on parchment in an airtight container. They can be made in advance and refrigerated or even frozen. For the sauce, brown sugar, butter, salt, and cream were combined in a saucepan and brought to a simmer. Once the sugar was dissolved and the sauce thickened a bit, it was ready. This step could also be done in advance, and the sauce can be refrigerated and reheated just before serving. When it was time for dessert, the broiler was set to high. The puddings were placed on a baking sheet and topped with some of the sauce. The sheet pan was placed several inches under the broiler, and the puddings were warmed until the sauce was bubbly. The puddings were transferred to serving plates, topped with more sauce, and garnished with whipped cream and toasted walnuts. 

Obviously, I was delighted with this dessert and could have eaten the sauce by itself with a spoon, but still, there seemed to be not quite enough sauce since I ended up making a second batch to serve with the leftover puddings the next day. This is no place to skimp on buttery, caramel sauce. And, I’m delighted to find out how wrong I was about making them. They’re easy enough to whip up again whenever I want. 

I am a member of the Amazon Affiliate Program.

Blogging tips