


 of which I received a review copy. This is from her Boston restaurant co-owned with her husband Christopher Myers. The book includes dishes from the restaurant menu as well as a few favorites from pre-service, family meals. Christopher Myers describes the type of food by saying “We take various Asian styles as our starting-off point, and we apply our own whatchamacallit to it.” There are Sichuan flavors next to Japanese influences along with some Thai, Vietnamese, Korean, and Indonesian elements. And, some of those flavors find their way into very American creations. There’s a Bulgogi BBQ Sloppy “Jo,” Indonesian Fried Chicken and Ginger-Sesame Waffles, and Korean Braised Short Rib Tacos with Kimchi-Sesame Salsa. The book begins with a good explanation of a list of ingredients and possible substitutions and moves into tips for wok cooking, cooking rice, the velveting process, and shaping dumplings. The recipes include everything from Dim Sum and Salads to Dumplings, Noodles, and Rice and Grain dishes. And, of course, Joanne Chang has included some great desserts. I was fascinated to see the Rhubarb Duck Sauce that’s served with Auntie Mia’s Spring Rolls. The sauce is a recreation of the Chinese-American take-out sauce that comes in little packets. This version starts with poaching rhubarb in simple syrup before pureeing it into a vinegary mixture with sriracha and ginger. There’s a note pointing out that they switch out the rhubarb for stone fruits in the summer. I’d love to try this with plums. Some other recipes I look forward to trying are Wild Mushroom Lo Mein, Wok-Charred Udon Noodles with Chicken and Bok Choy, and Vanilla Bean Parfait with Orange Granita. Right away, I made the Sweet-and Sour Brussels Sprouts and now have repeated cravings for them. Then, I got a bit mesmerized by the Dumplings chapter and in a fit of idealism was sure I could make a few different kinds in one day. I ended up only making one filling, but I’ll be visiting other options soon.
 For some background, I had originally intended to follow the book’s suggestion of using store-bought dumpling wrappers. I even found the exact brand recommended in the book. And, then I read the ingredient list. When asked why I cook so much, I always say it’s because I’m picky. This is a perfect example. Those dumpling wrappers are made with sodium benzoate, and that’s something I’d rather not have in my food. Also, I love making dumplings from scratch with homemade dough. Once again, I followed the dough making and shaping process from Andrea Nguyen’s book Asian Dumplings. I wasn’t disappointed at all to make the wrappers from scratch, but since it did take more time, I scrapped my plan for various types of fillings and focused on one. The Shitake Mushroom and Spinach Dumplings with Classic Dumpling Sauce is full of great flavors, and I had local Napa cabbage and spinach to use in them. There are a few steps to making the filling, and it wouldn’t be a terrible idea to make the filling one day and fill the dumplings the next. But, once you’ve filled lots of dumplings, extras can be stored in the freezer for another day. First, boiling water was poured over dried shitakes, and they were left to rehydrate. Next, sliced Napa cabbage was tossed with salt and left for 10 minutes. Oil was heated in a wok or skillet, sliced garlic was added followed by the spinach, and it was cooked until wilted and seasoned with salt, pepper, and red pepper flakes. The cooked spinach was placed in a colander until cool and then squeezed to removed excess liquid. The rehydrated shitakes were stemmed and finely chopped. The Napa cabbage was squeezed to remove excess liquid and then more finely chopped. Firm tofu was drained and crumbled and ginger was minced. In a large bowl, the shitakes, cabbage, spinach, tofu, were combined with the ginger, soy sauce, sesame oil, Chinkiang vinegar, salt, and pepper. The filling mixture went into about 40 dumplings, and I have a great time making the little pleats to close each one. I really do love it. The dough for the wrappers was made with all-purpose flour and boiling water and was left to sit for 30 minutes or so before dividing and shaping. The dumplings were cooked potsticker-style by frying the bottoms before adding a bit of water while quickly covering the pan to finish cooking by steaming. The dipping sauce was a simple mix of soy sauce, minced ginger, Chinkiang black vinegar, sriracha, and sesame oil.

Shitake Mushroom and Spinach Dumplings with Classic Dumpling Sauce
Recipes are excerpted from Myers+Chang at Home: Recipes from the Beloved Boston Eatery
© 2017 by Joanne Chang with Karen Akunowicz. Reproduced by permission of Houghton Mifflin Harcourt. All rights reserved. Makes 40 to 50 dumplings
Being a dumpling on the menu at Myers+Chang sitting next to Mama Chang’s Pork and Chive Dumplings is like sitting next to Charlize Theron on your fat day. In other words, when we created this dish, it had to have some jingling! Jingling is something like a Chinese word for “chutzpah.” At least my mom says it is after Christopher described what “chutzpah” meant. Hmmm. Someone might want to Google Translate this. These dumplings are stuffed full of garlicky sautéed spinach and earthy shiitakes with some tofu to bind it all together. They are healthy and full of flavor and they embody jingling.
2 cups dried shiitake mushrooms
4 large napa cabbage leaves, thinly sliced (about 2 cups)
1 1/2 teaspoons kosher salt
4 tablespoons vegetable oil, such as canola, plus more as needed
2 medium garlic cloves, sliced
1 pound fresh baby spinach
1/2 teaspoon freshly ground black pepper
1/4 teaspoon red pepper flakes
1 cup crumbled firm tofu (about 8 ounces)
1 tablespoon soy sauce
1 tablespoon peeled and finely chopped fresh ginger (about 1-inch knob)
2 teaspoons toasted sesame oil
1 teaspoon black Chinkiang vinegar
One 16-ounce package round dumpling wrappers (we like Twin Marquis brand)
1 recipe Classic Dumpling Sauce
1. In a medium saucepan, bring about 4 cups water to a boil. Place the shiitake mushrooms in a medium bowl and pour the boiling water over them to cover. Let sit for 10 to 15 minutes to allow the mushrooms to rehydrate.
2. Place the cabbage in a large bowl with 1 teaspoon of the salt. Toss well and set aside for at least 10 minutes.
3. Drain the mushrooms and let cool. When they are cool enough to handle, slice off any woody stems and mince the mushrooms very fine. You can do this by hand or pulse them in a food processor if you have one. Set aside.
4. In a wok or a large, heavy, flat- bottomed skillet, heat 2 tablespoons of the vegetable oil over high heat until it shimmers, about 1 minute. Add the garlic, give it a quick stir, and then add the spinach. Stir immediately and season with ¼ teaspoon of the salt, 1/4 teaspoon of the black pepper, and the red pepper flakes. Cook, stirring, until the leaves are wilted, about 1 minute, and remove them from the pan. Place in a colander, let cool slightly, and squeeze any excess liquid out with your hands. Coarsely chop the spinach and set aside.
5. Take the cabbage out of the bowl and squeeze hard with your hands. You will be amazed with the amount of water that comes out. Very finely chop the cabbage.
6. In a large bowl, combine the cabbage, mushrooms, spinach, and tofu. Add the soy sauce, ginger, sesame oil, vinegar, remaining 1/4 teaspoon salt, and remaining 1/4 teaspoon black pepper. Mix very well using your hands; it is really important that all the ingredients are distributed evenly.
7. Fill a small bowl with warm water. Lay a dumpling wrapper on a clean work surface and scoop about 1 tablespoon of the filling into the center of the wrapper. Dip your finger in the water and paint all around the edge of the wrapper to moisten. Fold the wrapper over in half to look like a half-moon. (This always reminds me of making a taco shell.) Pinch just the top of the wrapper together, leaving the sides exposed and open. Start pleating the left side of the dumpling: Hold the dumpling on the top, fold a pleat on one side of the wrapper about halfway down the arc toward the center of the dumpling, and press it into the facing side of the wrapper. Repeat the pleating almost to the bottom of the arc so that you have two pleats on the left side of the dumpling. Repeat the pleating process on the right side of the dumpling, again pleating toward the center. When the dumpling is completely pleated, you should be able to sit the dumpling on its bottom and it will look like a little love seat. The smooth side of the dumpling will be the seat, and the pleated side will be the back of the couch. Continue with the rest of the dumpling wrappers and filling until the filling has been used up. The dumplings can be made in advance and stored uncooked for up to 3 weeks in an airtight container in the freezer. The easiest way to freeze them is to place them on a flat plate or tray and freeze until dumplings are completely frozen, and then transfer to a resealable freezer bag or an airtight container and return them to the freezer. Thaw in the refrigerator on a flat plate overnight or for at least 6 hours before cooking.
8. In a large, heavy, flat-bottomed skillet with a lid or a nonstick skillet with a lid, heat the remaining 2 tablespoons of oil over medium-high heat. When the oil starts to shimmer, carefully lay as many dumplings as will comfortably fit on their bottoms in the skillet and turn the heat down to medium. Cook without moving the pan until the bottoms of the dumplings are golden brown, about 3 minutes. Check by lifting them up with your fingers and peeking underneath. Add about 2 tablespoons water to the pan and immediately cover with the lid. The pan will sizzle and steam up immediately, so don't be startled. Shake the pan from time to time to keep the dumplings from sticking. Let the dumplings steam for 2 minutes, at which point most of the water will have evaporated. Add another 2 tablespoons water to the pan, cover, and steam again. Turn off the heat, keep covered, and let rest for 1 minute. Uncover and turn the heat back to medium-high to crisp up the dumplings. Remove from the pan. Continue in the same manner to cook the remaining dumplings, adding 1 tablespoon of vegetable oil to the pan at a time as needed. Serve crispy-side up with the Classic Dumpling Sauce.
Classic Dumpling Sauce
Makes about 3/4 cup
This classic dumpling sauce can be paired with any of the dumplings in this book. You can also add more or less sriracha or substitute wasabi for a different kind of kick.
1/2 cup soy sauce
2 tablespoons peeled and finely chopped fresh ginger (about 2-inch knob)
1 tablespoon Chinkiang black vinegar
2 teaspoons sriracha
2 teaspoons toasted sesame oil
1. In a small bowl, stir together all the ingredients. Store in an airtight container in the refrigerator for up to 1 month.


Tweet


 So, for my first dumpling adventure, I chose the vegetarian crystal dumplings and chiu chow dumplings. Both are made with wheat starch dough, and this was a fun dough to make. Wheat starch was combined with tapioca starch because the tapioca gives it more elasticity. The two starches were combined in a mixing bowl with a little salt, and just boiled water. After stirring in the water, a little canola oil was added. I doubled the dough recipe, but before kneading it, I divided it in two equal parts. I thought kneading would be easier that way. The dough was kneaded for a couple of minutes on a flour-free surface, and it quickly became smooth and white. It’s noted that it should feel like Play-Doh, and it really does.
 To backtrack just a bit, it’s actually a very good idea to prepare the dumpling filling a day or two before assembling the dumplings. My first choice was the vegetarian filling including dried shitakes, dried wood war mushrooms, shallot, garlic, jicama, carrot, and scallions. The dried mushrooms were soaked and then drained and chopped, and the other ingredients were either minced or finely diced. The shallot and garlic were sauteed, and then the mushrooms, jicama, and carrot were added. A seasoning mixture of sugar, soy sauce, and reserved mushroom soaking liquid was added to the saute pan followed by the scallions and then a small amount of cornstarch dissolved in water. That cooked together just briefly, and then the mixture was left to cool. I decided to go all out and make a second filling as well because since I was doing this whole homemade dumpling thing, I thought why not. And, I thought two kinds of dumplings would be even more fun than one.
 The second filling I made was for chiu chow dumplings. That filling is flavored with dried shrimp and includes some kind of meat, usually pork but I used ground chicken thighs, and it includes some vegetables which make it less dense. It’s made by sauteing garlic and chopped dried shrimp before the ground chicken was added. Once the meat was browned, chopped re-constituted dried shitakes were added, with finely diced jicama, and chopped peanuts. A seasoning mixture of sugar, oyster sauce, soy sauce, shaoxing rice wine, and water was then added to the saute pan. Once again, a cornstarch slurry was added along with scallions. Both fillings were refrigerated overnight before being made into dumplings.
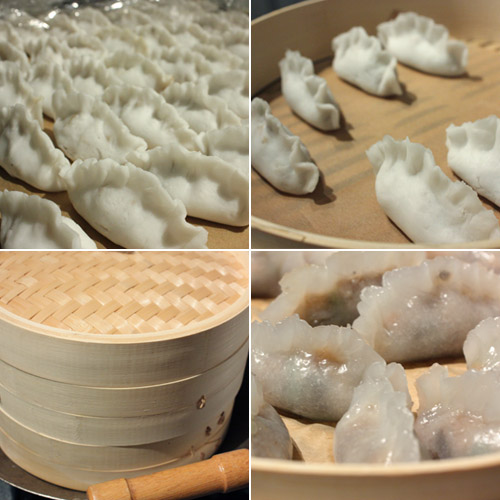 Does the whole process take some time? Yes. Is it worth it? Definitely. I was thrilled with the dumpling dough and how easy it was to shape. I was also really thrilled that every step of the process turned out exactly as described in the book. The quantity of filling for each type of dumpling was exactly right. The texture of the dumpling wrappers was chewy and springy and delightful. The fillings were full of umami, and I really mean that. There are a lot of savory flavors at work in each, and I kept thinking that both were very good examples of umami. The freshly made chile garlic sauce was bright and hot but not painful in small doses. The whole experience from cooking and assembling and steaming to eating was a fun one, and there will be a lot more dumplings in my kitchen in the future.