Thursday, March 27, 2014

Gumbo z’Herbes with Fried Oysters

The first time I made gumbo, I remember wondering if there was such thing as a vegetarian version. Years later I learned that, yes, there is actually a tradition of a vegetarian gumbo. It’s called Gumbo z’Herbes or Green Gumbo. It’s less common than meat- and seafood-filled gumbos, but it came about as a type of gumbo to serve during Lent or specifically on Good Friday. I’d been thinking about making this while local greens are in season, and I finally did it, fittingly during Lent. This is more of a soup than thicker gumbos, and it’s filled with whatever greens you have on hand, herbs, green onions, and in this case, chopped turnips. The recipe I followed is from Crescent City Cooking by Susan Spicer, and every time I use this book I find more dishes from it that I need to try. I liked that she gilded the dish a bit with the addition of fried oysters. And, why not? You wouldn’t want to serve a gumbo that’s entirely virtuous, right? Naturally, it starts with the trinity of vegetables which includes onion, celery, and green bell peppers. And, this is where things get scandalous. I prefer just about any other possible color of bell pepper to green. Here, I used a mix of green and orange, and I don’t feel too guilty about it. Chef John Besh recommends red bell pepper for his etouffee; so I’m not alone in this. Now, for the turnips, I was hoping it wasn’t too late in the season to find some at the farmers’ market, and luck was on my side. At our Wednesday market, I found the cutest, little white, Japanese turnips grown by Animal Farm. The flavor is mild and lovely, and they were perfect for the gumbo. 

Although this is a Lenten, vegetable-based kind of gumbo, the recipe does call for chicken stock. I made some vegetable stock to use instead. To begin, you need to make a roux in a wide, heavy pan like a Dutch oven, and making roux is one of those cooking-related tasks that I really enjoy. I love watching the color slowly transform from beige to brown while stirring and stirring. For this recipe, the roux was taken to a peanut butter color. At that point, the trinity of finely chopped onion, celery, and bell pepper was added. Next, finely chopped garlic, those lovely little chopped turnips, and some chopped green onions were added and allowed to cook for about five minutes. For the greens, I used washed and torn kale leaves and spinach leaves along with the leaves from the turnips. All the greens nearly overflowed from the pan, but they cook down in no time. Once the greens were wilted, thyme leaves and file powder were added followed by the vegetable stock. The stock was added slowly, brought to a boil, and reduced to a simmer. A bouquet garni of parsley stems, a bay leaf, and thyme sprigs was added to the stock, and it was left to cook for an hour. If you’re making the fried oysters, the oyster liquor can be added, and Worcestershire sauce is suggested for seasoning as well. To make the oysters, they were first dusted with cornmeal and then quickly fried just until golden. The oysters I brought home for this were tiny, so they only cooked in the hot oil for about two minutes. The gumbo was served with white rice, the fried oysters, some extra chopped green onions, and hot sauce on the side. 

I now know that regardless of the main ingredient in a gumbo, it’s always a fun and delicious dish. The trinity cooked in a brown roux never fails, and I never get enough of liberally dousing a gumbo with Crystal hot sauce. The greens and turnips cooked to a completely tender state and took on the flavors of the herbs and aromatics. I still love a good seafood gumbo, but I think this vegetable version, with or without the oysters, deserves more attention than it gets. 

I am a member of the Amazon Affiliate Program.

Friday, March 21, 2014

Pistachio Cake

I love eating sweets, making sweets, learning new types of sweets to make, and sharing homemade sweets. It was a given that I was going to enjoy the new book A la Mere de Famille from the Parisian shop of the same name, and I recently received a review copy. It first opened in 1761 as a grocery shop on land that at the time was a farm. Today, that property is on the Rue de Provence in the Faubourg-Montmartre quarter, and there are other locations as well. A timeline of the shop’s owners and its evolution is given in pieces spread throughout the book. There are also profiles of customers revealing how long they’ve shopped at A la Mere de Famille, which location they frequent, their favorite treats, etc. It’s clear that the clientele cherish the shop, the confections, the window displays, and the pretty, orange packaging. I hope to visit the original location one of these days. The recipes include cakes, chocolates, candies, jams, cookies, frozen treats, and syrups. There are delicate-looking Chocolate-Mendiant Lollipops which are swirls of piped, tempered chocolate onto which dried fruits and pistachios have been set. Speaking of pops, there are also Vanilla, Milk Chocolate, and Hazelnut Marshmallow Pops which are homemade vanilla marshmallows on a stick dipped in chocolate and then topped with nuts. There are caramels in various flavors, and I can’t wait to try the Cherry Caramels. And, there are nougats which I’ve wanted to attempt for the longest time but never seem to be ready to do so on a low-humidity day. The candied fruits and pate de fruits are delightfully colorful, and the ice cream sundaes and ice pops look impossible to resist. The first recipe I tried was the Pistachio Cake baked in a loaf pan with a crunchy topping of chopped nuts. 

The cake is made with pistachio paste which was made by toasting shelled pistachios and grinding them in a food processor. A sugar syrup was made and added to the ground nuts while pureeing. The pistachio paste recipe calls for orgeat syrup which I love, but I was out at the time and since such a small amount was needed, I used some almond extract instead. The paste can be made in advance and refrigerated for about a month. To begin the cake, eggs and sugar were whisked together in a mixing bowl, and cream and pistachio paste were added. Flour and baking powder were folded into the batter before melted butter was added, and it was poured into a parchment-lined loaf pan. Chopped pistachios were sprinkled on top. It was placed in a 400 degree F oven for five minutes, and then a lengthwise incision was made in the top of the cake. It was to be placed back in the oven with the temperature reduced to 300. I think there was a typo in the recipe because the baking time of 35 minutes at 300 degrees F was off. It needed more like 55 minutes and/or a higher temperature. The cake baked into a pretty arched top studded with chopped nuts. 

First, I have to tell you that the pistachio paste will not win any beauty contests, but the aroma and flavor are truly lovely. And, I’m glad to have enough of it leftover to use in the Pistachio Nougat. It gave the crumb of this cake a pretty, pale green color. It’s a buttery, nutty, delicious pound cake that’s easy to make. I can tell I’m going to have fun with all the recipes in this book. 

Pistachio Cake 
Recipes reprinted with publisher’s permission from A la Mere de Famille

Preparation time: 15 minutes 

Makes two 6-by-4-inch cakes or one 9-by-4-inch cake 

4 eggs 
1 1/2 cups sugar 
1/3 cup whipping cream, warmed 
3 1/2 tbsp pistachio paste 
1 3/4 cups all-purpose flour, sifted 
1 1/2 tsp baking powder 
6 tbsp unsalted butter, melted 
Handful of chopped pistachios 

MAKING THE BATTER 
In a large mixing bowl, whisk the eggs and sugar until the mixture is pale and thick. Add the cream and pistachio paste and whisk until combined. Fold in the flour and baking powder. Finally, stir in the butter. The batter should be smooth and shiny. 

BAKING 
Preheat the oven to 400°F. Line two 6-by-4-inch or one 9-by-4-inch loaf pan(s) with parchment paper. Pour the batter into the prepared pan and scatter the chopped pistachios over the top. Bake for 5 minutes, then make a lengthwise incision in the top of the cake with a sharp knife. Lower the oven temperature to 300°F, then return the cake to the oven for about 35 minutes (mine required a longer baking time of about 55 minutes), until the cake is golden-brown and a knife inserted into the middle comes out clean. Remove from the oven and cool in the pan on a wire rack for 10 minutes, then turn the cake out of the pan. Cool completely before serving. (The cake will keep in an airtight container for up to 3 days.) 

Chef’s tip: To keep the cake moister, wrap it in plastic wrap as soon as it comes out of the oven and allow it to cool like that. 

Pistachio Paste 

Makes about 1 pound 

Preparation: about 15 minutes 

1 1/2 cups blanched pistachios 
1/2 cup sugar 
2 tbsp water 
1 1/2 tbsp orgeat syrup (see chef’s tip) 
2 tbsp plus 1 tsp hazelnut oil 

PREPARING THE SUGAR SYRUP Preheat the oven to 325°F. Place the pistachios on a baking sheet and roast for 10 minutes. Remove from the oven and set aside. In a medium saucepan, combine the sugar and water and cook over medium-high heat until the syrup registers 250°F on a candy thermometer. 

MAKING THE PASTE Put the pistachios in a food processor and process until they are finely ground. With the food processor running, slowly pour the hot sugar syrup through the feed tube and continue to process until combined. Add the orgeat syrup and hazelnut oil and continue to process until the mixture forms a smooth paste. Transfer to an airtight container. Store the pistachio paste in the refrigerator for up to 1 month. 

 Chef’s tip: Orgeat syrup is an almond-flavored syrup that is often used in cocktails. It is available in most good liquor stores. You can use this pistachio paste in many ways—try making a pistachio-based cream instead of an almond-based frangipane in a pear tart. Mmm. . . 

I am a member of the Amazon Affiliate Program.

Sunday, March 16, 2014

Pickled Gulf Shrimp with Celery Root Sauce

We love our food trailers in Austin, and now it’s easier than ever to try some of their best dishes right at home. Tiffany Harelik has written a series of cookbooks with their recipes. I received a review copy of the latest, Trailer Food Diaries Cookbook: Austin Edition, Vol. 3 , and there are also versions from Dallas-Fort Worth and Houston and a new one on the way from Portland. The Austin Edition, Volume 3 is a fun collection including Drinks, Breakfast, Appetizers and Sides, Sandwiches and Handhelds, Sauces and Jams, Main Courses, and Sweets. Most of the trailers represented are from the city of Austin, but there are a few “Road Trip” locations in Pflugerville, San Marcos, Round Rock, and San Antonio. A few things I can’t wait to try are The Carrot Top from the Blenders and Bowls trailer which is a smoothie with carrot juice and ginger; Dock and Roll Diner’s Tsunami Sauce for sandwiches with jalapenos, lime, garlic, and oils; the Cabbage and Mint Salad with Poached Shrimp and Red Chile-Caramel Fish Sauce and Fried Prawn Chips from Fresh Off the Truck; and the Pineapple Cinnamon MMMpanadas from mmmpanadas. One of our food trailers that does a great job of offering each season’s best is The Seedling Truck. They offer a “revolving menu that is dictated by local farms and purveyors.” I was delighted to find their recipes for Braised Short Ribs with Brown Butter Carrot Puree, Grilled Lamb Chops with Red Peperonata Jam, and Pickled Gulf Shrimp with Celery Root Sauce in the book. I’d made pickled shrimp once before, and I really wanted to try it again. 

The recipe in the book makes a lot of pickled shrimp which is perfect if you’re hosting a few friends. Since I hadn’t planned a party, I cut the quantities in half. I used about a pound of shrimp which I cleaned and deveined leaving the tails intact. The shrimp were poached in boiling water to which had been added a bay leaf, half a lemon, and some black peppercorns. The poached shrimp should be removed from the boiling water and placed directly into an ice bath to stop the cooking. In a separate saucepan, a cup and a half of white vinegar, a cup and a half of water, two tablespoons of sugar, two tablespoons of salt, and a couple of teaspoons of coriander seeds was warmed until the sugar and salt dissolved. The vinegar mixture was then left to cool. Once cool, the vinegar mixture was poured into a bowl with the drained, cooled shrimp, and a big handful of roughly chopped parsley was added. The bowl was refrigerated overnight. Next, the sauce was made by sauteing a peeled and chopped celery root with half a chopped onion and a chopped garlic clove. Once the vegetables became a little tender, after five minutes or so, a cup and a half of water was added with salt and pepper to taste. The mixture was simmered for about 45 minutes until the celery root was completely cooked through. The water should mostly evaporate during the cooking time. After 45 minutes, the vegetables and any remaining liquid were transferred to a blender and pureed with a few tablespoons of cream until smooth. 

This version of pickled shrimp was so much better than my previous attempt. Shocking the shrimp in ice water is a crucial step, I believe. You really want to stop the cooking to keep the texture of the shrimp at its best. Also, a good, sharp, white vinegar is the way to go. It gives the shrimp a zippy, bold flavor which is perfectly balanced by the mild, sweetness of the celery root puree. I was completely delighted by this dish. I look forward to making this for a party since it requires being made in advance, and it’s a little more interesting than shrimp cocktail. And, when celery root isn’t in season, I highly recommend trying the pickled shrimp on top of deviled eggs. 

I am a member of the Amazon Affiliate Program.

Tuesday, March 11, 2014

Lemon Croquettes with Cilantro Pistou

I love looking at photos of beautifully presented food and learning a chef's interesting techniques no matter how complicated, but beyond all of that, it was an absolute joy to spend time with Daniel Boulud’s latest book. The book is Daniel: My French Cuisine, and I received a review copy. This is a big, heavy, serious-looking book with serious-looking recipes. But, from the beginning on the How to Use this Book page, the reader is put at ease. You’re invited to prepare components of dishes or whole recipes as you wish. There’s no expectation that you’ll jump in and prepare everything in the book just as it’s shown. The book is made up of three sections. The first is a delightful tour of dishes from Restaurant Daniel. The photos are stunning, and all the instructions are right there for you to experiment with as you please. Sprinkled throughout this section, you’ll find bits of the story of Boulud’s career and upbringing in France. The second section is a group of essays written by Bill Buford about iconic French dishes. He spent time in the kitchens at Daniel to learn about some classic preparations that aren’t often mentioned these days. These are mostly grand, dated dishes like Tete de Veau en Tortue and Carnard a la Presse, but the writing is all entertainment. Buford shares the comical moments of learning these dishes along with their histories and how Boulud came to know them. The last section includes four dinner party menus that Boulud prepares at home inspired by different regions of France. The three sections are very different, but together they give you a clear picture of the kind of chef that Daniel Boulud is, the level of quality of what he produces, and his love of food. 

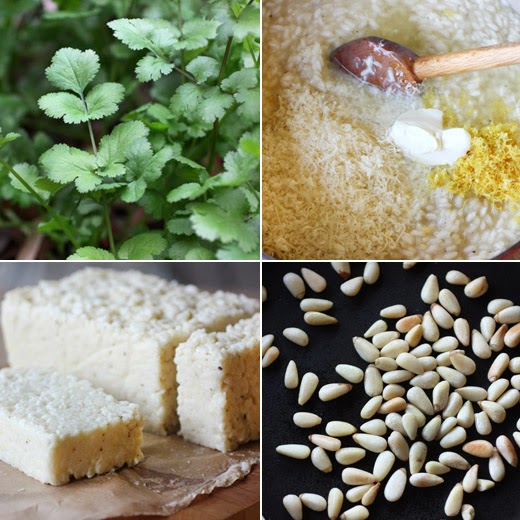
In the restaurant recipes section, there’s a Warm White Asparagus Salad with Poached Egg Dressing dish that looks like spring itself. I might try it with just one of the three accompanying sauces. Then, there’s the Hazelnut-Crusted Maine Sea Scallops with Nettles and Swiss Chard that’s gorgeous with the nettle foam and sauteed morels. And, there are parts of every dessert that I really want to attempt like Sauternes-Rhubarb Ice Cream, Apricot and Lavendar Clafoutis, and Coffee Cremeux and Espresso Ganache. So far, I’ve made two parts of the Striped Bass in a Cilantro-Tapioca Pistou with Artichokes and Lemon Croquettes. In the book, a shallow bowl is shown with the tapioca sauce in the bottom with a pretty mix of chopped artichokes and fava beans centered in the sauce, a piece of striped bass perfectly coated with cilantro pistou sits on the vegetables, and lemon risotto croquettes are perched on top with a tangle of micro cilantro and shaved artichoke slices. The risotto croquettes are perfect, and I do mean perfect, little, crispy cubes. They looked like fun to make. To start, a pretty standard risotto was made with onion cooked in melted butter. Arborio rice was added, and warmed chicken stock was ladled in a little at a time in the usual fashion. When the rice was fully cooked, shredded parmesan, a tablespoon of mascarpone, lemon zest, and lemon juice were added. It was tasted for seasoning and adjusted before the risotto was poured into a parchment-lined 8 1/2-inch by 4 1/2-inch loaf pan and left to chill in the refrigerator overnight. The next day, the risotto was unmolded and cut into one-inch cubes. The cubes were dusted with cornstarch and fried until crispy. The cilantro pistou was easy to make by pureeing lots of cilantro which is filling my herb garden right now with a couple of tablespoons of toasted pine nuts, some olive oil, and salt. 

I served the crispy, lemony croquettes with a dish of cilantro pistou for dunking. The bright, herby sauce was a light and lively contrast to the savory risotto pieces. There’s so much I’ll be turning to this book for in the future. There are plating arrangements to try and copy, flavor combinations to taste, sauces to attempt, and parts and pieces of recipes to use. Right now, I’m looking at one of the desserts from the last section of the book, the Fig Pine Nut and Mascarpone Custard Tart, and I can’t wait for fig season to get here. I’ll be glad to have this book on the shelf when it does. 

I am a member of the Amazon Affiliate Program.

Tuesday, March 4, 2014

Shitake Mushrooms with Sourdough Toast and Rosemary Blue Cheese Creme Fraiche

You know a restaurant takes sustainable sourcing seriously when its recipes are named for particular vegetable varieties grown in their own garden. That was one of things I loved about The Ethicurean Cookbook of which I received a review copy. The Ethicurean restaurant and kitchen are located in two glasshouses of the Barley Wood Walled Garden on an estate just outside Bristol in England. The restaurant is run by a group of four friends who joined together on this mission in 2010 to highlight seasonality and sustainable sourcing. Vegetables and fruits come from the Walled Garden and orchards including 70 varieties of apples, and other ingredients are carefully sourced or foraged nearby. I was confused about the recipe for Sea Robin with Fennel Butter Sauce and Herbed Pink Firs until I read through it and learned that sea robin is another name for gurnard which is a thin, mild, white fish. And, pink fir is a type of waxy potato grown in the restaurant’s garden. Of course, in the spirit of The Ethicurean, it would make perfect sense to substitute ingredients that are local and seasonal to the reader. The book is divided by season, and it’s full of stories about what’s growing at different times of the year. There are also lots of side notes about the history of some ingredients and explanations of food science. In the recipe for Caerphilly and Cider Welsh Rabbit, the authors explain that since Caerphilly is a mature cheddar with a good level of acidity and high moisture content, the casein molecules in the cheese will separate preventing it from becoming stringy when it melts. The photo of the lovely, broiled and cheese-filled sandwich next to a fresh, crisp salad looks delicious. Some other dishes that caught my eye were the Ewe’s-Curd-Stuffed Courgette Flowers with Fennel Sherbet; the Crab Salad with New Potatoes, Pickled Carrot and Smoked Paprika Mayonnaise; the homemade Vermouth; the Globe Artichokes with Hollandaise Sauce and Sumac; and the Chocolate and Salt Caramel Brownies with Cherry and Elderflower Sauce. 

Kurt and I share a fondness for blue cheese, so my first stop in the book was at the recipe titled Wild Mushrooms with Sourdough Toast and Thyme Stichelton Creme Fraiche. I made a few changes to keep the sourcing at least a little closer to home. We have fresh, locally-cultivated mushrooms that are available year-round, so I used local shitakes. I usually have thyme in my herb garden, but it died back during one of our freezes this winter. I substituted rosemary for it since I always have rosemary growing in multiple spots in our yard. And, last, rather than using Stichelton which is a British-made, raw milk, blue cheese, I used Jasper Hill Farms’ Bayley Hazen Blue which is also a raw milk blue. On little pieces of sourdough baguette, these mushroom toasts are a great appetizer. The mushrooms were sliced and then sauteed in some oil with chopped rosemary (or thyme). They were left to brown a bit before being stirred and turned. When fully cooked, butter was added to the mushrooms with a sprinkling of sea salt. The topping is an easy mix of creme fraiche,  blue cheese, and some rosemary in my case that was combined in the blender. The sauteed mushrooms were spooned onto pieces of toasted bread and topped with the blue cheese creme fraiche. My rosemary still had some flowers clinging to the sprigs which I used as garnish. 

I might have made some extra blue cheese creme fraiche and learned that it also makes a fabulous dipping sauce for roasted potato wedges. But, it was perfect with the mushroom toasts. They were crunchy and savory and a nice start to a meal on one of our chilly days. I’ll be looking back to this book for inspiration as the seasons change and different ingredients are at their best. 

Wild Mushroom with Sourdough Toast and Thyme Stichelton Creme Fraiche 
Recipe reprinted with publisher's permission from The Ethicurean Cookbook (Ebury Press).

Serves 4 

2 tbsp rapeseed oil 
300g mixed wild mushrooms, such as slippery jack, penny bun, russula, horse mushroom, sheep’s foot and puffballs, cleaned and sliced into 1cm strips 
leaves from 4 sprigs of thyme 
25g unsalted butter 
8 very thin slices of sourdough bread 
fine sea salt flaky sea salt 

For the thyme Stichelton creme fraiche: 
25g Stichelton cheese, roughly chopped 
75ml creme fraiche 
leaves from 5 sprigs of thyme 

For the thyme Stichelton creme fraiche, put all the ingredients in a blender or food processor and pulse to a semi- coarse consistency. Season with salt to taste and set aside. 

Place a large frying pan over a high heat and leave until it is very hot. Add the rapeseed oil; it should begin to smoke. Immediately add the mushrooms and thyme leaves, plus a dusting of fine salt, and toss to coat them evenly with the oil. Leave undisturbed for a minute or so, until the mushrooms colour ever so slightly, then toss and colour on the other side. Remove from the heat and add the butter to the pan. Toss until it has melted and the mushrooms are evenly coated, then check the seasoning. 

While the mushrooms are cooking, put the sourdough bread under a hot grill and toast, turning every minute, until both sides are golden brown. Thin slices of bread will curl under the grill, and the regular turning prevents this happening. Remove the sourdough from the grill and add a couple of slices to each plate. Cover with the mushrooms, season with flaky sea salt and add a heaped tablespoon of the Stichelton creme fraiche.

I am a member of the Amazon Affiliate Program.

Blogging tips