Showing posts with label lemon. Show all posts

Tuesday, September 29, 2020

Anchovy Dip

With most cookbooks, there are chapters that just aren’t for me since I don’t eat red meat. I like reading cookbooks all the way through to see what new things I learn, but I don’t end up using the meat recipes unless there’s a sauce that I repurpose with a different protein. It’s a completely different experience when I read a cookbook focused on fish. I received a review copy of Foolproof Fish: Modern Recipes for Everyone, Everywhere from America’s Test Kitchen and quickly fell for this book filled with recipe after recipe that I wanted to try. As is customary with America’s Test Kitchen, you can rest assured that every technique in every recipe has been investigated to arrive at the best procedure for each dish. There are instructions for everything from removing bones and skin to properly flipping delicate fillets in the pan. Each recipe begins with a description of “Why this recipe works.” One of the first recipes in the book, the Miso-Marinated Salmon, caught my eye because the “why it works” description explained how the miso cures the salmon if you marinate it long enough. I also realized that other miso salmon recipes I used in the past never recommended scraping the marinade off the fish before cooking. Right away, I realized what a better approach that is. After enough time marinating, the flavor has been absorbed by the salmon, and the excess ingredients will be too thick for a nicely lacquered finish. And, then I just wanted to make everything as I turned the pages of the book. Baked Halibut with Cherry Tomatoes and Chickpeas and Israeli Couscous with Clams Leeks and Tomatoes are two examples of quick, one-pot meals but there are several. I loved the idea of poaching cod fillets in a Thai-inspired coconut broth with lemongrass and ginger. There’s also a Hot-and-Sour Soup with Shrimp and Rice Vermicelli that sounds delicious. Classics abound like a lobster roll, shrimp po’ boy, gumbo, crab cakes, and clam chowder. I got distracted by the Peruvian Ceviche with Oranges and Radishes but then started cooking from the book by making the Shrimp Burgers topped with classic tartar sauce before I set about making the Anchovy Dip. 

When I announced I was making anchovy dip, Kurt was uncertain. He likes anchovies; he just wasn’t sure that making a dip of them would be a good idea. I, on the other hand, knew it would be good. I had the gall to make a couple of small changes to the recipe despite the testing it had already undergone. The recipe calls for blanched almonds, but I used raw cashews because I had them on hand. And, I skipped the suggested raisins for sweetness. To start, the nuts were boiled until soft, about 20 minutes, and then they were drained and rinsed. The nuts along with anchovies that I had soaked and drained and water, lemon juice, lemon zest, fresh garlic, Dijon mustard, pepper, and a pinch of salt were pureed in a food processor until smooth. To go with the dip, I returned to one of my favorite ways of making chips. I slowly baked thin slices of sweet potatoes and Yukon gold potatoes. 

By pairing the anchovy dip with homemade, baked potato chips, the snack became fish and chips. And, the dip was a smooth, savory delight. It was like bagna cauda made thick with the cashew puree. The anchovies gave it lots of great flavor that wasn’t overpowering at all. Whether you’re looking for the best approach to cook your favorite seafood dishes at home or for something new and different, this book has you covered.

I am a member of the Amazon Affiliate Program. 

Tuesday, November 12, 2019

Rosti with a Green Salad on Top

I’m all for encouraging more people to cook their own meals at home. So, I was delighted to see the newest book from the Canal House team: Cook Something: Recipes to Rely On of which I received a review copy. This book is full of simple, classic dishes that home cooks can learn from and use to build confidence in their cooking skills. Hirsheimer and Hamilton of Canal House describe themselves as “salt and pepper cooks.” They like to stick to the basics of great flavor pairings and highlighting the deliciousness of the season. While there is simplicity to their approach, the results of their recipes are always stellar. Over the years, I’ve accumulated several favorite recipes from Canal House books. I recall in the early days of reading their work, I noticed the frequent use of preserved lemon which I loved. A salmon salad and a lentil dish, both with preserved lemon, come to mind. I remember a lemon-butter sauce that was perfect for sockeye salmon. It was their recipe and technique for making a quick puff pastry that finally sold me on the concept. It’s the only way I make it now. I’m also a devoted fan of their quick cioppino, and it was their lasagne with fresh-made spinach pasta sheets that was one of our favorite Christmas Eve meals of all time. This new book sticks to their tried-and-true cooking point of view with recipes for all sorts of meals, sides, starters, and desserts and even a Grilling chapter that made me want to stock up on hardwood charcoal. Right away, you see their knack for flavor pairings with all the suggested toppings for deviled eggs like asparagus tips and preserved lemon(!); smoked salmon, black pepper, and fresh dill; and sliced cherry tomato, olive oil, pepper, and fresh basil. Likewise, there’s also a delectable list of toppings for small toasts or crackers to serve as appetizers such as roasted red peppers, capers, and currants; blue cheese and watercress mash; and lima bean and lemon mash. I should mention the photos show how deliciously lovely each of these looks. The soups chapter distracted me since we’ve had some chilly weather. I was pulled in by the description of a simple dinner involving the Hearty Squash and Bean Minestrone with a Green Sauce made from arugula served with warm bread and had to recreate it for a Sunday dinner at home. And, it was the photo of the Caramelized Apple Galette that made me try that recipe too. But, it’s the Salads chapter I want to tell you more about today. The Rosti with a Green Salad on Top was an ideal combination of flavors and textures with a lemony-anchovy dressing and a generous garnish of smoked salmon. 

If you just saw the photos of the salads in the book, you would think “those look so great with beautiful ingredients that have been simply plated.” But, when you read about how the salads are made and then look at the photos, the whole story becomes apparent. That straightforward tomato and fennel salad is actually a warm salad with peeled, fresh tomatoes that were briefly sauteed in olive oil just to warm them. The fennel was sauteed longer until tender and topped with lemon-anchovy vinaigrette, and the two were plated with a nice slab of feta. Little details of putting each salad together make each one special. For this salad on rosti, I had some local potatoes that I grated and mixed with chopped green onion and salt and pepper. The grated potato mixture was cooked in melted butter and pressed into flat cakes. Each cake cooked for a few minutes per side. I made the salad with arugula and opted for the Lemon-Anchovy Vinaigrette that’s made with supremed lemon segments. The lemon juice was caught in a bowl while cutting the segments. Chopped anchovies, olive oil, and crushed red pepper flakes were added, and the lemon pieces were broken up while stirring the vinaigrette. The option of adding a “flourish of silky smoked salmon” made this a meal. 


Like every Canal House recipe I’ve ever made, this one was a winner. I get excited to cook as I flip the pages, see the photos, and read the great ideas. I’m not surprised that the variations on Loose Ravioli have inspired me, but I didn’t expect to want to attempt Duck a L’Orange. There’s something for everyone and for every occasion here. 

Rosti with a Green Salad on Top 
Excerpted with publisher's permission from Cook Something: Recipes to Rely On Copyright © 2019 by Christopher Hirsheimer and Melissa Hamilton, photographs by Christopher Hirsheimer. Used with permission of Little, Brown and Company, New York. All rights reserved. 

Rosti is a Swiss potato pancake. A big russet potato on the kitchen counter was our inspiration. 

Grate 1 large, peeled, russet potato (about 1 pound), on the large holes of a box grater into a bowl. Add 4 chopped scallions, and season with salt and pepper. Melt 2 tablespoons butter in a nonstick skillet over medium-high heat. Add the potatoes, pressing them into a flat cake. Fry until golden, about 10 minutes. Cover the skillet with a large plate and flip the skillet and the plate over so that the rösti is cooked-side up on the plate. Add 2 tablespoons butter to the skillet and slide the rösti back into the skillet. Fry until golden, about 10 minutes. While the potato cake finishes browning, toss bibb lettuce, radicchio, and parsley leaves in Another Anchovy Vinaigrette. Divide the rosti between dinner plates and pile the salad on top. Add a flourish of silky smoked salmon for garnish. —serves 2–4 

Lemon-Anchovy Vinaigrette  
A lighter, brighter option for all Caesar salad lovers. This vinaigrette involves supreming the lemon, a French technique (they always know how to refine things) that removes the peel and the pith, then cuts the juicy fruit out from the membranes. This method works well with all citrus fruits. 

makes about 2/3 cup

2 lemons 
4 anchovy filets packed in oil, drained and finely chopped 
1/2 cup extra-virgin olive oil 
1/4 teaspoon crushed red pepper flakes 
Salt and freshly ground black pepper 

Using a sharp knife, cut off and discard all the peel and white pith from the lemons. Working over a medium bowl, cut lemons along sides of membranes to release the segments into the bowl. Squeeze the juice from the membranes into the bowl, and discard the membranes. Stir in the anchovies, oil, and crushed red pepper flakes, breaking up the lemon segments against the side of the bowl with a spoon. Season with salt and pepper to taste.


I am a member of the Amazon Affiliate Program. 

Monday, December 29, 2014

Pezzetti di Cannella

I have to mention one more cookie before the holiday season ends. This was a new one for me. It’s from the book Southern Italian Desserts by Rosetta Costantino. I received this book as a Christmas gift a year ago, and there are delightful cakes, pastries, tarts, gelatos, fruit desserts, and lots of cookies in it. Since I first read the book, I’ve been thinking about the La Deliziosa sandwich cookies filled with hazelnut cream. The cookies are actually made from pastry that’s cut into circles and then sandwiched with a pastry cream with added hazelnut paste. Last, the edges are rolled in finely chopped hazelnuts. They’re delicate and pretty, and they look delicious in the photo in the book. However, I needed to bake some cookies that would ship well and that could be kept at room temperature for several days. That’s how I arrived at the page for these crunchy, little cinnamon cookies. The recipe is from Puglia, and it includes lots of great flavor from cinnamon, cocoa powder, and lemon. It also makes a lot of cookies, but they’re petite, bite-size cookies that could last for weeks in theory. I’m not actually sure how long they could last because between packing and sending some and nibbling the rest, they disappeared in just a few days. 

The dough couldn’t be easier since it’s simply mixed with a fork and then kneaded by hand. Flour, sugar, cocoa powder, cinnamon, and baking powder were combined in a large bowl. A well was made in the center of the dry ingredients, and eggs, vegetable oil, a little milk, and lemon zest were added and mixed with a fork before being kneaded by hand. The dough was then wrapped in plastic wrap and set aside for about 30 minutes. To form the cookies, the dough was first divided into four pieces. Each piece was rolled by hand into a long rope just a little over one half inch wide. The rope was cut on the diagonal into one-inch pieces that were placed on baking sheets and baked for twelve minutes until puffed and firm. A glaze was made with confectioners’ sugar and lemon juice. The cooled cookies were tossed in the glaze and then set on baking sheets to dry. It takes several hours for the glaze to dry completely, and I left the cookies to dry overnight. Once dry, they were ready to be packed and shipped. 

I was intrigued by the combination of cinnamon, cocoa, and lemon, and now I’m so glad to have tried these cookies. Cinnamon takes center stage among the flavors, but the cocoa and lemon don’t go unnoticed. All together, they made these cookies completely addictive. And, since they’re tiny cookies, it’s very easy to keep reaching back for more. Next, I’ll have to circle back to the delicate hazelnut cookies or maybe some classic cannoli for serving right at home. 

I am a member of the Amazon Affiliate Program.

Tuesday, March 11, 2014

Lemon Croquettes with Cilantro Pistou

I love looking at photos of beautifully presented food and learning a chef's interesting techniques no matter how complicated, but beyond all of that, it was an absolute joy to spend time with Daniel Boulud’s latest book. The book is Daniel: My French Cuisine, and I received a review copy. This is a big, heavy, serious-looking book with serious-looking recipes. But, from the beginning on the How to Use this Book page, the reader is put at ease. You’re invited to prepare components of dishes or whole recipes as you wish. There’s no expectation that you’ll jump in and prepare everything in the book just as it’s shown. The book is made up of three sections. The first is a delightful tour of dishes from Restaurant Daniel. The photos are stunning, and all the instructions are right there for you to experiment with as you please. Sprinkled throughout this section, you’ll find bits of the story of Boulud’s career and upbringing in France. The second section is a group of essays written by Bill Buford about iconic French dishes. He spent time in the kitchens at Daniel to learn about some classic preparations that aren’t often mentioned these days. These are mostly grand, dated dishes like Tete de Veau en Tortue and Carnard a la Presse, but the writing is all entertainment. Buford shares the comical moments of learning these dishes along with their histories and how Boulud came to know them. The last section includes four dinner party menus that Boulud prepares at home inspired by different regions of France. The three sections are very different, but together they give you a clear picture of the kind of chef that Daniel Boulud is, the level of quality of what he produces, and his love of food. 

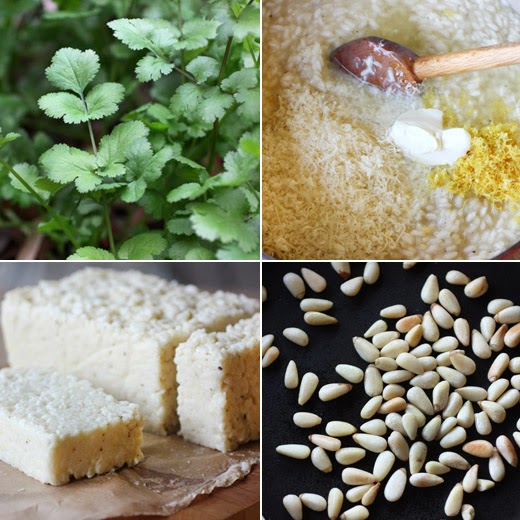
In the restaurant recipes section, there’s a Warm White Asparagus Salad with Poached Egg Dressing dish that looks like spring itself. I might try it with just one of the three accompanying sauces. Then, there’s the Hazelnut-Crusted Maine Sea Scallops with Nettles and Swiss Chard that’s gorgeous with the nettle foam and sauteed morels. And, there are parts of every dessert that I really want to attempt like Sauternes-Rhubarb Ice Cream, Apricot and Lavendar Clafoutis, and Coffee Cremeux and Espresso Ganache. So far, I’ve made two parts of the Striped Bass in a Cilantro-Tapioca Pistou with Artichokes and Lemon Croquettes. In the book, a shallow bowl is shown with the tapioca sauce in the bottom with a pretty mix of chopped artichokes and fava beans centered in the sauce, a piece of striped bass perfectly coated with cilantro pistou sits on the vegetables, and lemon risotto croquettes are perched on top with a tangle of micro cilantro and shaved artichoke slices. The risotto croquettes are perfect, and I do mean perfect, little, crispy cubes. They looked like fun to make. To start, a pretty standard risotto was made with onion cooked in melted butter. Arborio rice was added, and warmed chicken stock was ladled in a little at a time in the usual fashion. When the rice was fully cooked, shredded parmesan, a tablespoon of mascarpone, lemon zest, and lemon juice were added. It was tasted for seasoning and adjusted before the risotto was poured into a parchment-lined 8 1/2-inch by 4 1/2-inch loaf pan and left to chill in the refrigerator overnight. The next day, the risotto was unmolded and cut into one-inch cubes. The cubes were dusted with cornstarch and fried until crispy. The cilantro pistou was easy to make by pureeing lots of cilantro which is filling my herb garden right now with a couple of tablespoons of toasted pine nuts, some olive oil, and salt. 

I served the crispy, lemony croquettes with a dish of cilantro pistou for dunking. The bright, herby sauce was a light and lively contrast to the savory risotto pieces. There’s so much I’ll be turning to this book for in the future. There are plating arrangements to try and copy, flavor combinations to taste, sauces to attempt, and parts and pieces of recipes to use. Right now, I’m looking at one of the desserts from the last section of the book, the Fig Pine Nut and Mascarpone Custard Tart, and I can’t wait for fig season to get here. I’ll be glad to have this book on the shelf when it does. 

I am a member of the Amazon Affiliate Program.

Sunday, January 12, 2014

Lemon-Ginger-Beet Juice

I promise, this isn’t one of those “it’s January and we should be eating nothing but beet juice” kind of posts. Actually, this has nothing to do with January or resolutions. In fact, I’ve been waiting for months to mention this. Ever since reading the book Eating on the Wild Side, I’ve been implementing several of the suggestions from it and trying to eat more of the healthiest foods described. The book looks at the history of several edible plants and how their nutritional value has changed over time. As sweeter or milder versions of fruits and vegetables have been selected over bitter or other less desirable tastes, nutrients have been bred out of those fruits and vegetables. One vegetable that hasn’t changed much, however, is garlic. Garlic, and all alliums, offer all sorts of health benefits, but specifically with garlic, getting those benefits depends on how it’s used. Garlic contains alliin and alliinase which combine to form allicin when garlic is cut, sliced, minced, or smashed. And, allicin is very beneficial to good health. However, alliinase is heat sensitive. So, if cut garlic is heated immediately after being cut, no allicin is formed. If cut garlic is left to sit for ten minutes before being heated, the maximum amount of allicin is created. Then, you can cook it as you normally do. I’ve been reordering my cooking process for every dish that includes garlic. My first step has become slicing, mincing, or chopping the garlic in whatever way needed and letting it sit for at least ten minutes while prepping everything else. Another thing I was delighted to learn from the book is that our modern cultivars of artichokes are very, very nutritious. They’re noted for having a higher antioxidant capacity than all other fruits and vegetables. They’re also high in inulin which promotes good gut microflora. And, the best part of the info about artichokes is that the hearts contain as many antioxidants as the rest of the leaves. The canned or jarred versions have all those nutrients too. I tend to choose ones packed in glass jars to avoid BPA lining in aluminum cans, but it’s great to know those marinated artichoke hearts are so healthy. And, then I read about beets. 

Of course beets are good for you. Everyone knows that. Wild sea beets are similar to Swiss chard, and modern beets with big roots were domesticated from them. Despite the sweetness of beet roots, they have very little impact on blood sugar. The red color in beets comes from betalains which are excellent cancer-fighting phytonutrients. And, beets contain naturally occurring nitrates which can reduce blood pressure thereby increasing blood flow to muscles. The effect has been tested on athletes, and it was discovered that after drinking beet juice, test subjects were able to exercise 15 percent longer than others who didn’t drink it. British athletes drank beet juice rather than other Olympics-approved energy drinks before competing in the 2012 Summer Olympics. I loved learning this. I had kept a beet juice recipe from the September 2012 issue of Food and Wine magazine, and after learning this I couldn’t wait to try it before a run. There’s always a point in the winter when it seems like we’re inundated with beets from our CSA, and this year I was ready and waiting for that to happen. I was ready to juice all the beets we received. So, on a Friday afternoon when I was tired and ready for the week to be over, I set up my juicer and set about making an energy-enhancing beverage. I started with some ginger, a peeled lemon, and then I used several spinach leaves which I had on hand. The original recipe suggests kale. Then, I added a halved and cored apple, and instead of a cucumber, I used a pear. Last, I added a couple of cleaned and trimmed beets to the juicer. 

The color is fabulous as anything with beets always is. And, the flavor is much better than you might think. That’s largely thanks to the lemon and ginger. Really, add lemon and ginger to any vegetable juice, and it will be delicious. But, the vegetal flavors of the beet and spinach do take a backseat here. I went for a run after drinking the beet juice and felt great. I’ll have to test the concept a few more times before I can say with certainty if it really makes a noticeable difference while exercising, but I do know it’s a very healthy and tasty drink that I’m happy to keep testing. 

I am a member of the Amazon Affiliate Program.

Saturday, February 9, 2013

Lemon Ice Cream with Citrus Cornmeal Shortbread Cookies

You know I sometimes go a little crazy with cooking and baking with lemons. I’ve mentioned this before. It just happened again. Just recently, I made a lemon cream sauce for pasta, a few different kinds of lemon cookies, and lemon ice cream all in one weekend. Organic Meyer lemons aren’t always easy to find here but I got lucky one day, so I had a good excuse, right? You see, I do have two Meyer lemon trees, but they’ve had a tough couple of years. From the two trees, I only harvested one useable lemon this year. I blame the squirrels and birds, and well, I should probably keep a closer watch on the trees. So, when I find a good supply of Meyer lemons, I take advantage of it. This ice cream is from The Perfect Scoop, and it’s incredibly easy. Everything is whizzed up in the blender, and there are no eggs and no custard to cook. I love it when a recipe is this simple with a result that’s this delicious. It’s a creamy but tart ice cream that was fun to scoop up with a crunchy shortbread cookie. The cookies are from Martha Stewart's Cookies, and the recipe is also online. Orange zest is suggested for the cookie dough, but obviously, that got replaced with lemon zest here. There’s added flavor and a pretty, pale yellow color from cornmeal both mixed into the dough and rolled onto the edges before the cookies are cut. Together, the ice cream and cookies made a perfectly lemony dessert. 

I wasn’t kidding about how easy this ice cream is to make. You zest two lemons into a blender pitcher and add a half-cup of sugar. Just blend those together until the lemon zest is chopped very fine. Then, add one half-cup of lemon juice. I was using large lemons, so two was enough for one half-cup of juice. Also add two cups of half-and-half and a quarter teaspoon or so of salt. Blend until smooth, and chill for at least an hour before churning in an ice cream maker. The cookie dough is made by creaming together butter and confectioners’ sugar and then adding lemon zest and vanilla extract. Flour, yellow cornmeal, and salt are then added and mixed to combine. The finished dough is divided into two equal parts which are each rolled into a cylinder, wrapped in plastic, and refrigerated for an hour. The logs of dough are then rolled in cornmeal, and I added some sanding sugar as well, and then cookies are sliced and baked for about 30 minutes. 

Of course, other types of citrus could work here, or you could even mix more than one kind. But, once I’m thinking lemon, I tend to have a one-track mind. Right now, my trees are covered in blossoms, making me hopeful for lots of homegrown lemons next winter. I promise to make better use of those lemons than the squirrels or birds would. 


Thursday, January 31, 2013

Homemade Ginger Ale

Do you know the difference between salsify and scorzonera? Actually, I wasn’t even familiar with scorzonera until I read Roots: The Definitive Compendium with more than 225 Recipes by Diane Morgan, but I love learning new things about food. I learned scorzonera, also called black salsify, is very closely botanically related to salsify, and both have long, slender roots with similar flavors while scorzonera is milder. Twenty-eight types of roots are covered in the book with information about where they were originally grown, how they’re eaten, and their nutritional profile. And, following this information for each root, there are recipes. As I started reading the book, I was immediately fascinated by the Red Velvet Cupcakes with Orange Buttercream which are made with pureed beets and no food coloring. I made them in a rush and barely got just a quick photo to post on Instagram before taking them to a party where they disappeared in record time. Then while reading about galangal, I learned that “kha” in Tom Kha Gai is galangal in Thai. I never knew that, and I can’t wait to make this version of the soup. There are pretty dishes to make with cross-sectional cuts of lotus root, and a Three-Layer Parsnip Cake with Cream Cheese Frosting which would be a lot like a carrot cake. There’s also a Composed Jicama, Avocado, and Grapefruit Salad with Cilantro Drizzle that would be perfect for in-season avocados and grapefruit right now. And, of course, there are several dishes for that most popular of all roots, the potato. I can tell this book and I will be spending a lot of time together. In the Ginger chapter, you can learn to make your own Sushi-Style Pickled Ginger, a Brown Sugar-Ginger Ice Cream, and Candied Young Ginger. But first, I had to try the Homemade Ginger Ale. 

To start, you need to peel and grate enough ginger fill one-half cup. The grated ginger is then combined with brown sugar and water in a saucepan, and the mixture is brought to a boil and then simmered to dissolve the sugar. It’s then removed from the heat and allowed to steep and cool for about half an hour. Once cool, the syrup is strained through a sieve and chilled in the refrigerator. To complete the ginger ale, the syrup is mixed with club soda, lime juice, and lemon juice. 

Homemade soda is the best since you can control the level of sweetness. This ginger ale has good, spicy flavor with nice brightness from the lemon and lime. Naturally, I added rum to mine, but you knew I’d say that, didn’t you? Now, I want to go try a few things from the Sweet Potato chapter and then start asking around to find out if anyone is growing burdock root locally.

Homemade Ginger Ale 

Recipe reprinted with publisher's permission from Roots: The Definitive Compendium with more than 225 Recipes

Who knew it could be so simple to make ginger ale at home? Here’s an all-natural version, blissfully free of high-fructose corn syrup and preservatives. When I compared this homemade ginger ale to a national brand, it proved unrivaled in spicy, aromatic ginger flavor. Although the ginger syrup recipe makes enough for just four servings, it is easily doubled. Store the remainder in the refrigerator to use whenever you crave a tall, sparkling glass of refreshing ginger ale. 

Makes 1 Cup/240 ML Ginger syrup; Enough for 4 Drinks 

Ginger Syrup
1/2 cup/55 g grated fresh ginger 
1 cup/200 g firmly packed light brown sugar 
1 cup/240 ml water 

Ice cubes 
4 cups/960 ml club soda 
1/4 cup/60 ml fresh lime juice 
1 tbsp plus 1 tsp fresh lemon juice 
4 lime wedges 

1. To make the ginger syrup, in a small saucepan, combine the ginger, brown sugar, and water and bring to a boil over high heat, stirring constantly until the sugar dissolves. Reduce the heat and simmer for 5 minutes to completely dissolve the sugar and infuse the syrup. Remove from the heat and let the ginger steep in the syrup until cool, about 30 minutes. Strain the syrup through a fine-mesh sieve placed over a container with a tight-fitting lid and then cover and refrigerate until well chilled. (The syrup will keep in the refrigerator for up to 2 weeks.) 

2. Fill four 16-oz/480-ml glasses two-thirds full of ice. Pour ¼ cup/60 ml of the syrup, 1 cup/240 ml of the club soda, 1 tbsp of the lime juice, and 1 tsp of the lemon juice into each glass and stir to combine. Garnish each glass with a lime wedge and serve immediately.

I am a member of the Amazon Affiliate Program.

Thursday, September 6, 2012

Almond Rosemary Cake with Lemon and Creme Fraiche Glaze

“Rustic” is such a handy word when it comes to describing food. My homemade sourdough baguettes are always “rustic” which means I’m sloppy about shaping the loaves, and when my pastry doesn’t turn out as perfectly as it could, all is well if the word “rustic” is added to its title. However, there are times when “rustic” isn’t a euphemism for messy. Sometimes, a thing is “rustic” because it’s simple, charming, or well-textured. This almond cake is that kind of rustic. When I saw it in the June issue of Food and Wine, it went directly into my to-try stack of recipes. I have a not-so-successful history with almond cakes, so I headed into this recipe with a little concern. In the past, almond cakes I’ve made have been dense, dry, and dull. Thankfully, there were a few tricks to making this cake that prevented all of that. The cake batter is made with polenta and minced rosemary which added interest in both the flavor and texture departments. Also, the eggs were whipped with sugar to a fluffy state, and folding the mixture into the dry ingredients lightened the batter. One last trick was the use of a sugar and lemon syrup that was poured over the warm cake and prevented it from becoming dry.

Let me run through the details and the minor changes I made the original recipe. Skin-on, raw almonds were toasted, chopped, and ground in a food processor. I added some of the sugar to the almonds in the food processor to prevent them from forming a paste. The dry ingredients were combined, and I always sieve dry ingredients. I used whole wheat pastry flour instead of all-purpose, and polenta, baking powder, and salt were also included. After sieving those, I added the ground almonds, minced rosemary, and lemon zest. In a stand mixer, the eggs were mixed with the remaining sugar using the whisk attachment for about ten minutes until tripled in volume. Then, creme fraiche and cooled, melted butter were added. The egg mixture was folded into the dry ingredients in three additions. For baking, an eleven-inch springform pan is suggested, but I used a ten-inch pan. The cake baked for 25 minutes while the syrup was made. Sugar, water, and lemon juice were boiled and reduced for five minutes, and then I added a sprig of rosemary to steep in the syrup as it cooled. When the hot cake was removed from the oven, the syrup, minus the rosemary sprig, was poured over the top, and it was left to cool completely. Once cool, it was glazed with a mix of confectioners’ sugar, creme fraiche, and lemon juice and topped with pieces of rosemary.

I finally got over my losing streak with almond cakes. This is in no way light and fluffy like a chiffon, but it definitely wasn’t as dense as other almond cakes I’ve attempted. The sugar syrup worked like a charm in warding off a dry texture too. Next time, I might add a bit more minced rosemary to the batter since its flavor was very subtle, and those extra flecks of green will just make the cake even more “rustic” in a very good way.


Sunday, July 22, 2012

Sour Lemon Scones

I might have a lemon problem. I just finished telling you about a lemon-butter sauce, and now I’m on to lemon scones. Yesterday, I made lemon gelato. I’ve been adding lemon to cold tomato soup, putting preserved lemon in all kinds of salads, and lemongrass keeps appearing in dishes I’m making lately. Guess what flavor my birthday cake was earlier this year? So, I like lemon and so does Kurt, and we both like scones as much as we like lemon. Given that track record, it’s hard to believe I hadn’t tried this recipe sooner. I picked up the Baked book the other day, looking for something interesting for weekend breakfasts, and there I found Sour Lemon Scones. If my lemon problem initially sounded crazy, then it’s about to get worse. You see, there’s an optional ingredient in these scones. Yes, I said optional. As an option, if you so choose, you could add chopped candied lemon peel to the scone dough. My first thought was that I’d call a few local stores, ask if they have candied lemon peel since I never see it when I’m shopping, and if I located it, I’d use it. If not, it was optional. After hearing multiple times that it’s not available because it’s only stocked during the holiday season, that word “optional” started getting blurry. I became convinced that it was absolutely necessary that I try these scones with the candied lemon peel included. I bought some organic lemons, peeled them, and made my own candied lemon peel. This could definitely be a lemon problem.

It’s not entirely my fault for going out of my way to make candied lemon peel. The recipe for making it is right there in the book. To quote the scones ingredient list: “1/2 cup diced candied lemon peel, optional (recipe follows)” I had to make it. I did only make enough for the scones though. I peeled a couple of lemons, and I always use organic when I’m using the peel or zest. The peels were placed in a saucepan with cold water, brought to a boil, and drained. This was repeated two more times to remove some of the bitterness. Then, the drained peels were placed in a saucepan with two cups of water and a cup of sugar, and I left it to simmer for almost an hour and then turned off the heat. The peels were left in the sugar syrup until cool enough to handle, and then they were cut into strips and returned to the syrup. You can store the strips in the syrup in the refrigerator for a few days, or after a few hours, you can removed the strips from the syrup, roll them in sugar, and leave them on a cooling rack to dry. I left them to dry overnight and made the scones the next day. The scone dough was a mix of flour, sugar, baking powder, baking soda, salt, powdered ginger, butter, egg, buttermilk, and lemon zest. I used a mix of all-purpose flour and whole wheat pastry flour. After the butter was cut into the dry ingredients and the egg, buttermilk, and lemon zest were added, the chopped candied lemon peel was folded into the dough. Just before baking, the scones were brushed with buttermilk and sprinkled with turbinado sugar. And, when they were baked and cooled, I couldn’t resist drizzling them with a lemon and confectioners’ sugar glaze.

It’s possible that my brain was too busy thinking lemon, lemon, lemon, but I really barely noticed the ginger. I’m wondering if grating a little fresh ginger into the dough would be interesting next time. But mostly, I’m thinking about how deliciously lemony they were, and I’m delighted there are still a few in the freezer for another day.

I am a member of the Amazon Affiliate Program.

Wednesday, July 18, 2012

Wild Sockeye Salmon with Lemon-Butter Sauce

With salmon as fresh and lovely as this was, I was inclined to cook it as simply as possible. But, I still wanted to dress it up at least a little. This beautiful sockeye salmon was a second shipment I received from the Copper River/Prince William Sound Marketing Association. You can find more info about Copper River salmon, recipes, and a salmon locator on their Facebook page. Right before this salmon arrived, I had been flipping through Canal House Cooking Volume No. 4, of which I received a review copy, and the Lemon-Butter Sauce from it was something I couldn't wait to try. Hamilton and Hirsheimer refer to the sauce as "similar to hollandaise but better—fresher tasting, not so cloyingly thick." They learned this sauce from Darina Allen at Ballymaloe where she made it with Kerrygold butter which is what I used as well. It has the same ingredients as a classic hollandaise but only two egg yolks rather than three or four. Like hollandaise, the sauce is whisked together over low heat, and lots of butter is added one piece at a time. Still, it has a lighter texture than hollandaise, and the lemon flavor is front and center. It's a fantastic sauce for salmon. 

Here, the salmon was plainly poached in salted water. You'll want to check the doneness from time to time as it poaches. I portioned the salmon into pieces before poaching, and for me, the total cooking time was just under ten minutes. You'll need to cook the salmon first and let it sit for a few minutes while making the sauce, or make the sauce and keep it warm while the salmon poaches. Both steps are so quick, you can't really do them at the same time. For the sauce, two egg yolks and a tablespoon of water were whisked in a medium saucepan over low heat. Then, eight tablespoons of butter were added, one tablespoon at a time, while whisking constantly. Each bit of butter should melt completely into the sauce before adding the next. You want to be sure the sauce isn't cooking too quickly, and you can take the pan off the heat from time to time while whisking. When all of the butter has been added to the sauce, you should remove the pan from the heat and whisk in a tablespoon of lemon juice. Then, taste and season as needed. The sauce can be kept warm by placing the saucepan in a larger pan or heat-proof bowl of hot water. The salmon was served topped with sauce and chopped chives and tarragon or Mexican mint marigold leaves which is what grows easily here. 

It's such a simple, lemony, just-rich-enough sauce, I'll be making it often. And, I loved that the instructions for making it were so straightforward. It's as easy to make as it is delicious. And, even though the salmon didn't really require any embellishment, this made it even better. 

A couple of other recipes grabbed my attention in this volume of Canal House Cooking. There's a Salmon Salad and a Halibut Salad, and I really liked things about both. I flaked the leftover poached salmon, and made a salad that combined the two. First, I added finely chopped preserved lemon and chives suggested for the Salmon Salad, and then I added the green onions, celery, parsley, and mayonnaise from the Halibut Salad. I served the result as tartines with mixed salad greens. Lemon punctuated both the sauce and the salad, but the fresh, wild sockeye salmon was the star of both dishes. 


Monday, April 9, 2012

Lemon and Goat's Cheese Ravioli

I remember the day Wednesday June 2, 2010 like it was yesterday. Ok, that might be stretching the truth, but I do remember the day the video of Yotam Ottolenghi making this ravioli was posted on the The Guardian site. I just looked it up, and that day was June 2, 2010. I remember watching that video and thinking that I couldn't wait to make this. It was a few months later when I acquired a copy of the book Plenty, where the recipe also appears, and then I couldn't wait to make everything else in the book too. In the video, Ottolenghi calls the ravioli "little sunshines on the plate." And, they are. The lemony pasta with zest mixed into the dough, the fresh and tangy goat cheese filling, and the pop of pink and mildly spicy flavor from the peppercorns make the ravioli bright and springy. As I always say, making fresh pasta is one of my favorite kitchen tasks, and this time was no different.

Since making pasta is one of my favorite things, of course, I have my preferred way of doing it. I never used a food processor, and I never make a well out of a pile of flour on a work surface. I put the flour in a bowl, make a hole in the center, add the eggs, and mix with a fork. That way, I don't have egg running all over my counter, but I can feel the dough and decide if it needs more flour or not. For this pasta, the dry ingredients included flour, a little turmeric for added yellow in the dough, and lemon zest. Three whole eggs were added with three tablespoons of olive oil. The dough came together nicely, and it was divided into four pieces, each piece was flattened into a disk, wrapped in plastic wrap, and chilled for 30 minutes. Meanwhile, the filling was made by mixing together soft goat cheese, some sea salt, crushed red chile flakes, and black pepper. After the pasta dough had rested, one piece at a time was passed through a pasta machine several times while setting the rollers closer together after each pass. To streamline the process of filling and cutting the ravioli, I left half of each long piece of pasta dough intact. That half was brushed with egg wash and topped with dollops of goat cheese filling. The other half of each sheet was cut into circles about three inches wide. The circles were set over each dollop of filling, and then the cutter was used to separate each piece. Once cut, the edges of each were pinched to seal. You can cook the ravioli right away or cover and refrigerate them overnight. After boiling for a brief couple of minutes and draining, the ravioli were topped with crushed pink peppercorns, chopped parsley rather than tarragon in my case, more lemon zest and lemon juice, and some olive oil.

Each part of this dish is simple but just right. Pasta is plain by nature, but here it gets a boost from lemon zest. The filling was just a few ingredients added to goat cheese, and the toppings couldn't have been easier to add to each plate. But, all those simple parts resulted in something as fabulous as I knew it would be when I first saw the video.


Thursday, December 15, 2011

Lemon Wreath Cookies

I don’t know what your calendar looks like, but on mine instead of "December," it reads "Cookie Month." With parties, a cookie exchange, and several family birthdays, I get to try as many cookie recipes as I want all month long. I’ve been marking pages of holiday cookie recipes since November or pre-cookie month. So, this is the first of a few cookies you’ll be seeing here in the coming days. These delightful, little lemon cookies appeared in the December 2009 issue of Living magazine, and they showed up again in the special issue Holiday Cookies publication last year. I baked these for my sister-in-law for her birthday, but it was a selfish choice. These are very much like my favorite, little ring-shaped cookies that I always bring home from Mandola’s which is a nearby Italian restaurant and market. When I buy them there, they’re called anginetti cookies, but they’re also sometimes called ciambelle. They’re a little crunchy but mostly tender, they last well for days, and the bright, lemon flavor is in both the cookie and the glaze. The cookies I buy from Mandola’s don’t have sprinkles on them, but the magazine version did. I think it dresses them up nicely.

To start, these follow standard cookie procedure. Flour, baking powder, and salt were sifted together into a bowl. Lemon zest and sugar were combined, and that mixture was added to butter and creamed until fluffy. Eggs were added followed by vanilla extract and lemon juice, and then the flour mixture was slowly added while mixing. To form the cookies, one tablespoon of dough at a time was rolled into a short, four-inch rope. The rope was shaped into a ring and placed on a baking sheet, and that was repeated until all the dough was used. The cookies were baked and cooled, and then the lemon glaze was made from confectioners’ sugar and lemon juice. The top side of each cookie was dipped into the glaze, and they were topped with sprinkles.

Once the glaze is dry, these cookies store very well, or they would have if I could’ve stopped eating them. These could easily become a regular player in my annual Cookie Month, but from now on, I’ll also be baking them throughout the year.


Blogging tips