Showing posts with label cilantro. Show all posts

Thursday, June 6, 2019

Aloo (Potato) Parathas with Cilantro Chutney

I had a little cookbook fling recently. I started cooking from Indian-ish: Recipes and Antics from a Modern American Family and couldn’t stop. I blame it on the cilantro chutney. I made a batch and got hooked on it. I wanted to pour it on everything at every meal. My only regret is that this happened just as my garden cilantro stopped producing in the heat of spring. This new book is from Priya Krishna, and I received a review copy. It’s a collection of her mother’s recipes that are mostly traditional Indian dishes recreated with other culinary influences here and there. There are roti pizzas, a tomato rice dish with cheddar cheese, and feta used in place of paneer. It’s Indian food the way the Krishna family came to make it in their home in Dallas, Texas. The dishes are mostly vegetarian with one short chapter that involves chicken and fish. And, let me just walk you through what I’ve already tried from the book. The Lima Bean and Basil Dip is a tasty and easy snack that’s perfect for cucumber slices or crackers or flatbread. Next, I had to try the Spinach and Feta Cooked like Saag Paneer. I used a mix of spinach and kale, and a mix of tofu and feta. The use of feta was inspired by a Krishna family trip to Greece, and it is a delicious twist. I’ll be returning to this recipe often. A few days later, I made the one and only chicken recipe in the book: Garlic-Ginger Chicken with Cilantro and Mint. The chicken was marinated in a lovely mix of garlic, ginger, mint, cilantro, oil, and lemon juice along with coriander, turmeric, red chile powder, and amchur. After cooking the chicken, I used it in roti tacos, as suggested in the book, with an avocado and tomato kachumber, or salad, and amazing cilantro chutney. This was how I became dependent on cilantro chutney. I even got inspired to make homemade roti although that recipe isn’t in the book. I just really enjoy making various flatbreads. The flavorful, marinated chicken with the fresh avocado salad and bright and spicy cilantro chutney became an ideal way to fill a roti taco. In fact, Kurt requested we have that meal every Sunday night. I should point out there are several Kachumber recipes in the book like Beet and Avocado Kachumber, Daikon Radish Kachumber, and Avocado Corn and Tomato Kachumber. I adapted the latter since I didn’t have corn on hand that day. The leftover roti I made became Roti Pizzas inspired by the book. I used different toppings than the ones listed, but loved the idea and the result. There are also several pages I’ve marked for more things I haven’t cooked just yet. Because I do so enjoy making flatbreads, the next recipe I tried was the Aloo (Potato) Parathas with, of course, more cilantro chutney. 

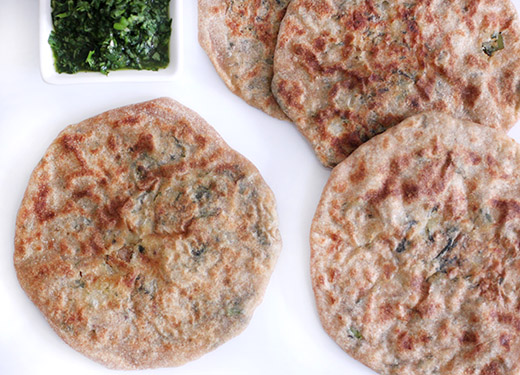
I was torn between making the Pesarattu (Lentil Pancakes) and the Aloo Parathas but decided on the Parathas since new potatoes had just come into season here. I brought some home from Boggy Creek Farm. The first step is to cook the potatoes and peel them once cooled. Next, the dough was made with whole wheat flour, water, a little oil, and salt. The dough was mixed and left to rest in the refrigerator. To make the filling, the peeled potatoes were mashed with red chile powder, crushed fennel seeds, clilantro, and salt, and I added cooked and chopped kale. There’s a tip in the head note about adding cheddar cheese, and that inspired me to make a different addition. I do add kale to everything. The filling was mixed until no lumps remained. The dough and filling were each divided into equal portions and rolled into balls. Working with one portion at a time, the dough was rolled into a round, and a potato filling ball was placed on top before pinching the dough up and around the ball of filling. The sealed dough pouch was turned over and then rolled out into a round. The formed parathas were cooked on a hot griddle with just a brushing of oil for a few minutes per side. 


The crispy edges gave way to tender centers, and I loaded so much cilantro chutney on each bite it spilled as I ate. It couldn’t be helped at that point of my addiction to the stuff. They were as fun to make as to eat, but I could say that about everything I’ve tried from the book. With these recipes and the suggestions for ways to combine and use them, this cookbook fling could go on a while. 

Aloo (Potato) Parathas
Excerpted from Indian-ish: Recipes and Antics from a Modern American Family © 2019 by Priya Krishna with Ritu Krishna. Photography © 2019 by Mackenzie Kelley. Reproduced by permission of Houghton Mifflin Harcourt. All rights reserved. 

Makes 4 parathas 

When I go back home to Dallas, my priorities are usually something like the following: Get eyebrows threaded, go to the Galleria mall with mom, and eat aloo parathas at my aunt Rachna’s house. I typically text Rachna, who is one of my mom’s sisters-in-law, the minute I land at DFW airport, and we set a date for me to come over and eat aloo parathas while we gossip about her son Ruchir’s love life. Aloo parathas are a simple dish—just bread filled with potatoes and spices. But the beauty of Rachna’s aloo parathas is the ratio. You know how people always complain that crab cakes have too much breading and not enough crab? This is also a common complaint about aloo parathas: too much dough, too little potato. Rachna’s version, however, is about 80 percent potato, 20 percent dough—the ideal proportions for ensuring a soft, satiny paratha. There are a lot of steps, but don’t be intimidated! If you can operate a rolling pin, you can make paratha. And when serving these, our family doesn’t abide by any kind of formalities—as soon as one is ready, someone claims it so it can be eaten while piping hot, with Cilantro Chutney or whatever condiment (achar, raita, etc.) happens to be around that day. 

TIP: Want to give your aloo paratha a little twist? Add 1/4 cup grated cheddar cheese to the potatoes in step 2. 

For the dough 
1 cup whole wheat flour, plus more for dusting 
1/2 cup room-temperature water 
1/4 teaspoon vegetable oil 
1/4 teaspoon kosher salt 
For the filling 
2 medium russet potatoes, boiled, cooled, and peeled 
1/4 teaspoon red chile powder 
3/4 teaspoon fennel seeds, crushed into a powder (this is easiest in a mortar and pestle) 
2 tablespoons chopped fresh cilantro (stems and leaves) 
1/2 teaspoon kosher salt 
1/4 cup vegetable oil, for basting the paratha (set aside in a small bowl for easy access) 

1. MAKE THE DOUGH: In a medium bowl, mix all the dough ingredients together and knead the dough with your hands until it is smooth and well incorporated. The dough should be soft, slightly sticky, and not too wet. Wrap the dough in plastic wrap and refrigerate for 20 minutes. 
2.WHILE THE DOUGH IS RESTING, MAKE THE FILLING: In another medium bowl, using your hands ora potato masher, mash the potatoes, then use a wooden spoon or spatula to fold in the red chile powder, fennel, cilantro, and salt. Aim for the consistency of smooth mashed potatoes. (If the potatoes aren’t smooth enough, the dough will be hard to roll.) Use a fork to get rid of any lumps. 
3.Divide the dough and mashed potatoes into 4 equal portions (as in, 4 portions of dough and 4 portions of potatoes) and roll each portion into a ball. 
4. Generously sprinkle a clean work surface with flour. Lightly coat each dough ball with flour, then use a rolling pin to roll out each ball into a 6-inch circle, rotating the dough as you roll to maintain the circular shape, and adding more flour to your work surface as needed to prevent sticking. 
5.Working one at a time, place a potato ball in the center of a dough circle, then pull the edges of the doughover the top of the ball, like you would enclose a parcel, and pinch together to seal. Make sure the potato filling is nicely sealed in or it will spill out during the next step. 
6. Flip the dough-potato ball over so the seal is on the bottom and use a rolling pin to roll it out into an 8-inch circle. Repeat filling and rolling until you have four 8-inch rounds. 
7.COOK THE PARATHA: Warm a medium skillet over medium-high heat. Once the skillet is thoroughly heated, carefully place a paratha in the pan. Cook for 2 minutes, until the underside starts to brown and blister, then flip. Add 1 1/2 teaspoons of the oil to the surface of the paratha and spread it around with a spoon. Cook for 2 minutes, until the other side is starting to brown and blister, then flip the paratha again. Add 1 1/2 teaspoons of the oil to the top of the paratha, spread it around, and cook until the underside is golden brown with dark brown spots, about 1 minute, then flip again. Cook the other side until golden brown with dark brown spots, no more than 1 minute. Transfer the paratha to a plate. Repeat to cook the remaining parathas. If there is residual flour in the pan, make sure to wipe it out before adding the next paratha. 

Cilantro Chutney 
Makes 1/2 cup (can easily be multiplied) 

Cilantro chutney is the king of chutneys. Why? Because it goes with any and all Indian food: samosas, dal roti, any kind of chaat (the Indian genre of snacks)...you name it. During the photo shoot for this book, my mom churned out literal buckets of the stuff every single day because (1) it’s delicious, (2) it’s photogenic, and (3) we drizzle it on everything. I love this simple, OG recipe from my mom because it retains the pleasant grassiness from the cilantro and has a creeping, lingering heat (though you can nix the chiles if creeping heat is not your thing). There are also many ways to customize it—add mint for fresher notes, or nuts for richness. Use it as a salsa, a sauce for grilled chicken, or a topping for Roti Pizza. 

1 bunch fresh cilantro, preferably organic, stems and leaves roughly chopped (about 4 cups) 
1 small Indian green chile or serrano chile, roughly chopped 
2 tablespoons fresh lime juice (from about 1 lime), plus more if needed 
1/4 teaspoon granulated sugar 
1/4 teaspoon kosher salt, plus more if needed 

1. In a blender, combine all the ingredients and blend until smooth. If the mixture is too thick to blend, add a few drops of water to get it going. Taste and adjust the salt and/or lime juice, if needed. This chutney keeps, refrigerated in an airtight container, for up to 2 days.

I am a member of the Amazon Affiliate Program. 

Saturday, April 14, 2018

Udon Noodles with Snow Peas and West African Peanut Sauce

It’s always so interesting to learn how cuisines have been influenced by different cultures and distant places. Cross-cultural effects on food is the focus of Between Harlem and Heaven: Afro-Asian-American Cooking for Big Nights, Weeknights, and Every Day of which I received a review copy. These recipes are from two Harlem restaurants where Alexander Smalls and JJ Johnson created menus with an Afro-Asian-American flavor profile. Because of forced migration, peoples of Africa brought seeds and farming and cooking techniques to many parts of the world. This book explains culinary connections between faraway places such as the mix of cumin, coriander, and pink peppercorns from Ghana that was taken to Puerto Rico and then to the US. And, there’s Roti flatbread found in Trinidad, Suriname, South Africa, Singapore, Sri Lanka, and Malaysia. The book also offers a very modern collection of recipes with bold, fabulous flavors and lots of dishes I want to taste. For instance, the Roti with Black-Eyed Pea Hummus, Eggplant Puree, and Carrot Curry Puree would be a flavorful and colorful snack platter with cocktails. I have to quote a statement about collard greens that I particularly enjoyed: “’Are Collard Greens the New Kale?’ No. Collards have worked harder than kale ever will. Collards are out there digging ditches and roofing houses while kale goes to spin class and leaves early for brunch.” Love that. And, the recipe for Collard Green Salad with Coconut Dressing made with ginger, lime juice, and chipotles sounds fantastic. Another collard greens recipe I want to try is the Collard Green Salsa Verde served with Salt-Crusted Salmon. A perfect example of a melting pot type of dish is the Afro-Asian-American Gumbo. The roux is made with dried shrimp which is also done in Senegal, okra was of course first grown in Africa and brought to North America by slaves, and the rice is added in a South Carolina style. I got completely distracted by the recipe for Tofu Gnocchi with Black Garlic Crema and Scallions since I’d never before encountered tofu gnocchi. The Beer-Battered Long Beans also got my attention. And, the Cocktails chapter continued the book's excitement with a West African Peanut Punch made with a smooth puree of peanuts, bourbon, and chile honey. My first trip to the kitchen with this book was to try the Udon Noodles and West African Peanut Sauce. The inspiration for this dish came from a mix of African and Japanese populations in Brazil. 

In the book, the dish is made with edamame. I couldn’t help making a local and seasonal adjustment. I had just brought home snow peas from Boggy Creek Farm and opted to use them here instead of edamame. This dish is all about the sauce, and this Mother Africa Peanut Sauce begins with a mirepoix and then some. First, cumin seeds were toasted in olive oil. Then, diced onion, carrots, tomatoes, celery, garlic, bay leaf, cilantro, bird’s eye chile, salt, and lemon juice were added. Next, tomato paste and peanut butter were added followed by vegetable stock. The sauce was stirred well and left to simmer for about 45 minutes. The bay leaf was removed before the sauce was pureed with an immersion blender. For the noodles, carrots were julienned and stir fried before being added to cooked udon along with chopped green onion and snow peas in my case, cilantro, Thai Basil, and the peanut sauce. 

There’s a lot of history that accounts for the combinations of flavors in these dishes, but the recipes are fresh and contemporary. There are big flavors, lots of spices and bright herbs, and a generous use of vegetables throughout the book. It’s going to be fun to continue tasting my way through the pages.

Udon Noodles with Edamame and West African Peanut Sauce 
Excerpted from Between Harlem and Heaven: Afro-Asian-American Cooking for Big Nights, Weeknights, and Every Day by JJ Johnson and Alexander Smalls. Copyright © 2018 by JJ Johnson and Alexander Smalls. Reprinted with permission from Flatiron Books. All rights reserved. Photography by Beatriz da Costa. 

In Brazil, there is an African population and a Japanese population that live really close together, and both grew up on udon West African peanut sauce is the mother sauce: peanut butter, tomato paste, tomatoes, French mirepoix, and our special mirepoix In the end it’s like a pad thai with more frequent flyer mileage in its account. There’s nothing like eating noodles and pasta when the sauce is really right. West African peanut sauce provides the perfect creamy coating for the Japanese udon noodles. 

6 to 8 servings 
1 tablespoon olive oil 
1 cup julienned carrot 
1/2 cup thinly sliced onion 
2 cups Mother Africa Peanut Sauce, warmed 
kosher salt for pasta water 
1 pound udon noodles 
1 cup shelled edamame, boiled in salted water for 5 minutes 
1/2 cup cilantro leaves 
1/2 cup Thai basil leaves 

Heat the oil in a wok over medium heat. Stir fry the carrot and the onion for 1 minute. Add the peanut sauce and stir to coat. In an 8-quart pot, bring water to a boil, salt it, and cook the noodles according to the package directions. Drain and add the noodles directly to the peanut sauce mixture, tossing to coat. Plate the noodles and top with edamame, cilantro, and Thai basil leaves. 

The Mother Africa Sauce 
Makes about 4 cups 

1 tablespoon olive oil 
1/2 teaspoon cumin seeds 
1/2 white onion, diced 
1/2 cup coarsely chopped carrots (1 medium carrot) 
1 plum tomato, chopped 
1/4 cup finely diced celery (1 rib) 
1 clove garlic, minced (1 teaspoon) 
1 bay leaf 
1/4 cup chopped fresh cilantro 
1 bird’s-eye chile, seeded and minced (1 teaspoon) 
1 teaspoon kosher salt, plus more to taste 
2 tablespoons fresh lemon juice (from 1 lemon) 
2 tablespoons tomato paste 
1 cup unsweetened, creamy peanut butter 
4 cups vegetable stock 

Heat the oil in a 4-quart pot over medium heat, add the cumin, and fry for 1 minute, stirring constantly. The cumin will become very aromatic and a few shades darker. Add the onion, carrots, tomato, celery, garlic, bay leaf, cilantro, chile, salt, and lemon juice, stirring to coat the vegetables in the toasted cumin oil. SautĆ© until the vegetables soften, about 5 minutes. Stir in the tomato paste and cook for 2 minutes. Once the tomato paste is incorporated, add the peanut butter, working it into the vegetables with a little stock, if needed. Cook until the oil separates from the peanut butter, about 5 minutes. Add the stock and stir, making sure to bring up all of the tomato paste and peanut butter from the bottom of the pot so it is well blended. Increase the heat to medium high to bring the sauce to a simmer. Cook, stirring, for 45 minutes. Remove the bay leaf. Using an immersion blender, puree the sauce in the pot until smooth. Season with salt to taste. 

I am a member of the Amazon Affiliate Program. 

Wednesday, May 18, 2016

Ground Chicken Kebabs

Did you see the film The Hundred Foot Journey? Do you remember the omelet-making scene? That omelet was the creation of Floyd Cardoz who was the consulting chef on the film. It’s also found in his new book, Flavorwalla, of which I received a review copy. In the book, he explains that a walla in India is someone who sells something specific or is particularly knowledgeable about a topic. A paowalla is someone who sells bread. Floyd Cardoz is the flavorwalla because he has “made his mark as a creator of bold, exciting food with balanced layers of flavors and textures that play off each other.” The recipes reflect his varied style of cooking with a mix of cultural influences. There are Mexican, Thai, Moroccan, and Portuguese influences in the dishes as well as Indian flavors. The common thread is the use of spices, herbs, and aromatic ingredients to punch up the results. There’s a Spiced Chicken Soup with Chickpea Noodles that sounds like it’s guaranteed to lift you from feeling under the weather. It’s made with cinnamon, cloves, cumin, scallions, ginger, fresh chiles, and homemade noodles with chickpea flour. I was intrigued by the Yellow Lentil “Dal” enriched with whisked eggs stirred in at the end. And, the Stewed Chicken with Fresh Tomatoes with chipotle, ginger, turmeric, and tamarind paste sounds great for late summer tomatoes. There are other egg dishes in addition to the omelet like Oven-Baked Eggs with Poblanos and Fingerling Potatoes and Coddled Eggs with Crab, Grits, and Leeks. There are quick meals for weeknights and dishes that are perfect for parties, and there are a few cocktails as well like the Tamarind Margarita. I fired up the grill for the Ground Chicken Kebabs because of the big flavors from ginger, garlic, mint, and serrano, and they were great served with the fresh, zesty Romaine Salad with Lime and Thai Chile. 

Cardoz explains that in many places in the world “kebab” is anything grilled whether it’s a cut of meat or piece of sausage or something formed into a patty. It doesn’t always involve food on a stick. And so, these patties were not skewered, just grilled as is. Two cloves of garlic, an inch of ginger peeled and cut into coins, and half a serrano chile chopped were combined in a food processor and finely chopped. Two tablespoons of cilantro and two more of mint leaves were added and finely chopped. A half cup of finely chopped onion was added to the mixture along with salt, pepper, and a half teaspoon of Garam Masala. The mixture was worked into a pound of ground chicken by hand. Lately, I’ve been buying humanely-raised, pastured chicken from Smith and Smith Farm at the farmers’ market and have been completely avoiding industrially-raised chicken. Direct from the farm, they sell whole chickens, pieces, and even boneless breasts and packs of ground chicken. So, once mixed, the chicken was formed into small patties that were refrigerated while the grill was being prepped. I brushed each side of the patties with vegetable oil and seasoned them with salt and pepper before placing them on the grill. They only need about three minutes per side depending on the heat of the grill. The dressing for the salad was made with canola oil, lime juice, fish sauce, minced ginger, and a minced Thai chile. It was tossed with chopped romaine, sliced radishes, cilantro leaves, and mint leaves. I served the kebabs with lime wedges and the salad on the side. 

The simplicity of little, grilled patties made the brightness of flavors even more unexpected. The squirt of lime on each kebab brought out the herbs, ginger, and chile within. A bite of kebab with a bite of fresh, crisp salad made an ideal mix. If you’re looking to add more spice and interesting flavors to your cooking, this book would be a great place to start. 

I am a member of the Amazon Affiliate Program. 

Thursday, November 5, 2015

Kabocha Squash in Pipian Verde

A lot has been written about our industrialized food system, why it needs to be changed, and the damages caused by it. The related environmental and health issues have been exposed repeatedly. But, a new book I just read also highlighted the cultural effects of the current food system. In Decolonize Your Diet by Luz Calvo and Catriona Rueda Esquibel, they describe how “the production of food in the early twenty-first century is wholly alienated not only from the way we live…but from our own cultural histories and traditional food ways.” Their book, of which I received a review copy, encourages a look back at traditional ingredients and ways of preparing meals from Mexican and Central American cuisine. It also focuses on very healthful, plant-based dishes using unrefined, unprocessed ingredients. I couldn’t wait to try a few recipes. The Vampiro Beet and Carrot Salad sounds fresh and pretty with grated vegetables, orange and lime juices, and jalapeno. The Purepecha Bean Soup is made with Flor de Mayo or pinto beans and dried chiles and is topped with crispy corn tortilla strips and diced avocado. As soon as red cabbage shows up in our CSA box, I’ll be making the Sweet Potato Tacos with Red Cabbage Slaw. And, I really want to try making homemade Mesquite Corn Tortillas with a mix of masa and mesquite flour. But first, the Kabocha Squash in Pipian Verde dish was calling my name. I sauntered off to our Wednesday farmers’ market hoping to find some sort of small winter squash to use for this without worrying too much about it being a Kabocha. Despite my open-mindedness, I actually found the lovliest, red Kabocha ready and waiting for me that day. This dish was meant to be. 

There are plenty of ways to start this in advance. Four poblano chiles were roasted, skinned, seeded, and chopped, and those could be prepped and refrigerated until ready to make the sauce. I roasted them directly on top of a burner and turned them as they charred. The squash was cut into wedges and roasted in the oven with a coating of olive oil and sprinkling of salt and pepper. This could be done in advance, and the squash wedges can be reheated when you’re ready to serve. The next step in making the sauce was to broil a quartered white onion, 10 tomatillos with husks removed, a few unpeeled garlic cloves, and I added a couple of serrano chiles. Next, a cup of raw, hulled pumpkin seeds were toasted in a dry pan on top of the stove. Those toasted pepitas along with two cups of water were then pulsed in a blender. Next, the roasted onion, the peeled garlic, the chopped poblanos, my additional serranos, and some oregano, cilantro, epazote, parsley, and a pinch of anise seeds were to be added to the blender. This was way too much for my blender, and I pureed all of this in two batches. Salt was added to taste, and then the purred sauce was transferred to a large saucepan and simmered for about 15 minutes. The simmering really brought the flavors together. To serve, the roasted squash wedges were set in a pool of sauce and garnished with cilantro leaves and more toasted pepitas. 

This recipe made a lot of sauce which is a good thing. I’m happy to have some stored in the freezer to use on enchiladas someday soon. And, it was delightfully tangy, spicy, and, herby with the squash. I’d never paired squash with these flavors before, and I’m so glad to have been introduced to the idea. There are several more ideas in the book I’ll be trying too. 

I am a member of the Amazon Affiliate Program.

Tuesday, March 11, 2014

Lemon Croquettes with Cilantro Pistou

I love looking at photos of beautifully presented food and learning a chef's interesting techniques no matter how complicated, but beyond all of that, it was an absolute joy to spend time with Daniel Boulud’s latest book. The book is Daniel: My French Cuisine, and I received a review copy. This is a big, heavy, serious-looking book with serious-looking recipes. But, from the beginning on the How to Use this Book page, the reader is put at ease. You’re invited to prepare components of dishes or whole recipes as you wish. There’s no expectation that you’ll jump in and prepare everything in the book just as it’s shown. The book is made up of three sections. The first is a delightful tour of dishes from Restaurant Daniel. The photos are stunning, and all the instructions are right there for you to experiment with as you please. Sprinkled throughout this section, you’ll find bits of the story of Boulud’s career and upbringing in France. The second section is a group of essays written by Bill Buford about iconic French dishes. He spent time in the kitchens at Daniel to learn about some classic preparations that aren’t often mentioned these days. These are mostly grand, dated dishes like Tete de Veau en Tortue and Carnard a la Presse, but the writing is all entertainment. Buford shares the comical moments of learning these dishes along with their histories and how Boulud came to know them. The last section includes four dinner party menus that Boulud prepares at home inspired by different regions of France. The three sections are very different, but together they give you a clear picture of the kind of chef that Daniel Boulud is, the level of quality of what he produces, and his love of food. 

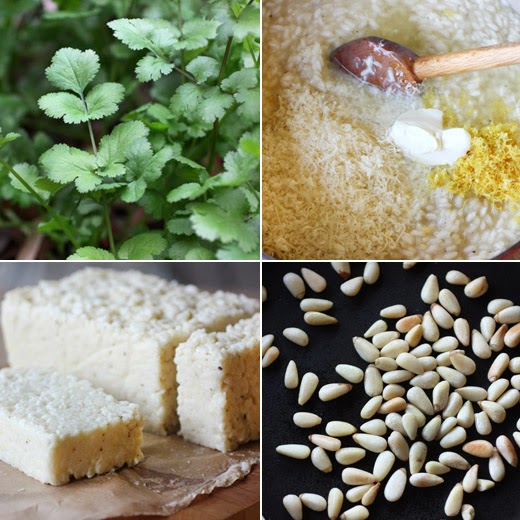
In the restaurant recipes section, there’s a Warm White Asparagus Salad with Poached Egg Dressing dish that looks like spring itself. I might try it with just one of the three accompanying sauces. Then, there’s the Hazelnut-Crusted Maine Sea Scallops with Nettles and Swiss Chard that’s gorgeous with the nettle foam and sauteed morels. And, there are parts of every dessert that I really want to attempt like Sauternes-Rhubarb Ice Cream, Apricot and Lavendar Clafoutis, and Coffee Cremeux and Espresso Ganache. So far, I’ve made two parts of the Striped Bass in a Cilantro-Tapioca Pistou with Artichokes and Lemon Croquettes. In the book, a shallow bowl is shown with the tapioca sauce in the bottom with a pretty mix of chopped artichokes and fava beans centered in the sauce, a piece of striped bass perfectly coated with cilantro pistou sits on the vegetables, and lemon risotto croquettes are perched on top with a tangle of micro cilantro and shaved artichoke slices. The risotto croquettes are perfect, and I do mean perfect, little, crispy cubes. They looked like fun to make. To start, a pretty standard risotto was made with onion cooked in melted butter. Arborio rice was added, and warmed chicken stock was ladled in a little at a time in the usual fashion. When the rice was fully cooked, shredded parmesan, a tablespoon of mascarpone, lemon zest, and lemon juice were added. It was tasted for seasoning and adjusted before the risotto was poured into a parchment-lined 8 1/2-inch by 4 1/2-inch loaf pan and left to chill in the refrigerator overnight. The next day, the risotto was unmolded and cut into one-inch cubes. The cubes were dusted with cornstarch and fried until crispy. The cilantro pistou was easy to make by pureeing lots of cilantro which is filling my herb garden right now with a couple of tablespoons of toasted pine nuts, some olive oil, and salt. 

I served the crispy, lemony croquettes with a dish of cilantro pistou for dunking. The bright, herby sauce was a light and lively contrast to the savory risotto pieces. There’s so much I’ll be turning to this book for in the future. There are plating arrangements to try and copy, flavor combinations to taste, sauces to attempt, and parts and pieces of recipes to use. Right now, I’m looking at one of the desserts from the last section of the book, the Fig Pine Nut and Mascarpone Custard Tart, and I can’t wait for fig season to get here. I’ll be glad to have this book on the shelf when it does. 

I am a member of the Amazon Affiliate Program.

Monday, September 10, 2012

Sesame-Crusted Miso Salmon with Cilantro Sauce

This year’s wild salmon season is coming to an end, but you can still get freshly caught Coho salmon through September. I just received some from the Copper River/Prince William Sound Marketing Association. Coho, sometimes called Silver salmon, is slightly lighter in color than Sockeye, and its flavor is milder as well. I had an idea about using the Coho for an hors d’oeuvre, and combined two different recipes. First, I remembered a crusted salmon dish from Martha Stewart's Hors d'Oeuvres Handbook. In that recipe, salmon was cut into small chunks, and each piece was pressed into a mix of spices and then seared. The flavors were Moroccan, and there was a citrus dipping sauce made with yogurt. That sounded lovely, but I also had my eye on a salmon recipe from Power Foods. That one is a recipe for a main dish, but I was interested in the miso marinade and used it for small chunks of salmon rather than full servings. It's served with a cilantro, lime, ginger, and chile sauce. So for my version, I marinated chunks of salmon in a miso sauce and then pressed each chunk into a mix of black and white sesame seeds. The chunks were seared and then served with little picks for dipping into the cilantro sauce. They looked a lot like Martha’s spice-crusted hors d’oeuvre but had different flavors.

Step one was to make the marinade. A cup of white miso, a third of a cup of rice vinegar, a quarter cup of brown sugar, and a third cup of water were cooked in a saucepan just to dissolve the miso and brown sugar. Miso should not be brought to a boil. The mixture was left to cool to room temperature, and the salmon was skinned and cut into bite-size chunks. The salmon chunks were covered with the cooled marinade and then refrigerated for an hour. Next, the cilantro sauce was by pureeing cilantro, lime juice, shallot, jalapeno, garlic, fresh ginger, and vegetable oil. After an hour, the salmon chunks were removed from the marinade, excess marinade was shaken off each piece, and the pieces were pressed into a mix of black and white sesame seeds. I seared the pieces, seed side down, in a saute pan with a little oil, and then briefly flipped each piece to brown the miso marinade lingering on the top side. I served the salmon with a cocktail pick in each piece and the cilantro sauce on the side.

The cilantro sauce was a bright-tasting and lively match to the miso and sesame on the salmon. And, the miso marinade coated the salmon well to give each bite sweet-savory flavor and color from being caramelized in the pan. The little salmon chunks were hard to resist, but the marinated and seed-crusted idea would be just as good with full-sized fillets.

I am a member of the Amazon Affiliate Program.

Wednesday, February 2, 2011

Grilled Fingerling Potatoes

Last weekend, when it was about 75 degrees outside which is just the way I like it at the end of January, we stood outside around the grill and watched as these potatoes crisped over the open flame. If I were making these potatoes again today I’d opt for a grill pan inside on top of the stove since right now, it’s 50 degrees cooler than it was last weekend. The potatoes would still be great grilled inside, and the sour cream drizzle, chile powder, and chopped cilantro have a lot to do with their flavor. Although, if you do have the opportunity to place these on a charcoal grill, the added smokiness they'll attain will make them even better. I received a review copy of a new, little book from Sur la Table called Everyday Grilling. It includes 50 recipes covering everything from appetizers to salads, sandwiches, vegetables, main dishes, and desserts, and there are some great grilling tips too. An enticing photo sits next to each recipe, and I was immediately drawn to the grilled mozzarella and anchovies in chard leaves, the grilled cauliflower steaks with tahini sauce, and the grilled eggplant cannelloni with ricotta. There’s a stir-grilled chicken, mushroom, and baby bok choy dish prepared in a grill wok, and plank grilling recipes for salmon, shrimp, and papaya. There’s even a grilled banana split for dessert. The grilled fingerlings with their toppings looked like they’d be great as a side dish or as party food. The fingerling shape makes them naturally pick up-able, and the toppings are like those of a simplified stuffed baked potato.

I used French fingerlings but any oblong, little potato would work. They were par-boiled on the stove first. The goal of the initial cooking is to get the potatoes just tender but not completely cooked through. Then, they were drained, sliced in half, brushed with olive oil, seasoned with salt, and placed on a hot grill for about five minutes per side. Last, they were topped with sour cream that had been thinned with water to make it pourable. The chile powder sprinkle could be whichever kind you prefer, and I used a mix of ancho and chipotle powders. Last, chopped cilantro was added, and last weekend I had plenty of cilantro in my herb garden but I haven’t checked its status since the arctic blast arrived.

Pre-cooking the potatoes made them fluffy on the inside, and grilling made the cut surface crisp while lending flavor from the grill smoke. These were easier to prepare than potato skins or twice-baked potatoes, and the toppings were simple, fresh, and well-matched. It’s a fun, useful book, and I’ll be turning to it for grilling ideas year-round as long it’s warmer than 25 degrees outside.


Wednesday, September 1, 2010

Stuffed Hatch Chile Omelet

At last, hatch season is here again. It’s a great day when I arrive at the grocery store to find piles and piles of these seasonal green chiles from New Mexico. There’s a stack of hot chiles and a separate one of mild ones, and all the products made with the chiles are tucked into every corner of the store. Our local stores also roast the chiles, and you can buy them roasted whole or already chopped. I kind of enjoy watching them blister on the grill, so I tend to buy the fresh, raw chiles and roast them at home. During their short season, I’m perfectly content to just toss chopped, roasted hatch chiles into pretty much everything I cook, but this year I wanted to stuff some whole chiles too. I pondered what to use for stuffing and what to serve with the chiles for a few days, and then I stumbled upon this omelet recipe which answered both questions. This is from Deborah Madison’s Vegetarian Cooking for Everyone. The roasted, whole chiles are stuffed with goat cheese, and then they’re surrounded by eggs and cooked into a big omelet. Of course, the same concept could be achieved with stuffed poblanos or anaheim chiles, but it was particularly fun to use some beloved late summer hatch chiles in this.

I had already roasted some hatch chiles on the grill the night before I planned to make this omelet. So, all I had to do was peel the charred layer off the chiles, split each down one side, and remove the seeds. The cheese stuffing was a quick mix of crumbled goat cheese, chopped cilantro leaves, and sliced green onions. I doubled the original recipe and stuffed four chiles with the cheese mixture. The remaining cheese that didn’t fit in the chiles was whisked into six eggs. The stuffed chiles were placed in a saute pan with some melted butter and were warmed over medium heat. Then the whisked eggs were poured into the pan and all around the chiles. I thought ahead and realized the chiles might be a challenge to cut through when serving. So, I arranged the chiles with their tips pointing to the center so they would fit into four pieces of omelet without being cut. The eggs started cooking on the stovetop, and as soon as the omelet began to set, the saute pan was placed under the broiler until the omelet was golden and puffed.

I soon realized that this is not a particularly photogenic dish, but it was such a good idea I had to share it anyway. The stuffed chiles could have served as an hors d’oeuvre with some bread or tortillas, but they were divine in the omelet. The mild goat cheese with the fresh green onion and cilantro flavors mingling with the earthy, smoky chiles all embedded in a puffy omelet was genius. It was so simple but so delicious, and I never would have thought to do this myself.


Monday, April 26, 2010

Pinto Bean and Poblano Rice Collard Greens Rolls with Ancho Sauce

Last week, I visited the Capital Area Food Bank of Texas with several other Austin food bloggers. We’re all participating in a week-long project to bring awareness to hunger in Central Texas. Our local food bank works with 355 partner agencies which distribute food to people in need. Since one year ago, our local food bank saw a 60% increase in needs. Currently, over 48,000 people rely on this food bank each week. The goal of the CAFB is to assist anyone with food hardship problems and to provide a positive way for people to take care of their health with nourishing food. Families or individuals are able to visit a food pantry once per month, and we were given a list of what is typically received:
2 cans spaghetti sauce
4 cans veggies (choice of green beans and/or corn)
4 cans fruit (choice of sliced pears and/or mixed fruit)
1 meat selection: whole chicken, beef roast, pork chops, or possibly pig trotters or ham
3 drink items: choice of large bottle of cranberry apple juice and/or powdered milk (shelf stable milk) boxes and/or apple juice boxes
1 bag spaghetti or bag of egg noodles
1 bag of pinto beans or white navy beans
1 bag of white rice
1 package of pickled jalapeno slices
1 ready-made dinner (hamburger helper)
1 bag/container of rolled oats
1 bag of cheerios
5 lb bag of potatoes


Additionally, many people also participate in food stamp programs. Several of our Austin famers’ markets can now accept debit cards and food stamps from the Women, Infant, and Children (WIC) Farmers Market Nutrition Program (FMNP) or food stamp (Lone Star: SNAP) programs. We learned that applying for food stamps is time consuming and challenging with a 22-page application that needs to be re-submitted every three months. A maximum benefit is about $200 per month. By blogging about the CAFB, we’re hoping to raise Hunger Awareness and encourage donations of food, money, or time to local food banks. On Saturday May 8 in central Texas, the US Postal Service will be collecting food donations for Stamp Out Hunger, and all of the food collected here is used locally.

Each of the local bloggers involved has taken a different approach to this project, and everyone involved is listed on the CAFB blog. I wanted to cook a big, healthy meal with some ingredients that would be part of a monthly food pantry pick-up and some that could be easily found at a farmers’ market. The items from the list above that immediately jumped out at me were the beans, rice, and pickled jalapenos. At the risk of heading straight for the dreaded, hippie-food territory, the fact is that 'beans and rice' is comfort food for me. I wanted to include a healthy green vegetable as well and make a meal that would produce lots of leftovers. I’m not sure if these are collards-enchiladas or southwest-cabbage rolls. I’ve made cabbage rolls a lot of different ways using standard green cabbage, napa cabbage, and leaves from different greens like chard, broccoli greens, and collards. I like using collards because the leaves are usually big and somewhat round. I’ve made more traditional rolls with tomato, lemon, and dill sauce. I’ve made them with ground turkey, I’ve used brown rice, and I’ve made them before with the same filling used here. Cooked pinto beans, rice, and shredded monterey jack cheese were on the inside, and the sauce was a puree of simmered anchos, onion, and tomato.

Admittedly, I made this more complicated than it needed to be, but let’s pretend that was just to show the possibilities. It's somewhat labor-intensive, but a few steps can be prepared a day or two in advance. Also, while I did make a sauce from scratch, a prepared enchilada sauce would work just as well. I cooked the pinto beans a day in advance, and I added half of a large, sweet, Texas onion and a few dried chipotles to the water as the beans cooked. The chipotles gave the beans a hint of smokiness and a little spice. The rice could have been made a day or two early as well. I roasted poblano chiles to add to the rice, and I stirred in some chopped cilantro from my garden, but it could have been left plain. For the ancho sauce, I sauteed the other half of that sweet onion, chopped of course, and then added seeded and chopped dried anchos and two chopped tomatoes. After that simmered with water long enough for the chiles to re-hydrate, I pureed the mixture until smooth and added lime juice.

I served the rolls with pickled jalapeno and pickled carrots on top with a little extra finely grated cheese. From three cups of cooked beans, one cup of rice, and one half pound of cheese, I made 20 rolls and still had some leftover rice. Not only did we have a healthy dinner full of spicy flavors and melty cheese, we also have several lunches covered for this week and a few rolls in the freezer for another time.


Pinto Bean and Poblano Rice Collard Greens Rolls with Ancho Sauce

3 c cooked pinto beans
1 c white or brown rice
3 poblano chiles, roasted, cleaned, seeded, and chopped
3 tablespoons cilantro leaves, chopped
2 tablespoons vegetable oil, plus more for baking dishes
4 ancho chiles, stemmed, seeded, and roughly chopped
2 fresh tomatoes, cored and chopped
1/2 large, sweet onion, roughly chopped
1 lime
1/2 pound Monterey jack cheese, grated
20 large collard greens leaves
Pickled jalapenos
Salt and pepper to taste

- In a small saucepan, bring two cups water to a boil, add rice, reduce heat to low, cover and simmer until rice is tender, about 20 minutes. Turn off heat and let rice sit for 10 minutes. Place rice in a large bowl and fold in chopped, roasted poblanos and cilantro. Set aside.
- For the sauce, heat vegetable oil in a large saute pan over medium-high heat. Add chopped onion and cook until tender and just starting to brown. Season with salt and pepper. Add chopped anchos, tomatoes, and one cup water. Reduce heat to low, cover pan, and simmer for 10 to 15 minutes or until anchos are tender. Remove from heat and allow to cool. Transfer mixture to a blender, add juice of one lime, and puree until very smooth. Taste for seasoning and adjust as needed.
-Pre-heat oven to 400 degrees F.
-Bring a large pan of water to a boil. Place collard greens leaves, a few at a time, into the boiling water. You can hold them by the stem and leave the stem sticking up out of the water. Let the leaves boil for about one minute until softened. Transfer to a sheet pan and repeat with all leaves. Let the leaves sit on the sheet pan until cool enough to handle.
- Coat two baking dishes with vegetable oil. Pour half of the ancho sauce into each baking dish.
- Place a collard leaf on a cutting board and cut away the thick part of the stem. The stems can be chopped and cooked for another dish, but they’re not needed here. Place a big spoonful of rice in the center of the widest part of the leaf. Top the rice with a big spoonful of beans, and then add some grated cheese. Fold in the leaf on each side and roll into a bundle and set the rolled bundle into the sauce in a baking dish. Repeat with all leaves. The pans I used fit 10 rolls each.
- Cover the baking dishes with foil, and bake until warmed through, about 20 to 30 minutes. Serve with sauce from the pan, a little more grated cheese, and pickled jalapenos.


Friday, March 5, 2010

Vinagre, Boricua Slaw, and Turkey Breast Pavochon

I can finally put into words one of the reasons why I’m addicted to cookbooks. I seem to imagine that the world of cooking is one big puzzle, and each time I learn something new, another piece is fit into place. And, I quite enjoy adding more and more pieces to that puzzle. I have an example. Last summer, I was cooking from Eric Ripert’s A Return to Cooking, and I attempted to make pique which is a spicy, Puerto Rican condiment. It didn’t work out so well, and I searched and asked around for more information about it and came up with nothing. Then, a couple of weeks ago, I was sent a review copy of Daisy: Morning, Noon, and Night, and while reading that book, I found a recipe for vinagre or vinagre de piƱa which was very similar to that for pique. I then learned that they are indeed the same thing. Seven months later, that piece of the puzzle was set into place. The process for making vinagre or pique was slightly different in this book, and it worked great this time. This new book is by Daisy Martinez from the Food Network’s Viva Daisy. I’ve never seen the show, so I wasn’t familiar with her cooking style. The book is a collection of her family’s favorite dishes experienced while traveling through different Spanish-speaking regions of the world. It’s an interesting culinary tour with lots of tips for advance preparation and piecing together menus. As the title implies, there are dishes for every meal in the day as well as food for parties and snacks. Bold flavors are found throughout from the shrimp ceviche xni pec to chimichurri sauce, Spanish coca which is like pizza, and Peruvian yellow pepper puree. There are desserts too like guava shells filled with cream cheese mousse, banana and dulce de leche strudel, and strawberry delicia.

So, when I finally figured out that pique goes by another name, I had to try it again. In this version, pineapple rinds were boiled for 30 minutes, and the liquid was then strained and added to a jar with sliced onion, smashed garlic cloves, habanero chiles, cider vinegar, fresh oregano leaves, black peppercorns, and some salt. It was left to cool and then refrigerated. In the previous version I tried, the mixture was left to ferment at room temperature, and it transformed into a questionable brew. This time, the hot liquid got the flavors mixing right away, and by going right into the refrigerator once cool, nothing bad had a chance to happen. The onion and garlic gave the acidic mixture big flavor, and the habaneros gave it a good kick. I used the vinagre in Daisy’s boricua slaw. The slaw was suggested as a side dish for anything served at a barbeque. It’s a crunchy mix of red cabbage, carrots, cider vinegar, cilantro, scallions, and vinagre to taste. I was so thrilled with the flavor of the vinagre, I continued to sprinkle more and more on the slaw at the table. The cabbage can definitely stand up to a good amount of spiciness. Since the slaw was mentioned as a side dish for meats, I also wanted to try the turkey breast pavochon from the book.

The name for this turkey dish is a mix of pavo meaning turkey and lechon which is roasted suckling pig. In this case, the turkey is roasted and seasoned in the same way as a lechon is prepared in Puerto Rico. A double, boneless turkey breast was seasoned with a wet adobo rub made from garlic, salt, black peppercorns, dried oregano, olive oil, and white vinegar. The adobo rub was placed under the skin and on the back side of the double breast, and then the meat was rolled and tied into a compact roast. I left it to marinate in the refrigerator overnight. The next day, I roasted the turkey first at 400 degrees F for 45 minutes, and then at 375 degrees F for an additional hour or so. The roasting time depends on the size of the turkey breast, so it’s important to start checking the internal temperature after about an hour and 15 minutes. The internal temperature should reach at least 150 degrees F before removing the turkey from the oven, covering it with foil, and letting it rest for 20 minutes.

I can tell you that this turkey smelled so good as it roasted that I may never cook another bird without some adobo sauce on it. The skin browned nicely, the meat was delicious and tender, and Kurt nodded with definite approval declaring it very good turkey. I had a lot of fun perusing this book and trying a few of the Latin-inspired dishes, and I look forward to trying more. Next time, I’ll tell you about how the turkey leftovers were used.


Friday, January 29, 2010

Spiced Rock Fish with Carrot Puree and Gingered Beets

Last week, I stopped by our Wednesday farmers’ market to see what looked good and what might become inspiration for our weekend meals. It was the carrots and sweet potatoes that caught my eye. Fresh, bright orange carrots, just pulled out of the ground have a crunch and sweetness that makes their distant, plastic-bagged cousins seem completely unrelated. The carrots I bought last week came from Johnson’s Backyard Garden, and it was an enormous and gorgeous bunch of carrots. I remembered reading about a carrot puree and eventually found it in Sunday Suppers at Lucques. That puree was part of a meal including harissa-spiced fish and gingered beets, and Suzanne Goin wrote that it was all inspired by carrots. She once had an abundance of fresh and delicious carrots and came up with this meal to highlight them. That sounded pretty perfect since I was in a similar carrot situation.

In the book, the dish is prepared with snapper fillets, but as I stood before the fish counter last weekend, the rock fish had a shinier and happier look about it. I went with the rock fish, and regarding sustainability issues, rock fish and snapper rate about the same. However, I’m kicking myself now that I realize I could have purchased snapper from a local source at the Saturday farmers’ market. Next time. The first step in preparing this meal was making harissa. Dried ancho chiles were rehydrated, cumin seeds were toasted and crushed, and canned tomatoes were cooked until reduced. All of those items were added to a food processor along with garlic, hot smoked paprika, cayenne, vinegar, and salt and pepper. Once pureed, it was harissa. Remember those sweet potatoes I mentioned? For another meal, they were made into oven fries and served with some of this harissa, and that was an excellent pairing. For this meal, the harissa was coated onto the fish which was left to marinate in the refrigerator for a few hours. Meanwhile, the beets were roasted, and the carrots were chopped. With such fresh carrots, I don’t actually peel them. I wash them and pull off any root fibers, but leave as much of each carrot intact as possible. The carrots were steamed with some cilantro stems while chopped onion was sauteed. The steamed carrots were added to the onion and allowed to caramelize a bit before that mixture was pureed with olive oil. The roasted beets were skinned and then tossed with a vinaigrette of shallot, jalapeno, garlic, ginger, mint, cilantro, lime juice, and olive oil. The fish was to have been grilled, but I pan-sauteed it instead.

There are times when a vegetable puree can be reminiscent of baby food, but this wasn’t one of them. The sauteed onion and caramelization added depth, and the hint of cilantro and olive oil prevented the puree from being too sweet. The earthy beets in vinaigrette were a bright and tangy contrasting flavor to that of the puree. And, the main attraction, the fish, was the star of the meal. The harissa had flavored the fish well, but since most of it was scraped away before cooking, what remained was subtle, smoky savoriness. This was one of those meals that I couldn’t believe I had whipped up in my own kitchen and that it was so easy. I love going out for great restaurant meals, but I’m always delighted when a meal seems that good at home.


Blogging tips