









 and couldn’t stop. I blame it on the cilantro chutney. I made a batch and got hooked on it. I wanted to pour it on everything at every meal. My only regret is that this happened just as my garden cilantro stopped producing in the heat of spring. This new book is from Priya Krishna, and I received a review copy. It’s a collection of her mother’s recipes that are mostly traditional Indian dishes recreated with other culinary influences here and there. There are roti pizzas, a tomato rice dish with cheddar cheese, and feta used in place of paneer. It’s Indian food the way the Krishna family came to make it in their home in Dallas, Texas. The dishes are mostly vegetarian with one short chapter that involves chicken and fish. And, let me just walk you through what I’ve already tried from the book. The Lima Bean and Basil Dip is a tasty and easy snack that’s perfect for cucumber slices or crackers or flatbread. Next, I had to try the Spinach and Feta Cooked like Saag Paneer. I used a mix of spinach and kale, and a mix of tofu and feta. The use of feta was inspired by a Krishna family trip to Greece, and it is a delicious twist. I’ll be returning to this recipe often. A few days later, I made the one and only chicken recipe in the book: Garlic-Ginger Chicken with Cilantro and Mint. The chicken was marinated in a lovely mix of garlic, ginger, mint, cilantro, oil, and lemon juice along with coriander, turmeric, red chile powder, and amchur. After cooking the chicken, I used it in roti tacos, as suggested in the book, with an avocado and tomato kachumber, or salad, and amazing cilantro chutney. This was how I became dependent on cilantro chutney. I even got inspired to make homemade roti although that recipe isn’t in the book. I just really enjoy making various flatbreads. The flavorful, marinated chicken with the fresh avocado salad and bright and spicy cilantro chutney became an ideal way to fill a roti taco. In fact, Kurt requested we have that meal every Sunday night. I should point out there are several Kachumber recipes in the book like Beet and Avocado Kachumber, Daikon Radish Kachumber, and Avocado Corn and Tomato Kachumber. I adapted the latter since I didn’t have corn on hand that day. The leftover roti I made became Roti Pizzas inspired by the book. I used different toppings than the ones listed, but loved the idea and the result. There are also several pages I’ve marked for more things I haven’t cooked just yet. Because I do so enjoy making flatbreads, the next recipe I tried was the Aloo (Potato) Parathas with, of course, more cilantro chutney.
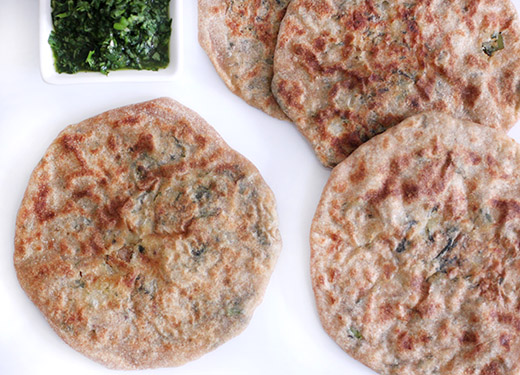
I was torn between making the Pesarattu (Lentil Pancakes) and the Aloo Parathas but decided on the Parathas since new potatoes had just come into season here. I brought some home from Boggy Creek Farm. The first step is to cook the potatoes and peel them once cooled. Next, the dough was made with whole wheat flour, water, a little oil, and salt. The dough was mixed and left to rest in the refrigerator. To make the filling, the peeled potatoes were mashed with red chile powder, crushed fennel seeds, clilantro, and salt, and I added cooked and chopped kale. There’s a tip in the head note about adding cheddar cheese, and that inspired me to make a different addition. I do add kale to everything. The filling was mixed until no lumps remained. The dough and filling were each divided into equal portions and rolled into balls. Working with one portion at a time, the dough was rolled into a round, and a potato filling ball was placed on top before pinching the dough up and around the ball of filling. The sealed dough pouch was turned over and then rolled out into a round. The formed parathas were cooked on a hot griddle with just a brushing of oil for a few minutes per side.

Aloo (Potato) Parathas
Excerpted from Indian-ish: Recipes and Antics from a Modern American Family
© 2019 by Priya Krishna with Ritu Krishna. Photography © 2019 by Mackenzie Kelley. Reproduced by permission of Houghton Mifflin Harcourt. All rights reserved. Makes 4 parathas
When I go back home to Dallas, my priorities are usually something like the following: Get eyebrows threaded, go to the Galleria mall with mom, and eat aloo parathas at my aunt Rachna’s house. I typically text Rachna, who is one of my mom’s sisters-in-law, the minute I land at DFW airport, and we set a date for me to come over and eat aloo parathas while we gossip about her son Ruchir’s love life. Aloo parathas are a simple dish—just bread filled with potatoes and spices. But the beauty of Rachna’s aloo parathas is the ratio. You know how people always complain that crab cakes have too much breading and not enough crab? This is also a common complaint about aloo parathas: too much dough, too little potato. Rachna’s version, however, is about 80 percent potato, 20 percent dough—the ideal proportions for ensuring a soft, satiny paratha. There are a lot of steps, but don’t be intimidated! If you can operate a rolling pin, you can make paratha. And when serving these, our family doesn’t abide by any kind of formalities—as soon as one is ready, someone claims it so it can be eaten while piping hot, with Cilantro Chutney or whatever condiment (achar, raita, etc.) happens to be around that day.
TIP: Want to give your aloo paratha a little twist? Add 1/4 cup grated cheddar cheese to the potatoes in step 2.
For the dough
1 cup whole wheat flour, plus more for dusting
1/2 cup room-temperature water
1/4 teaspoon vegetable oil
1/4 teaspoon kosher salt
For the filling
2 medium russet potatoes, boiled, cooled, and peeled
1/4 teaspoon red chile powder
3/4 teaspoon fennel seeds, crushed into a powder (this is easiest in a mortar and pestle)
2 tablespoons chopped fresh cilantro (stems and leaves)
1/2 teaspoon kosher salt
1/4 cup vegetable oil, for basting the paratha (set aside in a small bowl for easy access)
1. MAKE THE DOUGH: In a medium bowl, mix all the dough ingredients together and knead the dough with your hands until it is smooth and well incorporated. The dough should be soft, slightly sticky, and not too wet. Wrap the dough in plastic wrap and refrigerate for 20 minutes.
2.WHILE THE DOUGH IS RESTING, MAKE THE FILLING: In another medium bowl, using your hands ora potato masher, mash the potatoes, then use a wooden spoon or spatula to fold in the red chile powder, fennel, cilantro, and salt. Aim for the consistency of smooth mashed potatoes. (If the potatoes aren’t smooth enough, the dough will be hard to roll.) Use a fork to get rid of any lumps.
3.Divide the dough and mashed potatoes into 4 equal portions (as in, 4 portions of dough and 4 portions of potatoes) and roll each portion into a ball.
4. Generously sprinkle a clean work surface with flour. Lightly coat each dough ball with flour, then use a rolling pin to roll out each ball into a 6-inch circle, rotating the dough as you roll to maintain the circular shape, and adding more flour to your work surface as needed to prevent sticking.
5.Working one at a time, place a potato ball in the center of a dough circle, then pull the edges of the doughover the top of the ball, like you would enclose a parcel, and pinch together to seal. Make sure the potato filling is nicely sealed in or it will spill out during the next step.
6. Flip the dough-potato ball over so the seal is on the bottom and use a rolling pin to roll it out into an 8-inch circle. Repeat filling and rolling until you have four 8-inch rounds.
7.COOK THE PARATHA: Warm a medium skillet over medium-high heat. Once the skillet is thoroughly heated, carefully place a paratha in the pan. Cook for 2 minutes, until the underside starts to brown and blister, then flip. Add 1 1/2 teaspoons of the oil to the surface of the paratha and spread it around with a spoon. Cook for 2 minutes, until the other side is starting to brown and blister, then flip the paratha again. Add 1 1/2 teaspoons of the oil to the top of the paratha, spread it around, and cook until the underside is golden brown with dark brown spots, about 1 minute, then flip again. Cook the other side until golden brown with dark brown spots, no more than 1 minute. Transfer the paratha to a plate. Repeat to cook the remaining parathas. If there is residual flour in the pan, make sure to wipe it out before adding the next paratha.
Cilantro Chutney
Makes 1/2 cup (can easily be multiplied)
Cilantro chutney is the king of chutneys. Why? Because it goes with any and all Indian food: samosas, dal roti, any kind of chaat (the Indian genre of snacks)...you name it. During the photo shoot for this book, my mom churned out literal buckets of the stuff every single day because (1) it’s delicious, (2) it’s photogenic, and (3) we drizzle it on everything. I love this simple, OG recipe from my mom because it retains the pleasant grassiness from the cilantro and has a creeping, lingering heat (though you can nix the chiles if creeping heat is not your thing). There are also many ways to customize it—add mint for fresher notes, or nuts for richness. Use it as a salsa, a sauce for grilled chicken, or a topping for Roti Pizza.
1 bunch fresh cilantro, preferably organic, stems and leaves roughly chopped (about 4 cups)
1 small Indian green chile or serrano chile, roughly chopped
2 tablespoons fresh lime juice (from about 1 lime), plus more if needed
1/4 teaspoon granulated sugar
1/4 teaspoon kosher salt, plus more if needed
1. In a blender, combine all the ingredients and blend until smooth. If the mixture is too thick to blend, add a few drops of water to get it going. Taste and adjust the salt and/or lime juice, if needed. This chutney keeps, refrigerated in an airtight container, for up to 2 days.

Tweet


 of which I received a review copy. Valerie Bertinelli gives you the recipes she cooks at home and recipes she learned from her mother and grandmother, and talks you through the why’s and how’s in a friendly, down-to-earth fashion. This is a book of crowd-pleasing food and drinks with a few healthier options, some decadent dishes, and a lot of good ideas for every meal of the day. Egg in a hole is a classic, but I’d never thought of trying it with a bagel and then topping it with Neufchatel cheese mixed with sriracha. The nostalgic Snack Mix in the Happy Hour chapter, made with wasabi peas and broken ramen noodles, inspired me to seek out new and different ingredients for a gluten-free mix to make for gifts. And, speaking of nostalgia, there’s also a homemade Hamburger Helpa and Tuna Noodle Casserole with Potato Chip Topping. Two dishes that got me looking forward to summer produce were the Roasted Eggplant Pesto Pasta and Vegetarian Minestrone. And among the desserts, the Neapolitan Tacos convinced me I need to get my hands on a pizelle maker. Here, pizelles are draped over the handle of wooden spoon so they set in the shape of a taco shell before they’re filled with vanilla ice cream and chopped strawberries. Why have I never made a dessert taco? The ideas shown here started with the Giardiniera Aioli shown in the book with a beef sandwich. I thought it would also be fantastic on an avocado sandwich or as a dip for baked fries. Next, I re-read the head note for the Homemade Baked Potato Tots recipe. In it, there’s a mention of grating cauliflower in with the potato for a slightly lighter take on the concept. I decided to go one step further and mix sweet potato, russet potato, and cauliflower to make the baked tots and then dip them in giardinera aioli.


 , and I received a review copy. I should be clear that this book is so much more than just tacos. It’s a collection of favorite authentic Mexican dishes from Gonzalo Guzman, the chef of Nopalito restaurants in San Francisco. The recipes are true to their origin with inspiration from seasonal, local ingredients in California. Because of Guzman’s upbringing in southern Mexico in Veracruz, corn was “the king of Mexican ingredients.” And, freshly made corn tortillas are key to several dishes. The Basics chapter includes information about nixtamalization, making your own masa, and turning that into fresh tortillas. There’s also a recipe for wheat flour tortillas even though corn is preferred. Then, the chapters take you through small plates, big plates, drinks and desserts, and salsas. The Ensalada de Pepinos y Verdolagas caught my eye because it’s made with purslane and cucumbers and both are in season right now. Also, the dressing is an interesting vinaigrette thickened with pureed pepitas. There are quesadillas, tacos, and tamales with meat, fish, and vegetable fillings. And, there's a lovely looking Huarache de Huitlacoche y Hongos. I’ve never found huitlacoche available locally, but I’d love to try this with all mushrooms instead. The braised meat dishes, adobo-rubbed trout, and enchiladas would all be inviting for parties. And, I have to try the Smashed Shrimp with Eggs and Salsa served with tortillas and refried black beans and the Breaded Chicken Sandwiches on homemade cemitas or sesame rolls. The fresh, bright, and spicy flavors are evident, and I couldn’t wait to jump in and try several things.


 by Suvir Saran, and I’d marked the page when I first read the book. They take some time to make if you don’t happen to have any leftover, cooked farro or potatoes, but you could always space out the steps by prepping some things a day ahead. I also made the Tomato-Onion-Peanut Chutney from the book, and that could definitely be made in advance and refrigerated for a few days. The burgers get a crispy outside surface from the panko coating and being browned in olive oil, and the mushrooms and farro give them a nice, chewy texture inside. The chutney cooks down to a jam-like consistency, and it’s sweet, spicy, savory, and more complex and interesting than ketchup could ever hope to be. I only made half the chutney recipe to go with the burgers, but in the future, I’ll make the full quantity and store any extra in the freezer.


 , recommends boiling potatoes, and she boils them, skins them, and purees them in a food mill. Mario, in
  , uses russet potatoes instead, but he also boils them, skins them, and purees them in a food mill. Anne Burrell, who calls her recipe "


 Given the combination that went into the baking dish and the amount of time the layered potatoes and fennel spent melding and becoming fetchingly golden, I don’t think it’s necessary to explain how good that was. It’s not even possible that it wouldn’t be good. The fennel had a barely noticeable sturdier texture than the potatoes, and the cheese added its lovely nutty, salty richness. This potato dish could be paired with a lot of things, but it worked very well with chicken.


 The soup was served with crispy shallots on top and some


