









 , and I received a review copy. This is a collection of recipes and stories about Palestinian food and culture. Some dishes are classics, some are reconsidered classics, and they all sound like something I want to cook. At the start of the book, I learned that there is no “P” in the Arabic language. Falastin refers to the Palestinian people, the land, the culture, and more. The authors’ goal with this book was to “strike a balance between telling it like it is in Palestine and conveying the upbeat spirit and ambition of the people.” The stories of cooks, farmers, producers, and restaurants that appear among the recipes achieve that goal well. And, the recipes move from breakfast to every course of a meal with one delicious idea after the next. This is straightforward, home-cooking that’s easy and craveable. I stop every time I flip by the photo of the labneh balls rolled in herbs, chile flakes, and za’atar. I have to make those soon. I might even attempt a vegan yogurt version. There’s a chapter for Veggie Sides and Salads, and I don’t know why I’ve marked pages because I want to make everything here. Every single thing. The Roasted Cauliflower and Charred Eggplant with Tomato Sauce; Spiced Chickpeas with lots of herbs and green onion; and Bulgur, Tomato, and Eggplant Pilaf are a few examples. Ordinarily, a Soups chapter may or may not interest me much, but although it’s a small chapter here, it stopped me in my tracks. Butternut Squash and Saffron Soup with Caramelized Pistachios and Herb Oil and Chard, Lentil, and Preserved Lemon Soup with crispy onions are just two options I can’t wait to try. Also, the Sumac Onion and Herb Oil Buns and Za’atar Bread are on my list. The chicken dishes all look delicious, and I’m imagining ways of making the various meatballs and stuffed vegetables with either ground poultry or a mushroom and bean mixture instead of the lamb and beef. I really do want to make everything. That definitely applies to the Fish chapter as well. Fish Kofta with Yogurt, Sumac, and Chile; Roasted Cod with a Cilantro Crust; and Prawn and Tomato Stew with a Cilantro Pesto are all competing for what I’ll cook next. First though, I fired up the grill for Spiced Salmon Skewers with Parsley Oil.
 The head note mentions that these skewers are “a winner with all when served,” and I whole-heartedly agree with that assessment. They were only served to two of us at my house, but the recipe was definitely a winner. After the fish was cut into chunks, it was tossed with a Fish Spice Mix and olive oil and was left to chill for an hour. That part could be done the day before. The spice mix was made with ground coriander, ground cumin, ground turmeric, and paprika with added sumac and salt and pepper. There’s a suggestion to make more of this spice mix than you need since it works so well on so many things, and you should. I want to marinate all things in this spice mix. Now, I have to admit, I took a couple of liberties with the recipe. The idea was to cook quartered onions in olive oil and cool them before stacking them on skewers with the salmon. Since the salmon cooks quickly, this gives the onion a head start. The assembled skewers were to be cooked on a grill pan. I made the onion chunks a bit smaller, added some summer squash, peppers, and cherry tomatoes to the skewers, and seared them on a hot charcoal grill outside. There’s a great tip for making sure the salmon cooks evenly: if you have some thin pieces from the tail end, fold them in half to make a thicker cube on the skewer. For the parsley oil, parsley, garlic, olive oil and salt and pepper were pureed until smooth. The skewers were served with the parsley oil and lemon wedges on the side.


Tweet


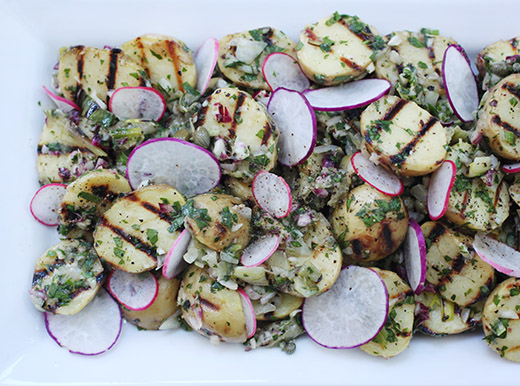
 from David Burtka is full of festive ideas, and I received a review copy. And, you can win a copy! Just leave a comment on this post before the end of Monday, May 6th including an email address where I can contact you. Two randomly selected winners in the US or Canada will each receive a copy of the book from the publisher. The book begins with handy party planning tips like setting the mood by testing lighting the day before, stocking up on plenty of ice and storing it in the bathtub or washing machine, checking with guests about any food allergies, and more. My favorite of the tips, and one that I live by, is getting as much done in advance as possible. You should enjoy the party too! Then, the party menus are grouped by season. But, there’s more than just menus and recipes. There are also suggestions for table decor, what to wear, how to take the theme to the next level, activities, and even a playlist for each occasion. Everything you need for an incredible party is here, but this is an easy-going book. You’re invited to pick and choose how much you want to do and how you want to shape your party. The recipes tend to serve six to eight, and you can scale up or down as needed. Each menu includes cocktails or mocktails, salads or sides, main dishes, and dessert. Of course, you could also mix and match recipes to create your own menus too. As soon as I opened the book, the Scallops with Peas and Green Oil got my full attention. It’s part of a spring party menu that starts with a Cucumber-Herb Cocktail and ends with a Flourless Chocolate Cake. The Mexican Fiesta looks like a lot of fun, and I would love to find big serving bowls of guacamole and ceviche at a party. I also loved the look of the Chocolate Chunk Hazelnut Bars and the pitcher of Fresh Blueberry Fizz at the Summer Picnic. It was the Sunday Funday menu that got me headed into the kitchen though. It starts with Mojito Slushies and includes Grilled Tofu Skewers with Coconut-Peanut Dipping Sauce, a DIY Sundae Bar, and the Grilled Potato and Leek Salad shown here.

 , of which I received a review copy, I learned about the mix of Bedouin traditional foods and ingredients and flavors brought there by the Indian Ocean trade routes. Those flavors that make up Omani cooking are found in the Middle East, South Asia, East Asia, and East Africa. Many ingredients are used in dried or preserved from like dehydrated coconut milk, dried limes, and salt-cured fish because of the history of needing those foods to last for distant travel both on land and at sea.


 If only that book had been available back when I first started cooking eggplant, I would have had a better understanding of the vegetable from the beginning. I highly recommend it for anyone in need of vegetable understanding or inspiration. First, he uses the term aubergine for eggplant which is so much prettier sounding, and I wish it would take off here in the States. Then, he fondly mentions the different varieties and their shapes, sizes, and colors. He writes of the ivory ones: “their pale skins blushed with lilac or rose as if someone had taken an artist’s brush to them.” He goes on to poetically discuss cooking aubergines: “The aubergine is at its most sensuous in a haze of olive oil and garlic, onion and sultanas, pine kernels, yoghurt and fresh mint. The fragrance is beguiling, sumptuous, heady. The flesh of Solanum melongena loves the muskier spices such as cumin and saffron, the piercing sharpness of pomegranate seeds, the faintest breath of rosewater. But nothing does quite so much for it as being grilled over charcoal. Smoke seeps into the spongy flesh, lending a note of intrigue and exposing an altogether darker undertone.” Now, that’s what eggplant is about. When a nice, big aubergine appeared in our CSA box, it was most certainly going to be cooked over charcoal.


 . It includes 50 recipes covering everything from appetizers to salads, sandwiches, vegetables, main dishes, and desserts, and there are some great grilling tips too. An enticing photo sits next to each recipe, and I was immediately drawn to the grilled mozzarella and anchovies in chard leaves, the grilled cauliflower steaks with tahini sauce, and the grilled eggplant cannelloni with ricotta. There’s a stir-grilled chicken, mushroom, and baby bok choy dish prepared in a grill wok, and plank grilling recipes for salmon, shrimp, and papaya. There’s even a grilled banana split for dessert. The grilled fingerlings with their toppings looked like they’d be great as a side dish or as party food. The fingerling shape makes them naturally pick up-able, and the toppings are like those of a simplified stuffed baked potato.


 is all about. The book is dedicated to comfort food from American family traditions and other cultures as well, and it serves as a reminder to sit down and enjoy time spent around the dinner table. That being said, the book is also about cooking with a certain level of precision and paying close attention to technique for the best possible results. This is a Thomas Keller book after all. His secret equation is great product plus great execution equals great cooking, and he provides the tips to achieve it. The recipes here are far simpler than what you’ll find in the
  , but there’s still a lot of care taken and some intentional fussiness here and there. I was immediately inspired to put together the kind of family meal that this book encourages. On page two, Keller describes a meal he prepared for his father which included barbecued chicken. Believe it or not, in the recipe it states, “try to find a sauce with some integrity, preferably from a small producer.” Yes, that was a suggestion to use a purchased barbecue sauce. I couldn’t do it. For a Thomas Keller meal, I had to make my own sauce. I’ll describe the side dishes, which were from the book, in another post, but what I’m showing today is the sauce I made for the grilled chicken. I had saved this recipe from the June 2009 issue of Living magazine. In that issue, there was a


 Back to this grilled chicken. It was very easy to prepare and was seasoned with only fennel pollen, salt, pepper, and fresh thyme. Speaking of fennel pollen, when I made the charred tuna spiedini last year, I headed off to the grocery store with every confidence that I would find some there. Two grocery stores and phone calls to two other markets later, I was not able to locate any fennel pollen in Austin and might have been somewhat frustrated by that. Eventually, I placed an order with
  That was the fastest and easiest method of grilling a whole chicken I’ve used. The under a brick concept is nothing new, but I’d never actually tried it. As Mario promised, it produced a cooked chicken with incredibly crisp skin and succulent, juicy meat. Fennel pollen is like ground fennel seed only more intense. It has an herby aroma, and it adds incredible flavor to meat and fish. The flavor of the fennel pollen and thyme permeated the meat, and this was one of the best tasting chickens off a grill that I can remember. It couldn’t have been simpler to prepare, and the flavors were straightforward and perfectly combined. The brick trick definitely works wonders.

 There was just one little issue with this roaster contraption, or maybe it’s not the contraption at all but was just a twist of fate regarding the size of jalapeños being sold locally last weekend. Several of the chiles I used slid right through the holes on the roasting rack. Maybe they were slenderer than usual. The banana peppers were definitely smallish and thin, but I didn’t think the jalpeños looked any thinner than normal. To hold our chiles in place, Kurt took charge of placing little rings of foil on the rack to fill out extra space in each opening, and that worked fine. The stuffed chiles went to the grill as secure as can be, and we eagerly awaited the end of their cooking time. They sat on a medium-hot area of the grill for about 18 minutes total, and Kurt turned the rack once after 10 minutes. The wait for the molten centers to cool enough so as to only burn a little seemed like an eternity, and I worried the jalapeños would be too spicy even though the membranes and seeds had been removed. We were surprised to find the jalapeños were very mild tasting as if the grilling had tamed them. The simple cheese filling worked well as it allowed the character of the chiles themselves to play a bigger part, and the time over charcoal was a key element in building the overall taste. The jalapeños were terrific, but we found that we were gravitating to the flavor of the banana peppers, and they oddly had a bigger hint of spiciness. Roasting the stuffed chiles was as fun as I’d imagined it would be, and I predict we’ll be doing this pretty much every time we light the grill.


 From a list of five different recipes from TBC, I chose the
  Now, about my conscience being my guide for this post:
 Beef producers in Texas come in all sizes. There are smaller producers who raise less than 100 head of cattle on their property, and there are others who operate multiple ranches in different locations. At some point these cattle all come together in what has become the conventional process. There are several stages in the cycle of conventional beef production. First, there are cow/calf producers who breed calves that are sold to other ranchers. The calves are sold to ranchers who have available land where cattle can graze. This is the most interesting aspect of the cycle to me because there is only so much land and so much grass where cattle can be fed. Because of that, next in the cycle, cattle may be sold to a stocker who tends the animals and feeds them until they reach the weight at which they can be sold to a feedlot. A feedlot sets the weight at which they’ll buy based on the current price of grain. Once cattle arrive at a feedlot, they are grain-fed until they reach market weight. Grain is grown in mass quantities and is a more efficient feeding solution that grass pasturing. The last transfer in the cycle is to the harvesting plant, or slaughterhouse, where the beef is processed into various cuts.


