I have two questions for you. Have you ever made a “quick” puff pastry? And, have you made homemade gianduia, also known as homemade nutella? I can now highly recommend you try both. At some point a few years ago, I wrote off the possibility of “quick” puff pastry. I had tried a couple of different recipes and ended up with pie crust each time. There were no puffy layers as seen in “real” puff pastry. I decided the “quick” versions were a myth. They didn’t work for me. All of that changed when I gave the concept one more try with this recipe. It’s from the book Canal House Cooks Every Day , and I received a review copy. This is a full-size book full of the same kinds of beautiful and doable, seasonal dishes for which Hamilton and Hirsheimer are famous. I made the Green Lasagne with Tomato Sauce and Fresh Ricotta around the holidays, and the spinach pasta with red sauce was as pretty as it was delicious. There are summery recipes I look forward to tasting like Tomatoes all Dressed Up for Summer with mayonnaise and fresh herbs. And, the photo of the platter of Deviled Eggs with various toppings like smoked salmon, preserved lemon rind, and harissa has inspired me for Easter brunch. But, I have to tell you how the Simple Puff Pastry recipe has changed my life. I’m now a believer. The “quick” version really can work.
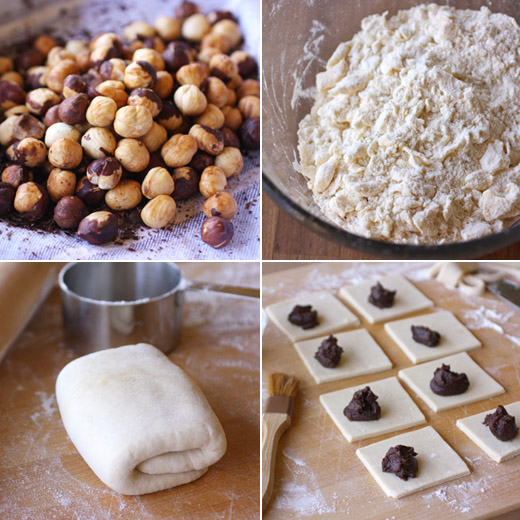
This is vastly faster than making a traditional puff pastry, but it’s still necessary to chill the dough at three points in the process. You start with exactly two ingredients: a stick of butter and a cup of flour. You work the butter into the flour in the same way I usually do for pie dough. Slices of butter are squeezed into the flour and stretched into thin pieces while mixing with your hands. Water is added and worked into the mixture until it holds together. Then, the dough is wrapped and refrigerated for 30 minutes. Next, the fun begins. You roll and fold to begin forming layers of butter. After two times of rolling and folding, the dough was chilled again. Then, rolling and folding is repeated before chilling the dough one last time before using it. I just let my mind wander for a moment over all the possibilities for hors d’oeuvres, tarts, desserts, whathaveyou now that I have this trusted recipe. I’m easily distracted that way. While the puff pastry chilled, I made the filling. I toasted hazelnuts, and I can never find skinned hazelnuts, which means that I toast them and rub off the skins with a towel. The toasted nuts were ground to a paste with a pinch of sugar in the food processor. The hazelnut paste was stirred into a mixture of melted chocolate with cream and butter. After filling all these little turnovers, there will be plenty of gianduia leftover for slathering on toast or eating with a spoon.
, and I received a review copy. This is a full-size book full of the same kinds of beautiful and doable, seasonal dishes for which Hamilton and Hirsheimer are famous. I made the Green Lasagne with Tomato Sauce and Fresh Ricotta around the holidays, and the spinach pasta with red sauce was as pretty as it was delicious. There are summery recipes I look forward to tasting like Tomatoes all Dressed Up for Summer with mayonnaise and fresh herbs. And, the photo of the platter of Deviled Eggs with various toppings like smoked salmon, preserved lemon rind, and harissa has inspired me for Easter brunch. But, I have to tell you how the Simple Puff Pastry recipe has changed my life. I’m now a believer. The “quick” version really can work.
This is vastly faster than making a traditional puff pastry, but it’s still necessary to chill the dough at three points in the process. You start with exactly two ingredients: a stick of butter and a cup of flour. You work the butter into the flour in the same way I usually do for pie dough. Slices of butter are squeezed into the flour and stretched into thin pieces while mixing with your hands. Water is added and worked into the mixture until it holds together. Then, the dough is wrapped and refrigerated for 30 minutes. Next, the fun begins. You roll and fold to begin forming layers of butter. After two times of rolling and folding, the dough was chilled again. Then, rolling and folding is repeated before chilling the dough one last time before using it. I just let my mind wander for a moment over all the possibilities for hors d’oeuvres, tarts, desserts, whathaveyou now that I have this trusted recipe. I’m easily distracted that way. While the puff pastry chilled, I made the filling. I toasted hazelnuts, and I can never find skinned hazelnuts, which means that I toast them and rub off the skins with a towel. The toasted nuts were ground to a paste with a pinch of sugar in the food processor. The hazelnut paste was stirred into a mixture of melted chocolate with cream and butter. After filling all these little turnovers, there will be plenty of gianduia leftover for slathering on toast or eating with a spoon.

I expected these little pastries to be enjoyable. Buttery dough filled with gianduia couldn’t really be a bad thing. What I didn’t expect was light, airy, puffed, and layered pastry like this. It was completely irresistible. Needless to say, there will be much, much more Simple Puff Pastry in my future.
Little Gianduia Turnovers
Recipes reprinted with publisher's permission from Canal House Cooks Every Day.
Makes 8
We make our own puff pastry and if we’re not using the dough right away, we’ll roll it out, gently fold the sheets into thirds like a business letter, wrap them up, and store them in the freezer so the delicious buttery dough is ready to use at a moment’s notice, relatively speaking. The pastry defrosts in the time it takes to heat up the oven, so a batch of cheese straws or a savory or sweet tart can be put together quite spontaneously. These dainty (Gianduia) turnovers came to our rescue once when dessert had been left as an afterthought. Not a bad save. Serve them at dinner or, if something sweet is your thing in the morning, at breakfast.
1 recipe Simple Puff Pastry or 1 sheet store-bought puff pastry
Flour
1/2 cup of Gianduia
1/4 cup heavy cream
2–3 tablespoons granulated sugar
Powdered sugar
Preheat the oven to 400°F. Line a baking sheet with parchment paper and set aside.
Lay the puff pastry on a lightly floured work surface and dust the top with a little flour. Roll the pastry out to a ⅛-inch-thick rectangle. Cut the pastry into eight 3-inches squares. Spoon 1-2 teaspoons Gianduia just inside one of the corners or quadrants of each pastry square. Brush the edge of the pastry with some of the heavy cream. Fold the pastry in half over the Gianduia, forming a nice little triangle or turnover. Crimp the edges together. Repeat with the remaining pastry squares and Gianduia.
Arrange the turnovers on the prepared baking sheet at least 1 inch apart. (The turnovers can be frozen at this point and baked later, if you like. Once they are frozen solid, transfer them to a resealable plastic bag. They’ll keep in the freezer, frozen, for up to 1 month. They do not need to be defrosted before continuing with the recipe.)
Brush the turnovers with some heavy cream and sprinkle each with some of the granulated sugar. Bake until puffed and golden, about 15 minutes. Cool slightly before dusting with powdered sugar. Serve warm.
Simple Puff Pastry
Makes one 10 — 12-inch sheet
Traditional puff pastry—the classic French dough for leaflike, flaky napoleons, turnovers, and cheese straws—requires an involved process of rolling, folding, and turning a sheet of dough with a cold block of butter to create upward of 730 thin, uniformly even layers. In this simplified recipe, also known as “rough puff” because it’s more rustic and the layers may rise unevenly when baked, the butter is worked into the flour as for a traditional pie dough. The dough is then rolled, folded, and turned several times, giving it flakiness when baked. It is a wonderful substitute for classic puff pastry, is easy to make, and inspires great confidence, even in a novice baker. Use salted Irish butter or another European-style butter with a high fat content for the best results.
8 tablespoons (1 stick) cold salted butter, preferably Irish or European-style high fat butter, cut in 1/4-inch-thick slices
1 cup all-purpose flour
Measure out the ingredients for making the dough: the slices of butter; ice water; a 1-cup measuring cup for dry ingredients with the flour. Mound the flour on a clean work surface (marble is ideal because it’s cool and smooth). Scatter the butter slices over the flour and sprinkle some of the flour over them to coat them. Using your fingers, work the butter into the flour, squeezing the flour into each slice of butter until the mixture is crumbly and full of thin, soft chips of floury butter. Gather the flour mixture into a mound again.
Sprinkle 6 tablespoons ice water over the flour and butter, using a dough scraper to pull back any water that dribbles away from the mound. Lightly work the flour-butter mixture together, folding the edges toward the center with the dough scraper until it begins to hold together but is still a shaggy mass with large streaks of butter. Gather the dough together, shaping it into a 1-inch-thick square block. Wrap the dough in plastic wrap and refrigerate for 30 minutes.
Dust the dough with flour and roll it out on a floured surface with a floured rolling pin to make a 1/2-inch-thick rectangle (about 4-8 inches); there will be pieces of butter visible. Starting with a short end of the dough, fold the dough into thirds, like a business letter. Repeat the rolling and folding steps once more. Wrap the dough in plastic wrap; refrigerate for 30 minutes.
Dust the dough with flour and put it seam side down on the floured work surface. With the rolling pin perpendicular to the seam, roll out the dough into a 1/2-inch-thick rectangle (about 4-8 inches), squaring the edges with your hands. Fold it into thirds again. Turn the dough seam side down. Repeat the rolling, folding, and turning process 2–3 more times, rolling the dough out to a 1/2-inch thickness each time and dusting it with flour as necessary. The dough should be supple and smooth. Fold it into thirds. Wrap in plastic wrap. Refrigerate for at least 1 hour and up to 2 days before using.
Gianduia
Makes about 2 cups
We slather this creamy chocolate and toasted hazelnut spread—our purer, more flavorful version of Nutella, the commercial brand available throughout the world—on warm toast for breakfast. It’s part of what makes our Gianduia and Caramel Tart so delicious. (We’ve found that it also tastes sinfully good with Oreo cookies, but let’s just keep that our little secret.)
1 generous cup (5 ounces) skinned hazelnuts
Large pinch of sugar
8 ounces semisweet chocolate
1/2 cup heavy cream
4 tablespoons salted butter, cut into pieces
Preheat the oven to 350°. Spread the hazelnuts out on small baking sheet or in an ovenproof skillet and toast them in the oven until they are a deep toasty brown, about 15 minutes. Remove them from the oven and set aside to cool completely. Grind the hazelnuts with the sugar in batches in a food processor to a fairly smooth, buttery paste.
Melt the chocolate in a heatproof medium bowl set over a pot of simmering water over medium-low heat, stirring often. Remove the bowl from the heat and whisk in the cream and butter. Stir in the ground hazelnuts. The gianduia will thicken and become soft and peanut butter–like as it cools. It will keep at room temperature in a covered container for up to 2 weeks.
I am a member of the Amazon Affiliate Program.











 . I had my eye on the Cafe Latte Ice Cream and Coffee Tuiles. In the book, this is shown with long, pointy shards of espresso-flavored tuiles jutting up from the top of a scoop of ice cream. It’s dramatic and delicious-looking and was something I had to try. But, there was another ice cream on my mind as well. A Chocolate-Hazelnut Swirl number from the LA Times had taken up residence in my food thoughts, and it couldn’t be ignored. I decided: why not add the chocolate-hazelnut spread to an espresso ice cream rather than to vanilla? And, that’s how this flavor combination was born. When your ice cream is almost finished churning, you just spoon in some Nutella or homemade gianduia. It swirls its way through the ice cream and turns into cold, fudgy bites here and there. While the ice cream firms up in the freezer, the tuiles are easy to make since the batter is baked in one, big thin piece and then broken after it cools.