




Showing posts with label hazelnuts. Show all posts

Friday, March 20, 2020

Roasted and Marinated Beets with Charred Kale and Hazelnut Vinaigrette

First, I hope anyone stopping by to read this is doing well. All is well in my home, and we’ve been staying in other than going for walks and runs since the weekend. I apologize for the irony here, but the terrific new book I want to tell you about today is Cooking for Good Times: Super Delicious, Super Simple [A Cookbook] by Paul Kahan. These are most certainly not good times, but we are all cooking more at home right now. Here’s my suggestion: rather than thinking about this book in terms of cooking for guests and parties and family get-togethers as it’s intended, instead maybe the dishes I mention below will inspire some new ideas to try for yourself and your family at home in the coming days. All the great suggestions from the book for entertaining can be kept in mind for future gatherings. I had the pleasure of visiting one of Kahan’s restaurants in Chicago, Avec, a few years ago. This book is inspired by the kind of conviviality and sharing of dishes that restaurant has always nurtured. So, the dishes in this book are more straightforward than chefy. I especially loved that the first chapter is called Make Some Food to Eat While You Cook. That implies the fun begins during the cooking, and maybe everyone is helping or at least hanging out while the cooking happens. The suggestions include marinated olives, things to spread on bread or crackers like beet and walnut dip, a charred summer squash-sesame dip that I can’t wait to try, two versions of hummus, and recipes for homemade bread and crackers. Each chapter begins with ideas for what drinks to pair with the following recipes. And, the chapters go through categories like cured meats as appetizers or parts of a meal, greens for all seasons, root vegetables, one devoted to versions of panzanella, and one just for grains, raclette, pizza, fish, chicken, pork, steak, and a few simple desserts. The Buy Some Greens chapter drew me in with the cold salads and warm dishes. The concept of charring greens in a ripping-hot cast iron skillet or on a hot grill was intriguing because you’re not fulling cooking the leaves. The goal is to just get the edges browned here and there while leaving the rest in a raw state. The charred kale with beefsteak tomatoes and pine nuts with a lemony vinaigrette sounds delicious. One of the salads on my list to try is the greens with tzatziki vinaigrette, potatoes, and green beans. The very next chapter, Roast Some Roots, also held me captive. The beet dish shown here today is from this chapter, and the roasted and marinated root vegetables with oranges, black olives, and feta as well as the roasted and marinated root vegetables with strawberries, ricotta, and pistachios caught my eye. In Toss Together Some Old Bread, you’ll find panzanella with Brussels sprouts, grilled onion, and crumbly cheese and Nicoise-style panzanella with tomatoes, green beans, olives, and anchovies. In the pizza chapter, I loved the suggestion for resting the dough in the refrigerator for up to three days. When you have the time, mix up a big batch of dough, divide into pizza-size pieces, shape the pieces into rounds, let them rest at room temperature for an hour, and then refrigerate to use any time in the next few days. The smoked whitefish, garlic cream, and marinated kale pizza recipe sounds especially good. I just realized I’ve mentioned charred and/or marinated kale in a few dishes, and I want to tell you more about it. 

To start the dish shown here, roasted and marinated beets are needed. At the beginning of the chapter with this recipe, there are instructions for roasting and marinating all kinds of root vegetables. My beets were very large, and I roasted them the day before making this dish. On the day I planned to serve it, I peeled the beets and cut them into wedges and marinated them in a mix of olive oil, orange juice, and crushed red chile flakes. The kale was washed, dried, and marinated in a vinaigrette of olive oil, lemon juice, minced garlic, salt, crushed red chile flakes, and black pepper. Grated parmigiana reggiano was to be added, but I skipped it to keep the recipe vegan. The beets and kale were marinated at room temperature for two hours, but they could have been refrigerated overnight instead. For the plated dish, a hazelnut vinaigrette was made with toasted and finely ground hazelnuts, walnut oil, red wine vinegar, minced shallot, salt, and pepper. I didn’t find hazelnut oil while shopping that day, and I used walnut oil instead. Next, a large cast iron skillet was heated for five minutes over high heat. Yes, it gets very hot. The marinated beets were added and cooked on one side for just one minute before being removed. Then, the marinated kale was added to the hot pan to char for one minute before being removed. In the book, burrata is recommended, and it would go on the plate first. I used a cashew yogurt mixed with a little minced garlic and salt and pepper and made a schmear on the plate. The kale and beets were scattered over top, everything was drizzled with the hazelnut vinaigrette, and chopped, toasted hazelnuts were sprinkled on for garnish and crunch. 

The mix of the nutty vinaigrette and the creamy yogurt were exactly right with the earthy beets and kale. And, I loved the browned edges resulting from charring. This book gives you lots of great ideas and flavor combinations, and more importantly, it gives you techniques to apply in lots of different ways. The charring step adds flavor and texture and can be used in a variety of dishes, the panzanella chapter opens a door to creativity with bread and vegetables in salad form, and the grains recipes work with any type of cooked grain you’ve got. I’m looking forward to cooking more from this now and in good times to come.

I am a member of the Amazon Affiliate Program. 

Monday, February 24, 2014

Milk Chocolate, Nut, and Raisin Clusters

I own the fact that I have an overactive sweet tooth. It frequently takes command of my food choices. That could be why I ran to the kitchen the minute I read about these chocolate clusters. They were in the February issue of Food and Wine in a story about Patricia Wells’ updated edition of her book Food Lover’s Guide to Paris. In the magazine, there are four itineraries for food and shopping tours around Paris. I really wanted to book a flight, but since that wasn’t possible on such short notice, I made candies instead. The recipe is from Chef Alain Ducasse, and they’re sold at his new shop. First, I was surprised that this simple, homey cluster of goodness lacking any sort of chic presentation came from such an acclaimed chef. And, next, I noticed there are cornflakes in the clusters. I believe this is the first French recipe I’ve encountered that called for cornflakes. There are also feuilletine flakes, but rather than ordering those online, I went with the option of using more cornflakes. There are two problems with this recipe. One is that it was very difficult to not eat all of the mixture before even spooning it into clusters, and the other issue was refraining from eating all the finished clusters in one sitting. 

The nuts and fruit could easily be changed out to use whatever you prefer, but I followed the suggested ingredients, other than skipping the feuilletine flakes, to taste the candies as they’re made by Ducasse. Hazelnuts were toasted in the oven and then rubbed in a towel to remove the skins before being roughly chopped. I bought a new container of golden raisins, but they seemed very dry. So, I soaked my raisins in hot water for twenty minutes, drained them well, and dried them on a towel. I used all cornflakes, and chopped, unsalted pistachios. Salt was added separately. The milk chocolate I used has a high percentage of cacao for milk chocolate at 40%. Another surprising ingredient that made me curious about these clusters was the addition of some white chocolate. There was no explanation for it, but I went with the suggested amount. The chocolates were melted and then half of the mixed chocolates was poured over the mix of cornflakes, raisins, and nuts. The mixture was carefully folded to distribute the chocolate, and then the remaining melted chocolate was added and folded until everything was completely coated. I used a tablespoon-size scoop to create the clusters which sat on lined baking sheets until set. 

I’m still wondering why the white chocolate was added. Maybe it made the flavor richer or slightly sweeter? The result was without a doubt delightful. The clusters were sweet and chocolatey with just enough salt for balance, and I did put a few flakes of sea salt on top of each one. The real fun in these clusters, though, is the mix of textures. Crunchy nuts, shatteringly crisp cornflakes, and chewy raisins all covered in chocolate made my sweet tooth very happy. 


Tuesday, July 16, 2013

Espresso and Chocolate-Hazelnut Swirl Ice Cream with Coffee Tuiles

I was torn between two ice cream flavors. So, rather than choose one over the other, of course, I went with both by combining them. I’d been inspired by the collection of coffee desserts in The Modern Vegetarian. I had my eye on the Cafe Latte Ice Cream and Coffee Tuiles. In the book, this is shown with long, pointy shards of espresso-flavored tuiles jutting up from the top of a scoop of ice cream. It’s dramatic and delicious-looking and was something I had to try. But, there was another ice cream on my mind as well. A Chocolate-Hazelnut Swirl number from the LA Times had taken up residence in my food thoughts, and it couldn’t be ignored. I decided: why not add the chocolate-hazelnut spread to an espresso ice cream rather than to vanilla? And, that’s how this flavor combination was born. When your ice cream is almost finished churning, you just spoon in some Nutella or homemade gianduia. It swirls its way through the ice cream and turns into cold, fudgy bites here and there. While the ice cream firms up in the freezer, the tuiles are easy to make since the batter is baked in one, big thin piece and then broken after it cools. 

To start the ice cream, I actually didn’t follow the exact recipe in The Modern Vegetarian. I have a favorite vanilla gelato that I always make that has more milk than cream and is a little lighter. I followed the usual procedure for making that vanilla base, but I steeped some instant espresso granules in the milk as it heated before straining it and proceeding with tempering eggs and making the custard. I used two tablespoons of instant espresso, but you could also use a quarter cup of roasted coffee beans. I let the milk sit and steep for 20 minutes or so, but with whole beans, you’ll want to give it an hour. While the custard chilled before churning, I made homemade gianduia with roasted hazelnuts, semi-sweet chocolate, cream, and butter. When the ice cream was churned, I added about three-quarters cup of the chocolate-hazelnut spread just before it was finished. The ice cream went into the freezer for a few hours before serving. The coffee tuiles were made from an easy batter started with three tablespoons of melted butter and two teaspoons of instant espresso granules. That was stirred until the espresso dissolved. Four and a half tablespoons of flour and a quarter cup plus one tablespoon of confectioners’ sugar were sifted together, and an egg white and the melted butter mixture were stirred into the flour with a wooden spoon. The batter should be beaten with the spoon until it forms a smooth paste. The batter was chilled in the refrigerator for ten minutes or so, and then it was spread very thinly on a silpat-lined baking sheet. It was baked at 350 degrees F for ten minutes. Check it after five minutes to see if it's set and browning at the edges yet. The baking time will depend on how thinly the batter was spread. Once cool, the big, thin cookie can be broken into shards. 

Those crunchy, coffee tuiles work perfectly as ice cream delivery devices. No spoons or gelato shovels are required when those are on hand. And, coffee and chocolate-hazelnut belong together. Why settle for one or the other when you can have both? My lack of decision-making skill worked to my advantage this time. 


Tuesday, March 12, 2013

Little Gianduia Turnovers

I have two questions for you. Have you ever made a “quick” puff pastry? And, have you made homemade gianduia, also known as homemade nutella? I can now highly recommend you try both. At some point a few years ago, I wrote off the possibility of “quick” puff pastry. I had tried a couple of different recipes and ended up with pie crust each time. There were no puffy layers as seen in “real” puff pastry. I decided the “quick” versions were a myth. They didn’t work for me. All of that changed when I gave the concept one more try with this recipe. It’s from the book Canal House Cooks Every Day, and I received a review copy. This is a full-size book full of the same kinds of beautiful and doable, seasonal dishes for which Hamilton and Hirsheimer are famous. I made the Green Lasagne with Tomato Sauce and Fresh Ricotta around the holidays, and the spinach pasta with red sauce was as pretty as it was delicious. There are summery recipes I look forward to tasting like Tomatoes all Dressed Up for Summer with mayonnaise and fresh herbs. And, the photo of the platter of Deviled Eggs with various toppings like smoked salmon, preserved lemon rind, and harissa has inspired me for Easter brunch. But, I have to tell you how the Simple Puff Pastry recipe has changed my life. I’m now a believer. The “quick” version really can work. 
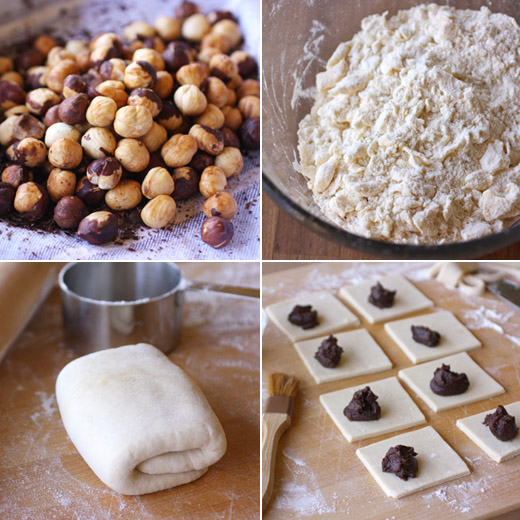
This is vastly faster than making a traditional puff pastry, but it’s still necessary to chill the dough at three points in the process. You start with exactly two ingredients: a stick of butter and a cup of flour. You work the butter into the flour in the same way I usually do for pie dough. Slices of butter are squeezed into the flour and stretched into thin pieces while mixing with your hands. Water is added and worked into the mixture until it holds together. Then, the dough is wrapped and refrigerated for 30 minutes. Next, the fun begins. You roll and fold to begin forming layers of butter. After two times of rolling and folding, the dough was chilled again. Then, rolling and folding is repeated before chilling the dough one last time before using it. I just let my mind wander for a moment over all the possibilities for hors d’oeuvres, tarts, desserts, whathaveyou now that I have this trusted recipe. I’m easily distracted that way. While the puff pastry chilled, I made the filling. I toasted hazelnuts, and I can never find skinned hazelnuts, which means that I toast them and rub off the skins with a towel. The toasted nuts were ground to a paste with a pinch of sugar in the food processor. The hazelnut paste was stirred into a mixture of melted chocolate with cream and butter. After filling all these little turnovers, there will be plenty of gianduia leftover for slathering on toast or eating with a spoon. 

I expected these little pastries to be enjoyable. Buttery dough filled with gianduia couldn’t really be a bad thing. What I didn’t expect was light, airy, puffed, and layered pastry like this. It was completely irresistible. Needless to say, there will be much, much more Simple Puff Pastry in my future. 

Little Gianduia Turnovers 
Recipes reprinted with publisher's permission from Canal House Cooks Every Day.

Makes 8 

We make our own puff pastry and if we’re not using the dough right away, we’ll roll it out, gently fold the sheets into thirds like a business letter, wrap them up, and store them in the freezer so the delicious buttery dough is ready to use at a moment’s notice, relatively speaking. The pastry defrosts in the time it takes to heat up the oven, so a batch of cheese straws or a savory or sweet tart can be put together quite spontaneously. These dainty (Gianduia) turnovers came to our rescue once when dessert had been left as an afterthought. Not a bad save. Serve them at dinner or, if something sweet is your thing in the morning, at breakfast. 

1 recipe Simple Puff Pastry or 1 sheet store-bought puff pastry 
Flour 
1/2 cup of Gianduia 
1/4 cup heavy cream 
2–3 tablespoons granulated sugar 
Powdered sugar 

Preheat the oven to 400°F. Line a baking sheet with parchment paper and set aside. 

Lay the puff pastry on a lightly floured work surface and dust the top with a little flour. Roll the pastry out to a ⅛-inch-thick rectangle. Cut the pastry into eight 3-inches squares. Spoon 1-2 teaspoons Gianduia just inside one of the corners or quadrants of each pastry square. Brush the edge of the pastry with some of the heavy cream. Fold the pastry in half over the Gianduia, forming a nice little triangle or turnover. Crimp the edges together. Repeat with the remaining pastry squares and Gianduia. 

Arrange the turnovers on the prepared baking sheet at least 1 inch apart. (The turnovers can be frozen at this point and baked later, if you like. Once they are frozen solid, transfer them to a resealable plastic bag. They’ll keep in the freezer, frozen, for up to 1 month. They do not need to be defrosted before continuing with the recipe.) 

Brush the turnovers with some heavy cream and sprinkle each with some of the granulated sugar. Bake until puffed and golden, about 15 minutes. Cool slightly before dusting with powdered sugar. Serve warm. 

Simple Puff Pastry 

Makes one 10 — 12-inch sheet 

Traditional puff pastry—the classic French dough for leaflike, flaky napoleons, turnovers, and cheese straws—requires an involved process of rolling, folding, and turning a sheet of dough with a cold block of butter to create upward of 730 thin, uniformly even layers. In this simplified recipe, also known as “rough puff” because it’s more rustic and the layers may rise unevenly when baked, the butter is worked into the flour as for a traditional pie dough. The dough is then rolled, folded, and turned several times, giving it flakiness when baked. It is a wonderful substitute for classic puff pastry, is easy to make, and inspires great confidence, even in a novice baker. Use salted Irish butter or another European-style butter with a high fat content for the best results. 

8 tablespoons (1 stick) cold salted butter, preferably Irish or European-style high fat butter, cut in 1/4-inch-thick slices 
1 cup all-purpose flour 

Measure out the ingredients for making the dough: the slices of butter; ice water; a 1-cup measuring cup for dry ingredients with the flour. Mound the flour on a clean work surface (marble is ideal because it’s cool and smooth). Scatter the butter slices over the flour and sprinkle some of the flour over them to coat them. Using your fingers, work the butter into the flour, squeezing the flour into each slice of butter until the mixture is crumbly and full of thin, soft chips of floury butter. Gather the flour mixture into a mound again. 

Sprinkle 6 tablespoons ice water over the flour and butter, using a dough scraper to pull back any water that dribbles away from the mound. Lightly work the flour-butter mixture together, folding the edges toward the center with the dough scraper until it begins to hold together but is still a shaggy mass with large streaks of butter. Gather the dough together, shaping it into a 1-inch-thick square block. Wrap the dough in plastic wrap and refrigerate for 30 minutes. 

Dust the dough with flour and roll it out on a floured surface with a floured rolling pin to make a 1/2-inch-thick rectangle (about 4-8 inches); there will be pieces of butter visible. Starting with a short end of the dough, fold the dough into thirds, like a business letter. Repeat the rolling and folding steps once more. Wrap the dough in plastic wrap; refrigerate for 30 minutes. 

Dust the dough with flour and put it seam side down on the floured work surface. With the rolling pin perpendicular to the seam, roll out the dough into a 1/2-inch-thick rectangle (about 4-8 inches), squaring the edges with your hands. Fold it into thirds again. Turn the dough seam side down. Repeat the rolling, folding, and turning process 2–3 more times, rolling the dough out to a 1/2-inch thickness each time and dusting it with flour as necessary. The dough should be supple and smooth. Fold it into thirds. Wrap in plastic wrap. Refrigerate for at least 1 hour and up to 2 days before using. 

Gianduia 

Makes about 2 cups 

We slather this creamy chocolate and toasted hazelnut spread—our purer, more flavorful version of Nutella, the commercial brand available throughout the world—on warm toast for breakfast. It’s part of what makes our Gianduia and Caramel Tart so delicious. (We’ve found that it also tastes sinfully good with Oreo cookies, but let’s just keep that our little secret.) 

1 generous cup (5 ounces) skinned hazelnuts 
Large pinch of sugar 
8 ounces semisweet chocolate 
1/2 cup heavy cream 
4 tablespoons salted butter, cut into pieces 

Preheat the oven to 350°. Spread the hazelnuts out on small baking sheet or in an ovenproof skillet and toast them in the oven until they are a deep toasty brown, about 15 minutes. Remove them from the oven and set aside to cool completely. Grind the hazelnuts with the sugar in batches in a food processor to a fairly smooth, buttery paste. 

Melt the chocolate in a heatproof medium bowl set over a pot of simmering water over medium-low heat, stirring often. Remove the bowl from the heat and whisk in the cream and butter. Stir in the ground hazelnuts. The gianduia will thicken and become soft and peanut butter–like as it cools. It will keep at room temperature in a covered container for up to 2 weeks. 

I am a member of the Amazon Affiliate Program.

Friday, December 9, 2011

Apple Cranberry Crumb Tart

I have to tell you about one more Thanksgiving dish, and then I promise to move on. As usual, I was indecisive about what dessert should be, and I considered everything from a chocolate and caramel tart to various pumpkin creations. In the end, fall fruits won. Actually, that’s not entirely true. I saw a crumb tart that was originally made with summer fruits, and the crumb topping and crisp-edged crust are what won me over. Crammed away in my files, the page with this tart had been cut from the June 1999 issue of Living magazine, and the recipe is online. I decided to switch out the raspberries and plums from the original version and use granny smith apples and cranberries instead. The important thing here, though, is really the crust. It was made with ground hazelnuts and cinnamon, and it was pressed into a spring-form pan and up the sides. I was sure that as soon as the tart finished baking, cooled, and the ring was loosened, the tall sides of the crust would crumble and fall into pieces. I was thrilled to be wrong. The lacy, crisp edges of crust held their shape perfectly even after the tart was cut for serving. There is one other interesting detail about this tart, and that’s the custard in the filling. After adding cranberries and apple pieces to the blind-baked crust, some custard was poured over the top to settle its way in and around all the fruit. With crust edges that didn’t crumble, a custard and fruit filling, and the golden crumb topping, this dessert scored well in all categories.

First up was toasting the hazelnuts and rubbing them in a towel to remove the skins. Then, they went into a food processor and were pulsed until medium fine. The ground nuts were transferred to a stand mixer bowl, and flour, sugar, light brown sugar, cinnamon, and salt were added. Cold pieces of butter were added next, and it was mixed until crumbs started sticking together. Three cups of the crumb mixture was pressed into a spring-form pan, and the rest was set aside. The crust was then baked for about 20 minutes. Meanwhile, the apples were sliced, and the cranberries were washed. The custard was made with flour, sugar, an egg and an egg yolk, heavy cream, cinnamon, salt, and nutmeg. The fruit was placed in the baked and cooled crust, and the custard was poured over it. The remaining crumb mixture was sprinkled on top, and the tart baked for 50 minutes. I wasn’t completely happy with the color of the crumb topping after that amount of time, so I turned on the broiler for a few minutes to brown the crumbs a bit more. For serving, I topped each piece with whipped creme fraiche.

The custard in the filling is just enough to hold the fruit together well. The flavor and texture are really all about the fruit. But, it was the nutty, golden crust and crumb topping that stole the show in my opinion. The crust edges held their shape so nicely, and the buttery, golden crumbs on top were just right with the sweet-tart filling.


Tuesday, October 11, 2011

Green Bean and Seared Shrimp Salad with Spicy Curry Vinaigrette

There are several perfectly fine, simple things to do with green beans like just steaming them and maybe topping them with sliced almonds or boiling them and tossing them with roasted potatoes. However, when some green beans appeared in my CSA box a couple of weeks ago, I really wanted to give them some zippy flavor. I wanted to use them in a Thai-style curry or maybe in some kind of interesting salad. I found exactly what I had in mind in, of all places, an Italian cookbook. Stir, by Barbara Lynch, had become a favorite source of mine for interesting pasta, pizzas, soups, and salads, and that’s where I found this green bean and shrimp salad. The big flavor I was looking for is in the vinaigrette which is made with shallots, white wine vinegar, Thai red curry paste, and creme fraiche. The salad itself is composed of blanched, crisp-tender green beans, big, seared shrimp, thin slices of radishes, and toasted hazelnuts. With so many textures and flavors coming together, this salad was exactly the kind of thing I imagined for those green beans.

The vinaigrette can be made in advance, and I should have made extra to use on a lettuce salad the next day. In a small bowl, finely chopped shallots, white wine vinegar, and Thai red curry paste were combined. Grapeseed oil, creme fraiche, and lemon juice were whisked into that mixture. It was seasoned to taste with salt, and of course, more curry paste can be added to make it spicier. Radishes were thinly sliced, and I used a benriner to make very thin slices. I also placed the radish slices in a bowl of ice water while prepping everything else to make them extra crisp. Next, hazelnuts were toasted in the oven and then rubbed in a towel to mostly remove the skins. The green beans were blanched to preserve their color, and the shrimp were seared in a saute pan until just cooked for about a couple of minutes per side. The green beans, shrimp, radishes, and hazelnuts were combined in a large bowl and tossed with the vinaigrette. I garnished the salad with Thai basil leaves, but cilantro was suggested in the recipe.

Of course, this salad could easily be adapted to include more of one thing and less of another. In the headnote, Lynch writes that she sometimes leaves out the shrimp when taking the salad to a picnic or serving it as a side dish. However the salad is composed, the vinaigrette is the one thing that shouldn’t change. The creamy texture and bright, lively flavors made this salad what it was.


Tuesday, March 29, 2011

White Chocolate Hazelnut Blondies

Have you heard about the national bake sale for Japan? It’s happening in multiple cities this Saturday, April 2, and Austin is one of those cities. As soon as word started spreading about organizing a bake sale in Austin, the positive response was overwhelming. There are currently over 100 volunteer bakers and about 40 businesses contributing to the Austin event. There will be five locations around town for the sale, and all donations will go directly to Americares for relief efforts in Japan. Each location will have an incredible variety of both sweet and savory treats on offer, and for anyone who is unable to take part in Saturday’s event, there’s an online giving page with FirstGiving where all donations also go directly to Americares.

To be able to contribute, in some way, to the recovery process in Japan by baking sounded perfect to me. The timing couldn’t have been better since I just received a review copy of the new book Milk and Cookies which is from the New York bakery of the same name. The book will be released on April 20. It presents recipes for cookie dough bases from which many varieties can be made. For instance, there’s vanilla base dough, dark chocolate base dough, oatmeal, peanut butter, and sugar cookie base dough. Each base has a chapter dedicated to it with different additions for several unique cookies. From the peanut butter base dough, you might make peanut butter-milk chocolate bites or peanut butter and jelly cookies. There are also chapters for special cookies like mocha-cherry drops, carrot cake cookies, and ice cream sandwich cookies, family favorites like biscotti and sfogliati crown pastries, and brownies and bars like Kahlua brownies and pecan bars. Last weekend, I decided to test a recipe for white chocolate blondies to find out if they were bake sale-worthy. The cookie dough itself was made with melted white chocolate, and after baking, the blondies were covered with a white chocolate glaze. The cut bars were chewy, and there were hazelnuts and chocolate chips to add crunch.

First, a pound of white chocolate, and yes, that’s a lot but this recipe makes a lot of blondies, was melted with butter. I used Callebaut white chocolate disks. Next, flour, baking powder, and salt were combined and set aside. Six eggs were mixed in a stand mixer, sugar was added, and then the cooled white chocolate mixture was incorporated. The dry ingredients were added, and last chocolate chips and toasted, chopped hazelnuts were stirred into the dough. The dough was baked in a large sheet pan and allowed to cool before the blondies were topped with a glaze made with cream and more white chocolate.

As a white chocolate fan, these blondies were a big hit with me. The white chocolate in the dough gave the crumb of the bars a dense but tender texture. The semisweet chocolate chips and hazelnuts added crunch and kept the bars from being too sweet. These will definitely be contenders for what I bring to the bake sale, but I have my eye on that peanut butter cookie chapter too.


Blogging tips