Showing posts with label butter. Show all posts

Tuesday, September 3, 2019

Brioche

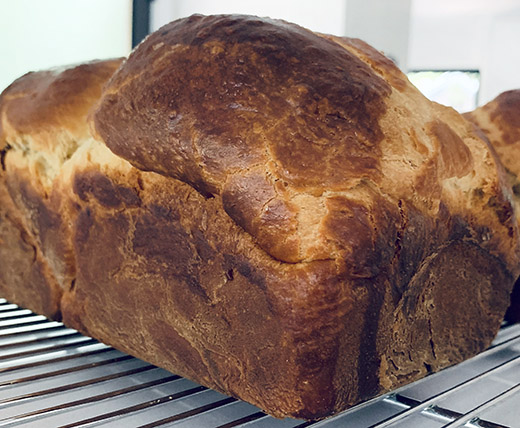
As a long-time fan of Martha Stewart, when she raves about a cookbook I pay attention. I noticed on Instagram that she had mentioned Baking at République: Masterful Techniques and Recipes by Margarita Manzke a couple of times. Specifically, she mentioned baking the brioche from this book and how delicious it is. Naturally, upon receiving a review copy of the book, I had to try the brioche. There are chapters devoted to some of the basic recipes that are used for several types of baked goods. Brioche is the first, and after the master recipe for brioche dough, there are several examples of how to use it including Brioche Fruit Tarts, Brioche Bread Pudding, Cardamom Sticky Buns, and more. Other chapters offer master recipes for Pain au Lait, Croissants, Kouign Amanns, Pate Sucree, Pate Brisee, and Pate a Choux. And, there are delightfully decadent recipes for using all of those types of dough. Following those chapters are ones for Muffins and Scones, Cookies and Bars, Cakes, Custards Puddings and Cream, and Basic Components. The Chocolate-Hazelnut Paris-Brest, Creme Brulee Cheesecake Tarts, and Mini-Chocolate Bundt Cakes all nearly distracted me from my intent to make the brioche first. But, I stayed on track. Now, in the days prior to tackling the brioche recipe, my trusty stand mixer of about 18 years had started acting a little funny. It didn’t seem to like operating at the lowest speed, but it was working at all the higher speeds. I was sure I could get through the dough making for this recipe by avoiding the lowest speed and working with the weirdness. Onward I went with letting a pound of butter warm a bit out of the refrigerator, cracking nine eggs, and getting the milk and locally-milled flour ready to go. And, the mixing got off to an ok start, but as soon as the dough became a bit heavy with the flour my mixer just stopped working at any speed. I was completely offended. How could it do this to me after all these years? How did it know I had all these ingredients ready to be used for a big batch of sticky, messy dough that really, really would be best made with a mixer? I didn’t seriously consider throwing out all the butter and eggs for even a moment. Instead, I started devising a plan for mixing all that butter in by hand without getting the butter too warm from my hands. Did I mention this was a big batch of sticky, messy dough? My kneading method involved using a bench scraper in one hand while turning and kneading with the other hand. After a few turns, I scooped it all into a bowl and refrigerated it for a bit before repeating. I wasn’t at all sure that this would turn into any kind of edible bread, but I was going to bake whatever became of it. 

It wasn’t particularly helpful to be reminded by others that we didn’t always have mixers. There must have been a time when this dough was made by hand. After everything was mixed, more or less, the dough was left to rise for 30 minutes before being turned and left for another 30 minutes. After the second rise, it was refrigerated overnight. I really believe the slow, cold rise overnight saved the dough. It was a smoother, lovelier dough the next day. To make the loaves, the dough was divided into four pieces, two dough balls were placed in each of two loaf pans, and they were left to rise again for about an hour and a half. After being brushed with an egg wash, the loaves were baked until deeply browned. 

Amazingly, the result was outstanding. Tender, buttery loaves were delicious sliced and served with blueberry jam. I also made very thick-cut French toast inspired by the book. I still have the second loaf in the freezer awaiting an occasion for a savory French toast with slow-roasted tomatoes. My old mixer and I have since parted ways after learning that a repair was unlikely, and a newer model has taken its place in the kitchen. I have lots of recipes to try with it!

I am a member of the Amazon Affiliate Program. 

Wednesday, June 5, 2013

Shrimp Popovers

I’ve never visited Charleston, South Carolina, but after hearing the Lee brothers describe the fresh oysters and fish of the waterways, the variety of locally-grown fruits and vegetables, and the rich cooking traditions of their hometown, I hope to get there someday soon. Matt and Ted Lee recently taught a class at Central Market Cooking School, and I attended with a media pass and received a copy of their latest book The Lee Bros. Charleston Kitchen. I posted some photos from the class on my Facebook page. The book brings together classic, iconic Charleston dishes, with updates in some cases, and stories of their origin. I had never heard of the liqueur called Rock and Rye which is a Charleston favorite. It’s made with rye whiskey and candied oranges, and I can’t wait to make it this winter. Other classics include dishes like Deviled Crab, Four-Pepper Collards, Peach Upside-Down Skillet Cake, and Shrimp and Grits. During the class, the brothers explained how Shrimp and Grits has changed over the years. Originally, it was a simple dish of shrimp cooked in butter with salt and pepper and served over plain hominy grits. Over the years, tomato found its way into the sauce with the shrimp, and then one restaurant after the next added new and different ingredients to personalize it in various ways. The version they shared includes tomato and bacon but otherwise keeps the complexity in check. The grits are made with milk and butter but no added cheese. It’s an interesting journey to follow a dish backwards to where it began and note its changes over time. The Syllabub has an interesting history as well. In Charleston, it was originally served more like a drink and always with rosemary which grows prolifically there. The night of the class, we were served an updated, layered syllabub of whipped cream with Madeira and fresh strawberries. 

After the class, I started flipping through the book and the Shrimp Popovers immediately caught my eye. It’s a straightforward recipe for popovers, but a spoonful of shrimp butter is placed in each cup of batter before baking. They smell delicious as they bake and puff up to full height, and they come out of the oven light and airy with crispy edges all around. The full recipe of shrimp butter in the book makes a lot more than you need for the popovers, so I made a half portion of it and still had enough for two batches of popovers. The quantity I made included a half pound of shrimp which were briefly boiled in salted water and then cooled, shelled, and deveined. The cleaned shrimp were combined with four tablespoons of butter, a little salt, and a pinch of sugar in a food processor and pulsed until no lumps were visible. The shrimp butter should be refrigerated for about an hour before using, or it can be stored in the refrigerator for up to four days. For the popovers, a cup of flour, one-half teaspoon of salt, a pinch of sugar, and I added a pinch of ground cayenne were sifted together before a cup of milk, two tablespoons of melted butter, and two eggs were whisked into the mix. The popover pan was heated in the oven for the last few minutes as it came to 450 degrees F. I brushed nine of the cups with melted butter before pouring in the batter to fill each cup about two-thirds full. A spoonful of shrimp butter was added to each cup, and the popovers baked for 20 minutes. 

The popovers are perfect when just cool enough to handle, but they can also be reheated for a few minutes before serving if baked in advance. And, there are several suggestions for using any extra shrimp butter like spreading it on toast or biscuits, stirring it into grits, or tossing it with pasta. Until I get a chance to visit Charleston in person, I’m happy to continue getting acquainted through the food in this book. 

I am a member of the Amazon Affiliate Program.

Wednesday, May 8, 2013

Kouign-Amann

When I look at recipes for cakes, I make mental notes like “this one would be great for a birthday,” or “this is the cake for a spring party,” or “I have to remember this one during the holidays.” But, with the new book from Gesine Bullock-Prado, I was making all those usual mental notes and also thinking “I want to bake this cake just to see if I can do it.” The new book is Bake It Like You Mean It, and I received a review copy. There are showpiece cakes with intricate layers and beautiful frosting; there are meringues layered with fillings or built into a torte; and there are cheesecakes, mousse cakes, and even simple pound cakes. The Banana Caramel Slices are layered with chocolate sponge cake and caramel cream and topped with a chocolate glaze and caramelized bananas. The Citrus Angel Food Cake combines lime, orange, and lemon batter baked in one pretty cake. And, there’s a Checkerboard Cake, a Puzzle Cake, and a big roulade turned on its side that looks like it’s made with vertical layers when sliced. I want to make all of these cakes. There are clear instructions and tips, a good bit of humor to keep the book feeling fun, and helpful photos show the process for some recipes. After reading through recipes and looking at photos, I had several aha moments of realizing these cakes look more complicated than they might actually be to make. In addition to all those stunning layer cakes, there’s also a chapter for yeast-risen goodies like Brioche, Tangerine Dream Tea Ring, and Kouign-Amann. Since I didn’t have a handy occasion for a big cake with several layers and Kouign-Amann is something I’ve wanted to try making for the longest time, I started with that. 

This is a Breton cake, or mini cake depending on how it’s made, and the name quite appropriately comes from the words for cake and butter. There are only a few ingredients here which means it's a celebration of butter and sugar. So, this is a time to splurge on really good butter, and I used vanilla sugar from a jar where vanilla pods get stuffed after scraping out seeds. Making the dough for the little cakes is a lot like making puff pastry. A simple yeast-risen dough was rolled out, a block of butter was placed on one side, the dough was folded over, and it was rolled and folded, chilled, and rolled and folded again. For these cakes, the dough is rolled in sugar rather than flour. So, you end up with layers and layers of butter, dough, and sugar that are cut and folded into squares that bake into sweet, little, tender cakes with crispy, sugary edges. 

I love finding out things aren’t as difficult to make as they look, and the Kouign-Amann was a perfect example of that. This will be the book to grab when special occasions demand an impressive dessert. And, it’s also the book to grab when you just want to try baking something new and fun. 

Kouign-Amann 
Recipe reprinted with publisher's permission from Bake It Like You Mean It.

If you’ve had the pleasure of spending time in Brittany, no doubt you have had a taste of a kouign-amann. If you’ve had the pleasure of spending time in Brittany and you didn’t eat kouign-amann, then you never really went to Brittany at all because you can’t fully appreciate the place and her people until you take a bite of that crispy, sweet, buttery, slightly-chewy-in-the-center-and-caramelized-on-top-and-on-the-edges pastry. 

2 1/4 cups (450 g) granulated sugar, divided 
2 teaspoons salt 
5 cups (625 g) all-purpose flour, plus extra for dusting the work surface 
2 tablespoons instant yeast 
 1 pound (455 g) unsalted European butter, at room temperature 

In the bowl of a stand mixer fitted with the hook attachment, combine 1 1/2 cups (360 ml) water, 1/4 cup (50 g) granulated sugar, and the salt. Add the flour and yeast and mix until a smooth, shiny dough forms, about 10 minutes. If the air conditions are very humid, you may need to add a bit more flour. If dry, add a few tablespoons of water. The dough should be smooth and pull away from the sides of the bowl. 

Spray a large bowl with nonstick cooking spray. Place the dough in the bowl and turn it over a few times to coat thoroughly. Cover with plastic wrap and place in a warm area of your kitchen to allow to proof until doubled in volume, about 1 hour. 

In the bowl of a stand mixer fitted with the paddle attachment, combine the butter and 1/2 cup (100 g) sugar. Mix until the two are well blended and the butter is smooth but not soft. Transfer the mixture to a piece of plastic wrap and shape into a rough 8-by-11-inch (20-by-28-cm) rectangle. Cover completely with plastic wrap and, using a rolling pin, gently even out the butter into an even block. Refrigerate for 20 minutes. 

Turn the dough out onto a lightly floured work surface. Lightly dust the top of the dough with flour as well. Roll the dough into a rough rectangle, approximately 12 by 18 inches (30.5 by 46 cm). Place the butter block on one side of the dough and fold the second half over the dough block. Press along the edges of the dough block to secure the butter inside the dough. 

Sprinkle the work surface evenly with 1/4 cup (50 g) sugar. Place the dough on the sugar and roll out into a rectangle approximately 12 by 18 inches (30.5 by 46 cm). Sprinkle the top with 1/4 cup (50 g) sugar. Fold one short half toward the middle and fold the other half over on top of that, as if you were folding a business letter. Cover with plastic wrap and chill for 20 minutes. 

Again, sprinkle your work surface with 1/4 cup (50 g) sugar, and sprinkle 1/4 cup (50 g) sugar over the top of the dough in an even layer. Roll out the dough into a rectangle 12 by 18 inches (30.5 by 46 cm) and fold into a business letter again. Cover and refrigerate for 45 minutes. 

Preheat the oven to 400°F (205°C). Line a half sheet pan with parchment paper. 

Sprinkle 1/2 cup (50 g) sugar onto the work surface and roll the dough into a rectangle 8 by 16 inches (20 by 40.5 cm). Using a very sharp pastry wheel, cut the dough into eight (4-inch / 10-cm) squares. Prepare each pastry by folding each corner of the square toward the center and pressing the corner to seal into place (you’ve just created a smaller square). Continue until you’ve finished folding all the squares. Sprinkle the squares with the remaining 1/4 cup (50 g) sugar. Cover with plastic wrap and allow to rest for 20 minutes. 

Bake for 20 minutes, or until the top is a deeply golden brown and caramelized. Eat while warm! 

I am a member of the Amazon Affiliate Program.

Friday, November 12, 2010

Croissants

Do you have a mental list or an actual list of things you hope to cook some day? Croissants was one item on my list. Earlier this year, Michael Ruhlman wrote about unfinished business and challenged everyone to commit to accomplishing something new in the kitchen. I left a comment on that post thereby publicly committing to attempting both gnocchi and croissants before the end of the summer. So, I did finally take a stab at making gnocchi, but I had a really good reason for waiting on the croissants. It was hot. It's always hot here during the summer, but fear coupled with a warm kitchen and humid air prevented me from spending three days on croissants during the summer season. I needed time to convince myself that even if my first try was a failure the effort would be a learning experience, and I needed the weather, my schedule, and the universe in general to cooperate. Last week, we had some nice, cool, non-humid days, and I finally went for it. I'm certainly no expert after only one go at making these lovelies, but I now understand that waiting for a cool day was a very, very good idea. There is a lot of butter involved here, and too soft, oozing, warm butter would have been disastrous. I had heard several times that the very best croissants to make are the ones from Baking with Julia written by Dorie Greenspan. I attended a cooking class taught by Dorie a couple of weeks ago, and when she signed her new book for me after the class, I mentioned that I was planning to try those croissants. She said "it's a project, but it's worth it." She couldn't have been more right.

I knew that to make croissant dough, a whole lot of butter needed to be layered into some dough. I knew it was necessary to roll out the layered dough and butter and fold and turn. I was sure that I would fail instantly at this and there would be butter squishing out in every direction, and I would never get the dough rolled into a straight enough shape to fold properly. I was wrong. Before starting, I read the recipe all the way through about ten times. Then, I set about following each step as precisely as I could. The dough was made with yeast, flour, sugar, salt, and milk. It was made in a stand mixer with a dough hook. As instructed, I added a little more milk when the flour wasn't all worked into the dough. When it came together, the dough was wrapped in plastic and refrigerated overnight. The next day, I mixed four and half sticks of cold butter with two tablespoons of flour and pressed it into a thick oval. My oval of butter wasn't all that attractive because of the wrinkles left by the plastic wrap, but it really doesn't matter how it looks. I refrigerated the butter oval for an hour or two before proceeding.

The next step was what I thought would be the scariest. The dough was rolled into a wide oval, and the butter oval was placed in the center of it. The dough was folded over the butter, and then, the butter had to be distributed across the width of the dough. This was done by whacking the packaged dough and butter bundle with a rolling pin. Slowly but surely the butter did work its way throughout the dough, and it did not result in the squishing mess I had anticipated. One small victory was mine. After distributing the butter, and rolling a little, you are left with a big rectangle of butter-filled dough, and you give it its first fold. Excess flour was brushed off, the dough was folded in thirds like a letter, and it was placed on a baking sheet, covered with plastic wrap, and refrigerated for two hours. My first fold of croissant dough went off without a hitch.

Next, the dough was rolled again into a big rectangle, it was folded in thirds once again, and it was placed back in the refrigerator for another two hours. Then, it was time for the third and final folding. The dough was rolled yet again into a big rectangle, and this time, the dough was folded inward in quarters with the last fold closing like a book, and that double turn is known as the wallet. I loved making the wallet. I didn't have finished croissants yet, but I felt like I had really accomplished something by successfully arriving at this point. Interestingly, at this point, or after any of the folds, the dough could have been placed in the freezer to store for a later date. It should be thawed overnight in the refrigerator before proceeding with the next step. Otherwise, after the last fold, the dough should be refrigerated for two hours before proceeding, and I left it refrigerated overnight.

At last, it was time to actually make the croissants. The chilled dough, with all those folded-over layers of butter, was cut in half and one piece went into the freezer while the other one was rolled into a big rectangle one more time. That was folded in half. That double layer of dough was cut into triangles. The double-layered triangles were unfolded back out into a single layer, and the dough was cut down the center to separate the triangles, and croissant forming began. After cutting the triangles, there are two scrap pieces of dough from each end. Those scraps are used to make little footballs of dough that sit in the back of each croissant to help plump them. Or, if you're making almond croissants, which I also did, a little ball of almond paste would be used instead. To form each croissant, a dough triangle was picked up and stretched to twice its length. The football of scrap dough or ball of almond paste was placed at the wide end of the triangle. Then, the triangle was rolled from wide end down to small end, and voila, croissants were born. After filling two baking sheets with croissants, they were brushed with an egg wash, the almond paste filled ones were sprinkled with sliced almonds, and they were left to rise for three hours before being baked.

Yes, this was a project. Mixing the dough on the first day was quick and easy, but you do need to have two days thereafter during which you can come into the kitchen every couple of hours and tend to the dough and then spend the time to form the croissants and wait for them to rise. But, you already know I'm going to tell you it is absolutely worth every minute of your time. After one bite, I declared that these croissants were hands-down the most delicious things I've ever baked. The bonus to all of this is that, that last time the dough came out of the refrigerator, it was cut in half. Half was used to make these croissants, and the other half is in the freezer. I can use that to make more croissants whenever I want. When it's gone, I'll definitely make the dough again just as soon as the weather, my schedule, and the universe are all aligned once more.

I’m submitting this to Yeastspotting where you’ll find some seriously well-made bread.


Blogging tips