Showing posts with label cherries. Show all posts

Thursday, August 9, 2012

Porch Crawler Cocktail

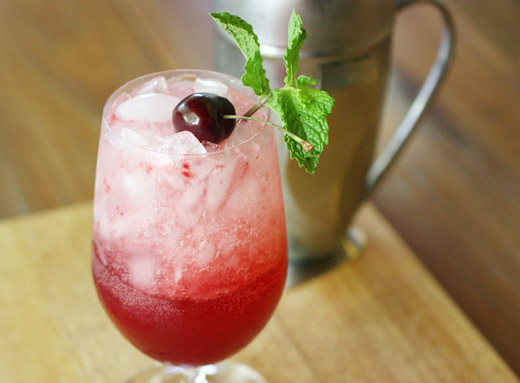
The name of this cocktail makes it sound more lethal than it really is. Porch Sitter might be a better title for it. It’s a fruity, zingy ice-cold drink for summer, and it’s a perfect excuse to sit down and put your feet up for a minute or two. I did some searching on the name Porch Crawler and learned it’s a common name for highly alcoholic drinks with some sweetness and fruit. This one just has a little rum, not a mix of different spirits, but it does have fruit. I had every intention of making this at some point last summer after cutting the page from the April 2011 issue of Food and Wine, but the weeks flew by and cherry season was over before I knew it. So this year, it had to happen. Fresh, pitted cherries are muddled with mint leaves and a halved serrano chile. When you taste it, you don’t really notice the chile at first since the fruit and mint get all the initial attention. Then, you realize there’s something else going on here. It’s just a hint of heat to make things interesting.

Stem and pit a handful of cherries, and place them in a cocktail shaker. Add a few mint leaves and a halved serrano chile. You can remove the seeds from the chile if you’d like to make it milder. Muddle those ingredients in the shaker, and then add some ice. Next, add rum, lemon juice, and simple syrup, and shake until cold. Strain the cocktail into a glass with ice, and top with club soda.

I suppose it’s possible you could end up needing to crawl if you consumed enough of these, but I’ll still argue it could use a better name. I wouldn’t change anything else about it though. And, I still have time to make a few more before cherries disappear for this year.


Saturday, July 14, 2012

Cherry-Brown Butter-Creme Faiche Tart

Choosing dessert for a cherry-themed dinner was easy. I had just read about a tart in The Sugar Cube that can be made with any berries or cherries, and I couldn’t wait to try it. In the book, it’s made with raspberries that are all lined up in neat rows down the length of a rectangular tart. I wanted to do the same thing only with halved cherries instead of raspberries. It worked like a dream. The tart crust was buttery and flaky, and the cherries were juicy and sweet. But, the filling in this tart was the highlight. I thought the mixture would be a tasty middle to hold the fruit in place, but I didn’t expect the level of wow brought on by the vanilla and brown butter. Actually, the butter was melted with vanilla seeds and the pod in it and smelled incredible as it browned. When that fragrant vanilla brown butter was mixed into the filling with creme fraiche, I knew I was going to have a great tart. There is some fussiness to making this tart like making the dough, chilling it, rolling it, fitting it into a tart pan, chilling again, and that sort of thing. I can tell you though, it’s worth the effort.

I made the tart dough by hand as I usually do although the recipe recommends using a food processor. Butter was cut into flour that had been stirred with a little salt and some sugar. Cold cream and an egg yolk brought the dough together, and it was chilled for about an hour. As suggested in the book, I used a four-inch by thirteen-inch, rectangular tart pan. After placing the dough in the pan and docking the bottom, it was chilled in the freezer while the oven pre-heated. The tart shell was blind baked with pie weights for about 15 minutes, the oven temperature was reduced, the weights were removed, and it was baked another ten minutes. Meanwhile, that amazing filling was made with vanilla brown butter, sugar, salt, an egg, flour, and creme fraiche. The baked tart shell was allowed to cool a bit before the filling was added, and then halved cherries were placed in rows, cut side down in the filling. The tart went back into the oven for 25 minutes.

I mentioned before how much I’m enjoying this book, and this was one more reason why. Every recipe I’ve tried from it so far has worked perfectly and delivered delicious results. A dessert with cherries is easy for me to like, but this one topped all expectations.

Raspberry (or Cherry)-Brown Butter-Creme Fraiche Tart
Recipe reprinted with publisher's permission from The Sugar Cube.

Notice how raspberry is the first word in the title? That’s because this tart is all about the fruit. Yes, there’s a rich tart dough made with egg yolk and cream. And yes, it’s slathered with an amazing filling of vanilla browned butter and creme fraiche. But the filling is more of a flavorful base to support and contrast with all the bright fruit. Now, don’t skimp and use extract instead of a vanilla bean when making the filling. You won’t get the same depth of flavor as you do when you brown the seeds and pod along with the butter. You can, however, feel free to change up the fruit. You can use other berries, or even cherries that have been pitted—just cut them in half and toss with about two tablespoons of sugar.

MAKES 6 TO 8 SERVINGS

Ingredients

Tart dough
1 1/4 cups plus
2 tablespoons unbleached all-purpose flour
1/8 teaspoon sea salt
1/4 cup sugar
1/2 cup (1 stick) cold unsalted butter, cut into 1/2-inch cubes
2 to 3 tablespoons heavy cream
1 egg yolk

Brown butter filling
1/2 vanilla bean
4 tablespoons unsalted butter
1/4 cup plus
1 tablespoon sugar
1/4 teaspoon sea salt
1 large egg, at room temperature
1/4 cup unbleached all-purpose flour
2 heaping tablespoons creme fraiche
1 pint (abour 2 cups) fresh raspberries (or cherries)

Instructions

TO MAKE THE TART DOUGH:
In the bowl of a food processor, combine the flour, salt, and sugar and pulse a few times. Add the butter and pulse until the mixture looks pale yellow and sandy.

IN A SMALL BOWL, combine the cream and egg yolk. While pulsing, pour the mixture through the feed tube of the food processor. Continue pulsing until the dough forms a ball around the blade.

TURN THE DOUGH OUT onto a lightly floured surface and gather it into a ball. Flatten the ball into a disk so it’s not too thick and will be easier to roll out, wrap it in plastic, and chill until firm, at least 30 minutes.

REMOVE THE DOUGH from the refrigerator and let stand at room temperature for a few minutes to soften a bit. Roll out the dough on a lightly floured surface using a lightly floured rolling pin, frequently turning it a quarter turn. (Use a bench scraper to dislodge any areas that stick to the work surface and dust the area lightly with flour.) Roll the dough out until it is 1/4 inch thick and an inch or two longer than the length and width of a 4-by-13-inch removable-bottom tart pan. Carefully transfer the dough to the pan and gently press it into the pan, including the corners. Roll the rolling pin across the top of the tart pan to cut off the excess dough. Check around the top of the pan and make sure the dough is at least flush with the top, or make it a little higher. Prick the bottom of the tart all over and chill in the freezer until firm, 15 to 20 minutes.

TO MAKE THE FILLING:
Split the piece of vanilla bean lengthwise and scrape out the seeds with the back of a knife. Add to a small sauté pan along with the pod and the butter. Cook over medium heat, whisking frequently, until the butter darkens to a nutty brown and the solids drop to the bottom of the pan, about 3 to 5 minutes. Remove from the heat and discard the vanilla bean pod. Measure out 3 tablespoons of the browned butter, making sure to get as much of the vanilla bean seeds and browned bits as you can. (You can save any extra butter for another use.)

IN A SMALL MIXING BOWL, whisk together the sugar, salt, and egg until combined. Whisk in the flour, then whisk in the browned butter and crème fraîche until combined.

PREHEAT THE OVEN to 400°F. Crumple a piece of parchment paper (to increase its flexibility so that it will conform more easily to the shape of the tart shell), then flat-ten it out and fit it into the chilled shell. Fill with pie weights, dried beans, or rice. Bake until the sides of the shell look set and golden, 10 to 15 minutes, then gently lift the parchment and beans and remove them from the tart. Reduce the heat to 350°F, and continue baking until the bottom is set and lightly golden, 5 to 10 minutes longer. (If the edges start to look too dark, cover them with strips of foil.) Let cool slightly on a wire rack for about 5 minutes before filling.

SPOON THE FILLING into the prebaked tart shell, spreading it evenly over the bottom with a small offset spatula. Arrange the berries in an even layer on top. Bake on the center rack until the filling has puffed up around the fruit and is golden brown, about 25 minutes. (Again, if edges are getting too dark, cover with strips of foil.)

LET COOL before cutting tart crosswise to serve.

TIPS
You can use any leftover scraps of tart dough to make mini jam tartlets. Roll it out and cut it into rounds. Drop a dollop of jam in the center of each round, and fold the dough over to make a turnover. Crimp the edges with a fork, chill until firm, and then bake until golden brown.

Taste your fruit. If it’s not very sweet, fold in 1 tablespoon melted apricot jam or seedless raspberry jam. Or use superfine sugar, which is absorbed more quickly.

You can make the filling several days in advance. Let it come to room temperature before you use it, so it will be easier to spread.

I am a member of the Amazon Affiliate Program.

Wednesday, July 11, 2012

Grilled Quail with Savory Cherry-Zinfandel Compote and Kohlrabi, Fennel, and Bing Cherry Salad

Can we talk cherries? I go a little bonkers for them every year. Last year, it was Cherry Lambic Crisps and White Chocolate-Cherry Ice Cream and Cherry Sorbet Sandwiches. The year before, I couldn't get enough of Pickled Cherries. So, when Whole Foods asked if I'd like to help celebrate Cherry Fest by coming in for more fresh, lovely cherries and planning a special menu around them, it was an invitation to a kid into the proverbial candy store. Cherry Fest is taking place at all Austin Whole Foods stores this weekend, Friday through Sunday, with special events from 12pm until 5pm. On Friday, there will be a one-day sale on cherries. For a cherry-themed meal, I imagined quail would pair well with the fruit, and I set about hunting for sauce ideas. In Sunday Suppers at Lucques, there's a Savory Cherry Compote served with duck confit which I thought would work just as nicely with grilled quail. With the main dish decided, I started a search for a salad with cherries. Girl in the Kitchen had just what I'd hoped to find. It's a raw, crunchy mix of thinly sliced kohlrabi and fennel with fresh cherries, and it's made tangy and bright with chopped preserved lemon and fresh mint. 

I couldn't help making a few minor changes to the cherry sauce. Rather than making it with port, I opted for a Zinfandel on the fruitier side. Also, to keep this sauce firmly in the savory category, I added some minced shallot to the ingredients that simmered with the cherries. So first, spices and herbs were gathered in a cheesecloth bundle, and those included thyme, bay leaves, chiles de arbol, star anise, a cinnamon stick, and black peppercorns. A quarter cup of sugar was melted in one cup of water in a saucepan, that was brought to a boil, and then a half cup of Zinfandel, juice from two oranges, and the spice sachet were added. I added minced shallot at that point as well. The heat was reduced to a simmer, and one third pound of stemmed and pitted cherries was added and poached for about ten minutes. At that point, the sauce was strained into a heat-proof measuring pitcher to remove the cherries and sachet. The strained sauce was returned to the saucepan, and cooked until reduced by two-thirds. It was strained again, seasoned with salt and pepper, and just before serving, a tablespoon of butter was swirled into the sauce and the cherries were returned to the pan. I used semi-boneless quail which were cut in half, and I removed the wing tips. I marinated the halved quail in a mix of olive oil, minced garlic, sliced serrano chiles, chopped sage, oregano, and rosemary. Grilling the quail happens quickly. They only need a few minutes on each side over high heat on the grill. Then, I moved them to a cooler spot on the grill and basted them with some of the sauce. The grilled quail was served with more sauce including the cherries. The sauce is full of big, fruity, spicy flavors, but once it coated the quail, it seemed more subtle, like that was exactly where it belonged.  

The salad is a very quick preparation. Trimmed kohlrabi and fennel bulbs were cut in half lengthwise, and then thinly sliced on a mandoline. Cherries were pitted and sliced in half. Everything was combined in a large bowl, drizzled with olive oil, finely chopped preserved lemon was added, and it was seasoned with salt and pepper. You should taste before adding salt since the lemon adds a good bit of saltiness of its own. After tossing to mix well, chopped, fresh mint was sprinkled on top. It's a simple mix of well-coordinated flavors. Fruity sweetness, acidity, herbiness, and the floral anise of fennel were delightful in this cool, crisp salad. 

A dessert with cherries was easy to choose, and of course, I'm not done with cherries for this year. I've been having them for breakfast with Greek yogurt and homemade granola, and I still need to stock the freezer with a few bags after more have been pitted. And, more ideas for using cherries keep catching my eye: 

Cherry Tartlets 
Cherry Prosecco Granita 
Cherry and Rosemary Focaccia 

I received a $150 gift card from Whole Foods. I am a member of the Amazon Affiliate Program.

Monday, July 25, 2011

Chocolate Dipped Ice Cream and Sorbet Sandwiches

It's no surprise that we're having a hot summer here. We always do. We have had an impressive 40 days of temperatures at or above 100 degrees F though, and it's only July 25. From the looks of the weather forecast, we're about to add seven more days to that total. What this means is that all I really want to eat is food that's cold and preferably frozen. Last August, there was a photo in Bon Appetit of a stack of chocolate dipped ice cream sandwiches. The sandwiches were all different flavors, one end of each had been dipped in melted chocolate, and then sprinkled with jimmies or toffee chunks or chopped nuts. This photo had been touched up with added vapor swirls around the sandwiches to further highlight their lovely coldness and perfection as a treat during the heat of summer. That pile of extremely cold sandwiches was something I needed in my freezer. You could use whatever ice cream or sorbet you'd like for the filling, but since I'd been waiting to find fresh, organic cherries for a few weeks, there were a couple I'd had on my mind. First, I made candied cherries and used them in white chocolate cherry ice cream, and then I cooked some cherries and pureed them for cherry sorbet. Both of those recipes are from The Perfect Scoop. The fillings were already delicious on their own, but the brown-butter cookies and chocolate coating with chopped almonds didn't hurt them one bit.

Yes, that was brown-butter cookies. And, the technique, found in the Bon Appetit recipe, for making these sandwiches was an interesting one. The cookie was baked in one solid layer in a nine by thirteen inch pan. I cut the sheet of cookie into four pieces horizontally. Two were filled with white chocolate cherry ice cream, and the other two were filled with cherry sorbet. In each case, the bottom cookie sat at one edge of the pan in which it was baked, ice cream or sorbet was piled thickly on top, and the other cookie piece was placed on top of that. With an off-set spatula, you can smooth the exposed edge. Then, each long piece of filled cookie sandwich was wrapped in plastic wrap, left in the pan, and placed in the freezer to firm up. After a few hours, the cookie bars were cut into separate, little sandwiches. The great news is that these brown-butter cookies cut easily with a serrated knife. They didn't break or chip apart as I feared they might. The cut apart sandwiches were placed back in the freezer once again before the next step. Last, chocolate was melted, one end of each sandwich was dipped into the chocolate and then into chopped nuts, and they set up in the freezer until dessert time arrived.

Almost any cookie would make a good ice cream sandwich, but some are easier than others to bite into after being frozen. The cookies used here performed perfectly for filling, cutting, and biting. The process of filling a long piece of cookie and then cutting the sandwiches after they were frozen and firm worked amazingly well. I haven't decided which filling, the white chocolate cherry ice cream or the cherry sorbet, I like better, but opening the freezer to find two different options for frozen treats is certainly making our hot summer a little more bearable.


Monday, July 18, 2011

Cherry Lambic Crisps

In late May and throughout June, I keep an eye out for organic, fresh cherries. Conventionally-grown cherries will make appearances around town, but organic ones seem to be harder to find. I started asking around about them since I was sure I must have darted right by them without noticing at some point. Then, as if they knew I was starting to panic, a few days later, Whole Foods announced a one-day, organic cherry sale. I got to the store as early in the day as I could and loaded several pounds of cherries into my shopping cart. I tell you all of this to explain the many, cherry-filled dishes that will be showing up around here starting with this one. These individual cherry lambic crisps were shown in the June issue of Food and Wine, and that issue was full of recipes made with beer. In this case, a cherry lambic was mixed with the fruit for the base of the crisp, and dried sour cherries were added to the fresh, sweet, dark cherries. I was intrigued.

So, a combination of cherry beer, fresh and dried cherries, honey, and seeds from a vanilla bean was mixed and left to sit for 30 minutes. The dried sour cherries plumped, and juices from the fresh cherries mixed with the honey and beer. The fruit mixture was divided between six ramekins. The crisp topping was fairly standard with sugar, flour, chopped almonds, brown sugar, cinnamon, nutmeg, and cardamom. Orange zest was to have been added, but I used lemon zest instead. Melted butter was stirred into that mixture, and it was pressed by hand to form clumps as it was added to the top of each ramekin with fruit. The crisps baked for about 30 minutes to a bubbly and golden state.

The crisps tasted like cherries rather than beer, but then, the taste of cherry lambic itself is more of cherries than of beer. The chewy, dried sour cherries added a nice contrast to the sweet, fresh ones, and the topping's buttery crunch was made even better by the addition of chopped almonds and spices. I would definitely make this again with the exact same ingredients, but I think a version with wine-soaked fruit might be interesting too.


Monday, June 14, 2010

Pickled Cherries

Last month when I started telling you about My Favorite Ingredients, I mentioned the cherry chapter in the book and how I was looking forward to the start of the season. Well, it is upon us, and I now believe there is no quantity of cherries in my refrigerator that would be too much. Pickled cherries is the first recipe in that chapter, and I’d been thinking about them for weeks. I imagined vinegary, sweet, little bites of fruit with hints of spice served alongside a soft cheese with some personality. Also, there would have to be some bread and maybe a really good beer to accompany the cherries and cheese. As soon as I found cherries in town, I set about pickling them, let them sit all of one week as I couldn’t wait another day, I baked some bread, visited my favorite local cheese shop, and the plan became a reality. I chose Leonora cheese from Spain which is a soft-ripened, aged goat cheese, and I grabbed a bottle of Saison Dupont otherwise known as my new favorite, summer beer. It all came together as a snack that makes the word snack seem inadequate.

To pickle the cherries, they were washed and left with pits and stems intact. Sugar was dissolved in red wine vinegar and bay leaves, cloves, and peppercorns were added. The mixture was brought to a boil, simmered for ten minutes, and allowed to cool. The cooled syrup was poured over the cherries, and I stored them in the refrigerator. The longer they sit, and they can remain refrigerated for up to one year, the more wrinkly the cherries will become. Since I couldn’t wait longer than a week, mine were still mostly plump.

In the book, pickled cherries are used in a warm pheasant salad with tardivo and toasted hazelnuts. That sounds like a wonderful fall dish, but I don’t think I’ll have any cherries left by then. Maybe I can come up with something more summery for a salad with notes of bitterness for balance. Something with arugula could work or possibly grilled romaine. While I think about that, I’m ready to make the cherry cordial and the brandied cherries from the book, and then I might have to pickle some more before the season ends.


Friday, August 7, 2009

Cherry-Zucchini Muffins

In my last CSA pick-up, I received a gigantic zucchini that could have fed an army. I asked around for ideas for using it in multiple dishes. Someone on Twitter mentioned that when his zucchini get that large, he feeds them to his animals. I can understand that given that at this kind of size there are bigger seeds and the texture is starchier, but I was determined to make good use of this monster for human consumption. In the end, I chopped some of it and roasted it for a pasta dish, and for the rest, some sort of zucchini bread was a no-brainer. A quick bread is a good way to go with a big, starchy zucchini because it’s grated before being mixed into the batter, and the texture matters less that way. After looking at a few options for zucchini bread, I came upon a recipe for muffins in Martha Stewart's Baking Handbook. In the book, these are actually cranberry-zucchini muffins, but I used cherries because that felt summerier.

This is a very quick muffin batter to assemble. The great big half of zucchini was grated and set aside. Eggs, sugar, oil, and vanilla were whisked together, and then the zucchini was added. Flour, baking powder, baking soda, cinnamon, and salt were incorporated before frozen cherries were folded into the batter. Into the oven went the muffins, and they emerged golden with little, green flecks.

I liked seeing the bits of green from the zucchini just to remember that it was in there. It’s, of course, completely imperceptible in the flavor, but it does a magic trick on the texture. This is a muffin that can sit for a few days and still taste just as tender and delicious as the first day thanks to all that grated zucchini. These muffins also freeze very well, and I’ve already pulled the second half of the batch out of the freezer to finish them. This size of zucchini wouldn’t be a good choice for a raw salad or for pickles, but it did make some very fine muffins.


Blogging tips