Showing posts with label pecans. Show all posts

Wednesday, August 24, 2016

Pecan, Oat, and Dark Chocolate Chunk Cookies

A few weeks ago, Kurt and I had a conversation about sports drinks. We’d both been out in the hot weather and were feeling dehydrated, and Kurt asked if a good, all-natural sports-drink type of product exists. My short answer was no. But, the more I thought about it, I decided the best option might be coconut water. I personally have not conducted any scientific tests, but I do find coconut water to be very refreshing and hydrating after working out outside in the heat of summer. And, incidentally, when I choose a brand of coconut water, Harmless Harvest is my favorite. I want to point out that this conversation and the beginning of my preference for Harmless Harvest all happened prior to that company contacting me about their Harmless Movement campaign. I was delighted to receive gifts of a branded mason jar and espresso cup and coupons for samples of coconut water. My reasons for choosing Harmless Harvest are: they use organically-grown, special green coconuts and never use ultra-processed mixes or blends; their farmers use traditional cultivation methods ensuring unique coconut flavor goes directly into the bottle; rather than pasteurizing the product, they use a special multi-step micro-filtration process to protect flavor; their product contains no GMOs, no additives, and no preservatives; and theirs is the first-ever Fair for Life-certified organic coconut water. It’s very rare that I’m approached by a brand that I am so happily willing to promote. I was able to sample a flavor option I hadn’t tried before as well. Harmless Harvest makes a coconut water with Fair Trade coffee and a little caffeine boost. I thought a snack with some dark chocolate in it would be a good match for coffee-flavored coconut water. I pulled a recipe from my files from the May 2015 issue of Living magazine, and this not-too-bad-for-you cookie with no butter, no flour, and no sugar quickly became my new favorite treat. 

Not often do I shout from the rooftops about a vegan cookie with no flour in it, but this really is a delicious cookie. First, pecans are finely ground, and that’s what gives the cookies body and great flavor. To the ground pecans, oats, baking powder, salt, cornstarch, olive oil, maple syrup, and vanilla extract were added. The mixture was stirred to combine, and the dough was ready to portion and bake. Keep in mind that this dough doesn’t spread or settle as it bakes, so after placing mounds on a cookie sheet, press each to the thickness you prefer before baking. The cookies baked at 325 degrees F for about 20 minutes. 

Kurt’s favorite cookie is oatmeal-chocolate chip, so he was excited to find these cookies in the kitchen. He took a bite and declared them fantastic before I let him know they contained no butter, no sugar, and no flour. None of that mattered. They’re rich from the pecans and olive oil, nicely sweetened with maple syrup, and the big chunks of dark chocolate don’t disappoint. And, they go perfectly with Harmless Harvest coconut water with Fair Trade coffee. 


Wednesday, July 23, 2014

Grilled Peaches with Pecans and Maple Meringue

I have to admit, I’d never thought about how versatile meringues are. When I received a review copy of the book Meringue Girls, I wondered: how many different recipes could there really be? It turns out, there are several. And, all of them are irresistibly pretty. The Meringue Girls, Alex Hoffler and Stacey O’Gorman, created a London-based shop that supplies these lovely treats for special events. Their meringues come in all sorts of shapes, sizes, colors, and flavors. It’s such a fun book with bright, cheery, pillowy meringues shown on page after page. The photos make you want to jump in and try several options. There’s a base recipe for meringue followed by suggestions for flavors and instructions for adding color and piping shapes. That recipe, in any flavor, can be used for all the various desserts shown in the book. There are filling and flavor options that can be mixed and matched for sandwiched, little meringue kisses like Lemon Curd mixed with poppy seeds and cream cheese placed between kisses that might be tinted yellow or Nutella Buttercream could sandwich chocolate kisses or maybe Green Tea kisses could be filled with chocolate ganache. Among the desserts and puddings, there’s Raspberry Ripple and Meringue Gelato made with broken kisses; a Pistachio and Rose Water Pavlova with Greek Yogurt, Honey, and Figs; and a Pretzel and Chocolate Marshmallow Meringue Tart to name a few. Since our Texas peaches are at the peak of their season, I had to try the Grilled Peaches with Maple Meringues. In the book, the halved, grilled peaches are sprinkled with crushed amaretti cookies before being topped with swirls of maple meringue that are browned. I opted for chopped toasted pecans instead of the cookies. For garnish, the peaches are drizzled with maple syrup. 

The maple meringue is made like an Italian meringue but heated maple syrup is used instead of sugar syrup. Maple syrup was heated to 235 degrees F before it was slowly poured into egg whites that had already been whisked to stiff peaks in a mixer bowl. The mixer was turned up to high, and the eggs and syrup whisked until the mixture was thick and shiny. Next, halved peaches were grilled, and I used a grill pan on the stovetop for these. I scooped the meringue into a piping bag to squeeze dollops onto each peach. I used a kitchen torch to brown the meringue, and I’ve realized the torch is the funnest tool there is in the kitchen. The peaches were transferred to a serving platter, I scattered chopped pecans all around and on top of them, and a little maple syrup was added to finish. 

The browned maple meringue dressed up the peach halves, and the maple flavor was a great match for the sweet fruit and crunchy pecans. This meringue doesn’t have to be baked, or torched, and another use for it is to fill doughnuts which I’d love to try. With all of these delicious ideas I’d never thought of before, I think I’ll be making meringues more often. 

Grilled Peaches With Crushed Amaretti Cookies and Maple Meringue 
Recipe reprinted with publisher’s permission from Meringue Girls

Our maple meringue has a lovely golden color and is absolutely delicious. Here, we use it dolloped on top of grilled peaches filled with crunchy amaretti cookies. For a super-summery dessert, try cooking the peaches on an outdoor grill. 

Serves 4 

4 peaches, halved and pitted 
8 to 12 amaretti cookies, crushed 
Maple Meringue (see separate recipe) 
Maple syrup for drizzling 

Preheat your oven to 350°F. Heat a large ovenproof grill pan over medium-high heat until hot. Place the peach halves cut-side down in the pan and cook without moving them until dark grill lines have formed, about 4 minutes. Turn the peach halves over, slide the pan into the oven, and cook until the peaches are just softened (but not falling apart), about 10 minutes. If you’ll be browning the meringue under the broiler, preheat the broiler. 

Fill the center of each peach half with crushed amaretti cookies and dollop maple meringue on top. Brown the meringue under the broiler or with a kitchen torch until golden. 

Carefully transfer the peaches to a serving platter or individual plates. Drizzle with maple syrup and serve right away. 

Maple Meringue 
This maple meringue uses natural maple syrup instead of refined sugar. It's made like an Italian meringue—you heat the syrup to a high temperature and add it to the stiff egg whites. The earthy and rich maple flavor really comes through. The meringue doesn’t need to be baked, so it's perfect for our Maple Meringue Doughnuts. It also works really well in recipes for baked meringues (you can make kisses with it) or as a topping for waffles. You will need a candy thermometer for cooking the syrup. 

Makes 3 cups 

1⁄2 cup maple syrup 
60 g egg whites (from about 2 eggs) 

Put the maple syrup in a small heavy-bottomed saucepan and attach a candy thermometer to the pan. Place over medium heat. 

When the syrup approaches 220°F, begin whisking the egg whites on low speed in a stand mixer. When they’re frothy, increase the speed to high and beat until the whites hold stiff peaks. 

When the syrup has come up to 235°F, turn the mixer speed to medium and slowly stream in the hot maple syrup. Once you’ve added all the syrup, whisk on high speed until the meringue is thick and a little shiny; this will take 5 to 7 minutes. The meringue is now ready to use. 

I am a member of the Amazon Affiliate Program.

Monday, December 16, 2013

Linzer Cookies

When it comes to classic recipes, ones that I’ve never tried before, I sometimes get caught up in checking every possible source at my disposal for versions of the recipe in question. It’s a little crazy, but I have to know what all the options are. And, so it was with Linzer Cookies. I kept seeing them here and there and really wanted to try making them this holiday season. With the sugar-dusted tops and jam filling, they make pretty holiday cookies. I had an excellent reason to bake some extra cookies too. The gang behind Austin Bakes organized another bake sale on the weekend following Thanksgiving to benefit recovery efforts after the recent flooding in south Austin. It was a great way to start the holiday baking season. So, my search for recipes started with the original The Barefoot Contessa Cookbook. Ina’s Linzer Cookie is a plain, shortbread sandwich cookie with raspberry jam. They’re lovely but a little less traditional. A more traditional option would be made with ground nuts, spices, and maybe citrus zest in the dough. In The Model Bakery Cookbook, Linzer cookies are made with almonds and lemon zest but no spices. Raspberry Linzer Disks from The Modern Baker have almonds, cinnamon, and cloves but no zest. The version found in Martha Stewart’s Cookies includes ground pecans and cinnamon but no citrus zest. And, the version I finally settled on is from Chewy Gooey Crispy Crunchy Melt-in-Your-Mouth Cookies, and it combines all the possible ingredients with cinnamon, cloves, orange zest, and lemon zest. Hazelnuts are suggested for the nuts, but I liked the idea of using pecans and made that one change. 

The cookie dough comes together quickly in the food processor. Flour, toasted pecans, granulated sugar, salt, cinnamon, and cloves were pulsed until the nuts were finely ground. Pieces of butter were added and pulsed until crumbly before almond extract and lemon and orange zests were added and pulsed into the dough. The dough was divided into two parts, each was wrapped in plastic and left in the refrigerator to chill for a few hours. I actually made it in advance and left it in the refrigerator for a couple of days. When ready to bake, each half of dough was rolled out between sheets of parchment paper. Circles were cut, and I used a piping tip to cut smaller circles in half of the cookies for sandwich tops. The dough does become soft and sticky as it’s rolled and cut. While combining and re-rolling dough scraps, I placed the dough in the refrigerator from time to time to let it chill for easier handling. The cut cookies baked for about 14 minutes. When cool, the cookies for the bottoms were topped with raspberry jam that had been strained to remove the seeds. The cookie tops were dusted with confectioners’ sugar before taking their places on top of the jam. 

I’m easily entertained by learning about different approaches to the same type of cookie, and in the end, I was thrilled with this choice of recipe. All the flavors of spices and citrus were fragrant and lovely. I think Linzer Cookies are now going to have a permanent spot on my holiday cookie baking list. 

I am a member of the Amazon Affiliate Program.

Tuesday, November 19, 2013

Genmaicha Granola Bars

With perfect timing, in the midst of the vegetable love I mentioned, I got to read a review copy of Feast by Sarah Copeland. It’s a book devoted to fresh and fabulous vegetarian dishes with just a few, minor seafood appearances. And, the influences for these dishes come from around the world with tacos, tempura, gulyas, romesco, kimchi, curry, pizzas, crepes, and more. The book was mentioned back in April in Living magazine when the Barley Risotto with Radishes, Swiss Chard, and Preserved Lemon recipe was shown. I added that page to my to-try stack of recipes at the time. Then, when I recently saw the recipe in the book, I finally had to make it. The barley starches blend with the stock as it slowly cooks, and the radishes become tender and mild as they braise. Swiss chard and bright, citrusy sorrel add fresh flavors, and the preserved lemon adds a punch. It’s a clean-tasting dish that’s filling at the same time. Some other dishes I’d like to try include the Sweet Potato and Kale Tortilla Soup, Pea Guacamole and Seared Halloumi Soft Tacos, and the Indonesian Rice Bowl. I didn’t want to risk overdoing it with vegetable propaganda, so I’m showing a sweet recipe from the Breakfast and Brunch chapter. Granola bars are one of those things that always get my attention. I love making every version I ever see, but I was especially drawn to this one because of the genmaicha tea in the ingredient list. Copeland writes that the tea “adds depth, a malty richness, and a caffeine boost.” 

Interestingly, there’s no butter or oil in this recipe and no refined sugar either. Everything is bound together by a mix of pureed dates, maple syrup, and honey. I made one substitution because as I began measuring ingredients, I discovered I didn’t have millet although I was sure I did. I used amaranth instead. So, oats, amaranth, sunflower seeds, pumpkin seeds, sesame seeds and I used black sesame seeds, cinnamon, and salt were combined. Toasted pecans and almonds were coarsely chopped in the food processor and added to the oat mixture. Pitted dates were then pulsed to form a paste, and maple syrup, honey, and vanilla were added and pulsed. The date puree was added to the oats with genmaicha tea leaves, and the mixture was stirred until well-combined. The granola was baked until brown at the edges and then allowed to cool. I found it easier to cut bars after chilling the pan for a few hours. 

The bars had a great mix of crunchy seeds and nuts and chewiness from the date puree. The flavor from the tea was very subtle, but I liked having a little green tea caffeine in each bar. Now that I’m looking back at the breakfast chapter, I’m marking the pages for Avocado-Cheese Arepas and Mustard Greens, Cheddar, and Farm Egg Breakfast Pizza. I won’t be running out of great recipe ideas for vegetables any time soon. 

Genmaicha Granola Bars
Recipe reprinted with publisher's permission from Feast.

Many granola bars masquerade as health food when, in fact, dozens of them are anything but, laced with sugar and chocolate chips. The granola bar of your dreams, though, can be chock-full of fast energy and lasting nutrition like this one—loaded with nuts and seeds, like almonds and sunflower, pumpkin, and sesame seeds. Millet adds incredible crunch, and naturally sweet dates and maple syrup hold it all together. Genmaicha—green tea leaves with roasted brown rice—adds depth, a malty richness, and a caffeine boost. If you can’t find genmaicha or simply don’t do caffeine, skip it. These granola bars will win fans far and wide either way. 

Makes 8 TO 10 Bars 

2 cups/170 g old-fashioned rolled oats 
1/2 cup/60 g millet 
1/3 cup/30 g raw sunflower seeds 
2 tbsp raw unseasoned pumpkin seeds (pepitas) 
1 tbsp sesame seeds 
1 tsp ground cinnamon 
1/2 tsp fine sea salt 
1/3 cup/50 g toasted pecans 
1/3 cup/50 g toasted skin-on almonds 
 Packed 1 cup/170 g pitted Medjool dates 
1/3 cup/75 ml Grade B maple syrup, plus more as needed 
1/4 cup/60 ml honey or brown rice syrup 
1 tsp pure vanilla extract 
1 tbsp genmaicha tea leaves 

Preheat the oven to 325°F/165°C/gas 3. Line an 8-in/20-cm square baking pan with parchment paper so that there are overlapping flaps. 

Stir together the oats, millet, sunflower seeds, pumpkin seeds, sesame seeds, cinnamon, and salt in a medium bowl. 

Pulse the pecans and almonds in a food processor until coarsely chopped (it’s okay if some nuts are coarsely ground and others a little powdery). Stir into the oat mixture. 

Pulse the dates in a food processor until a thick paste forms. Add the maple syrup, honey, and vanilla and pulse until a puree forms. Scrape out the puree with a rubber spatula and stir into the oat mixture. 

Add the genmaicha tea leaves and continue stirring (your clean hands work best) until the oats and nuts are sticky and coated with the puree. If the mixture doesn’t clump together easily, add up to 1 tbsp of maple syrup. 

Transfer the granola to the prepared baking pan and press into a smooth, even layer. Bake until just starting to brown around the edges, about 25 minutes. Transfer to the counter to cool slightly in the baking pan, about 15 minutes. Grab the flaps of parchment paper, lift out the whole batch, and transfer to a cutting board. Cut into eight to ten bars while still warm. Let them cool completely and serve at room temperature. Store in an airtight container for up to 1 week. 

I am a member of the Amazon Affiliate Program.

Thursday, November 7, 2013

Classic Chocolate Brownies (70%)

These might look like ordinary, run-of-the-mill brownies, but I have to tell you so many things about them. First, the recipe is from Alice Medrich’s latest book, Seriously Bitter Sweet, and I received a review copy. This book is an update to Bittersweet from 2003. It’s a new look at using chocolate in baking now that so many varieties are available and cacao percentages are clearly marked. What used to be called semisweet and bittersweet have lost meaning now that we can purchase 54%, 60%, 75%, 90%, and just about any other number of cacao percentage chocolate. This new book presents recipes tested and perfected for specific ranges of cacao percentages in chocolate, and there are options for changing the formulas to use different types of chocolates. With higher percentage chocolates, less is needed but you’ll need to add more sugar and possibly butter. It’s fascinating to see how adaptable the recipes are. Also, since vintage recipes were written for semisweet or bittersweet chocolate which tended to be in the range of 54% to 60% cacao, the formulas which are clearly explained in a separate chapter can be used to update any recipe with specific types of chocolate. There are also conversions for using cocoa powder rather than chocolate. So, the book offers endless possibilities with mousses, truffles, cakes, souffles, sauces, tarts, pies, and cookies that can easily be adapted to use whichever type of chocolate you prefer. I got distracted by a couple of the cacao nib recipes that I look forward to trying like the Nibby Espresso Cookies and the Cocoa Bean Cream Almond Roulade filled with a cacao nib-infused whipped cream. There’s even a section for savory dishes made with chocolate such as the Wild Mushroom Ragout with unsweetened chocolate in the sauce. But, before trying any of those, I baked some classic brownies. 

The recipe for these brownies, as you see below, is written for a New Classic version. The New Classic involves baking for only 20 minutes and then immediately setting the brownie pan into an ice bath until cool. This is to produce the fudgiest, gooeyist brownies. I chose to go the slightly more cakey route by following the Classic variation included in the notes below, and I used 70% chocolate. There’s a slightly adjusted note for using 60% chocolate in the notes as well. See what I was saying about this book? It’s fascinating, and the possibilities are endless. So, with the Classic 70% variation, the oven was preheated to 350 degrees F, six and a half ounces of chocolate was used, one tablespoon less of butter was used, and one-quarter cup less sugar was used than for unsweetened chocolate. And, I opted to add toasted, chopped pecans. In the intro to the brownie section of the book, Medrich explains that through testing, it was discovered that a glossier top is produced when the chocolate and butter mixture is allowed to get hot, up to 150 degrees F, when melting. Then, when sugar and cold eggs are added, vigorous beating with a wooden spoon contributes to the final texture. One more trick is to chill the batter in the brownie pan for several hours before baking for the glossiest top and chewiest texture. Even though these brownies baked at a slightly lower temperature for slightly longer and didn’t get the ice bath cooling technique, they were still pretty fabulously fudgy with a nicely glossy top. 

I do tend to appreciate, i.e. geek out about, cookbooks with lots of precision and detail, and this one fits that description. The how’s and why’s of ingredients and techniques are delightfully well-explained. And, they’re being explained by someone who has not only witnessed and worked through the changes in the world of chocolate but has influenced the arrival of better quality chocolates through her creations. If you like baking with chocolate, you’ll really like this book. 

New Classic Chocolate Brownies 
Recipe reprinted with publisher’s permission from Seriously Bitter Sweet by Alice Medrich (Artisan Books). Copyright © 2013. 

Makes 16 large or 25 smaller brownies 
This recipe makes brownies that are crusty on top and wonderfully gooey within. They are baked at a high temperature for a short period of time, then cooled in an ice bath. Also known as the Steve Ritual (as in Steve Ritual Brownies), this crazy, wonderful method was discovered by Portland educational researcher Steve Klein during his college days; it now has a considerable Internet following. 

Ingredients 4 ounces (115 grams) unsweetened chocolate, chopped 
8 tablespoons (115 grams/1 stick) unsalted butter 
1 1/4 cups (250 grams) sugar 
1 teaspoon pure vanilla extract 
1/4 teaspoon salt 
2 cold large eggs 
1/2 cup (65 grams) all-purpose flour 
2/3 cup (2 1/3 ounces/65 grams) walnut or pecan pieces (optional) 

Directions 
1. Position a rack in the lower third of the oven and preheat the oven to 400°F. Line the bottom and all four sides of the baking pan with parchment paper or foil. 

2. Place the chocolate and butter in a medium heatproof bowl set in a wide skillet of barely simmering water. 

3. Stir frequently until the chocolate is melted and the mixture is smooth and hot enough that you want to remove your finger fairly quickly after dipping it in to test. 

4. Remove the bowl from the skillet. Stir in the sugar, vanilla, and salt with a wooden spoon. Add the eggs one at a time, stirring until the first one is incorporated before adding the next. Stir in the flour and beat with a wooden spoon or a rubber spatula until the batter forms a shiny, cohesive mass and comes away from the sides of the bowl. It is important that the batter pull together and away from the bowl, so don’t stop stirring until it does. Stir in the nuts, if using. Scrape the batter into the lined pan and spread it evenly. 

5. Bake for 20 minutes, or until the brownies just begin to pull away from the sides of the pan. The surface of the brownies will look dry, but a toothpick inserted in the center will come out quite gooey. 

6. Meanwhile, prepare an ice bath by filling a roasting pan or large baking pan with ice cubes and about 3/4 inch of water. 

7. When the brownies are ready, remove the pan from the oven and immediately set it in the ice bath. Take care not to splash water on the brownies. Let the brownies cool. 8. Remove the pan from the ice bath, lift up the ends of the parchment or foil liner, and transfer the brownies to a cutting board. Cut into 16 or 25 squares. (The brownies can be stored, airtight, for 2 to 3 days.) 

Variations: 
Classic Chocolate Brownies: For cakier brownies, bake at 350°F for 30 to 35 minutes, until a toothpick inserted in the center comes out with some thick, gooey batter still clinging to it. Omit the ice bath; cool on a rack. 

Classic 70% Brownies: Position a rack in the lower third of the oven. Preheat the oven to 400°F and prepare an ice bath for New Classic Brownies, or skip the ice bath and preheat the oven to 350°F as for Classic Brownies. Combine 6 1/2 ounces (185 grams) 66% to 72% chocolate, 7 tablespoons (100 grams) butter, and 1 cup (200 grams) sugar in a medium heatproof bowl. Proceed as directed for either New Classic or Classic Chocolate Brownies. 

Classic 60% Brownies: This recipe produces brownies with a beautifully glossy, crackled crust. The batter will be stiffer than you are used to and may require longer and more vigorous stirring to form a smooth, cohesive mass. 

Position a rack in the lower third of the oven. Preheat the oven to 400°F and prepare an ice bath for New Classic Brownies, or skip the ice bath and preheat the oven to 350°F as for Classic Brownies. Combine 10 ounces (285 grams) 54% to 62% chocolate, 5 tablespoons (70 grams) butter, and 2/3 cup (135 grams) sugar in a medium heatproof bowl. Proceed as directed for either New Classic or Classic Chocolate Brownies. 


Monday, April 15, 2013

Burnt Caramel Cake

I was sure it was going to be a cake filled with lemon curd and topped with a toasted meringue frosting. Then, I changed my mind and considered a simple, vanilla angel food cake with strawberries on the side. And, there are two different pistachio cakes that I’ve wanted to try for ages. I have a hard time choosing when it comes to my birthday cake. In the end, my decision was made when I remembered the Burnt Caramel Cake in Basic to Brilliant, Y'all. I mean, caramel covering multiple layers of cake? Of course I had to make this. There are three cake layers rich with butter and eggs, and the icing is a cooked caramel made thick with butter and cream. In this book, every recipe has a tip for making it “brilliant.” For this cake, an embellishment of apple hazelnut compote is suggested as a filling between the layers which sounds lovely but in more of an autumnal way. I decided to dress it up with chopped, toasted pecans between layers instead, and I sprinkled big flakes of sea salt on top. The recipe is available online, but there’s a missing bit of instructions. It skips over adding the eggs which should be mixed in after the butter and sugar have been creamed. The instructions for the caramel icing are great though. This reminded me of the frosting I made for Kurt’s birthday cake which needed to be spread swiftly which I learned as I went. Here, Virginia Willis points out that if you place the bowl of caramel icing in a bigger bowl of warm water, it keeps the icing from setting quite so quickly. It’s a great tip and one I’ll remember next time I work with a similar frosting. Once on the cake, the caramel sets nicely and, the cake stores well at room temperature. 

It’s a simple cake to make which starts with softened butter that’s creamed with sugar. Next, four eggs were added one at a time and mixed into the butter. Flour that had been sifted with baking powder was added in three parts with milk being added alternately. The batter was divided among three pans, and the cakes baked for about 25 minutes. To make the icing, sugar was caramelized in a skillet while more sugar, butter, and cream were brought to a boil in a saucepan. The caramelized, or burnt, sugar was then poured into the cream mixture, stirred to combine, and cooked to reach the soft-ball stage. Off the heat, vanilla and salt were added. It was allowed to cool a bit before being whisked in a stand mixer. Placing the bowl of icing into a big bowl of warm water worked perfectly to prevent it from setting too quickly as the cake was assembled. Still, once the icing was spooned onto the cake, it needed to be spread quickly before setting. I had toasted and chopped some pecans in advance and sprinkled them on the two bottom layers after spreading the caramel icing. 

This is an old-fashioned, caramel-dream of a cake. It was like one giant, Southern praline wrapped around layers of buttery, vanilla cake. I'm not good at deciding on a flavor of ice cream when presented with several options either. This wasn’t a quick decision, but I think I finally chose well. 

I am a member of the Amazon Affiliate Program.

Monday, April 1, 2013

Spinach and Red Quinoa Salad with Pecans and Halloumi

I realize this just looks like a spinach salad, but there’s a lot more going on in there. For one, it was intended as a quinoa and spinach salad, and I did use the entire suggested amount of quinoa, but I had a lovely bunch of spinach and wanted to use every bit of it rather than only a couple of handfuls. So, the extra spinach is hiding a lot of the red quinoa. But, that’s not all. There are also chewy pieces of dried apricots, toasted pecans and pumpkin seeds, and a tangy dressing with pomegranate molasses and lemon juice. And, the grilled halloumi is seasoned with ras-el-hanout. All those lovely flavors combined to make much more than some simple, spinach salad. I found this dish in the book New Vegetarian Kitchen which was an impulse buy a few weeks back. I was standing in the coffee bar line at Whole Foods when I saw the bright green cover of this book on a display and naturally grabbed a copy to peruse while my cappuccino was being made. In it, there are things like Watermelon Curry on Black Lentil Cakes, Bhel Puri on Poppadom Crisps, Spring Vegetables with Crunchy Walnut Crumble and Harissa Mayonnaise, Vietnamese Tofu and Mango Salad Cups, and many other things I want to try. The variety of dishes including sweet, savory, starter, and main convinced me I needed to take this book home. 

The first step of making this salad is to cook three-quarters of a cup of red quinoa. Do you rinse your quinoa before cooking it? I never used to rinse quinoa or rice but I’ve started doing so lately. Quinoa has naturally-occurring saponins on the surface that could affect the taste if not rinsed away. Odds are that it was rinsed before being packaged, but I give it another rinse in a sieve just to be sure. So, rinsed quinoa was cooked, drained, and allowed to cool. Next, halloumi was sliced, brushed with olive oil, dusted with ras-el-hanout and grilled on each side on a grill pan. At the same time, pecans were toasted in the oven, and pumpkin seeds were added to the baking sheet for the last few minutes. I made a little extra dressing since I was also using extra spinach, and that included about four tablespoons of pomegranate molasses, two tablespoons of lemon juice, four tablespoons of olive oil, one crushed clove of garlic, a pinch of ground cumin, and some freshly ground black pepper. To build the salad, the cooled quinoa was placed in large bowl and topped with the dressing. Cleaned and chopped fresh spinach was added followed by some chopped dried apricots, minced red onion, and chopped parsley. Each serving of salad was topped with a few pieces of grilled halloumi and some pecans and pumpkin seeds. 

I’m easily drawn to any dish with halloumi. I love the salty flavor it adds and the firm texture that takes so well to grilling or searing. The spices that mixed with the dressing, sweet dried apricots, nuts, and parsley were an added bonus. This tasty meal-of-a-salad indicates that my impulse buy was a good one. 

I am a member of the Amazon Affiliate Program.

Tuesday, November 27, 2012

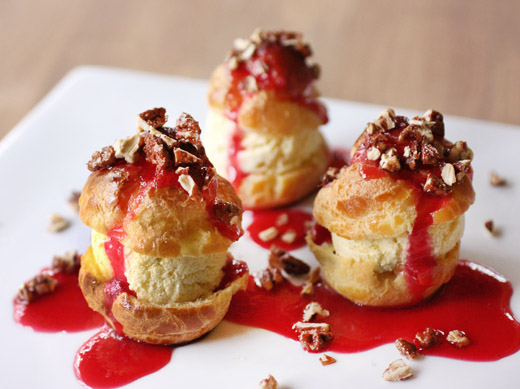
Profiteroles with Cranberry Caramel Sauce and Maple Spiced Pecans

After holding tryouts for Thanksgiving dessert, I of course ended up going in a completely different direction than any of the contestants. Let me explain how this happened. Kurt claims to not have much of a sweet tooth, but there are three similar sweets that he really likes. Those are Boston cream pie, eclairs, and profiteroles. I’d made the first two at different times in the past, but I’d never made profiteroles even though we always order it when we see it on a restaurant dessert menu. I had various ideas about how to change up the classic components of a profiterole to make it a more seasonal, Thanksgiving kind of dessert, and Kurt voted down almost all of them. He insisted plain, vanilla ice cream and standard chocolate sauce was the only way to go. There would be no pumpkin or cinnamon ice cream or spiced pate a choux or nutmeg dusting on top or any such thing. But, there was a Cranberry Caramel Sauce that I absolutely had to try. It’s from the October/November issue of Garden and Gun, and it belongs with a Pumpkin Bread Pudding recipe from Austin’s own Jodi Elliott of Foreign and Domestic. So long as the ice cream remained nothing but vanilla and the pastry puffs weren’t messed up with any spices, Kurt was willing to try a sauce other than chocolate. Then, I went ahead and made the Maple Spiced Nuts from the bread pudding recipe as well. One last, little change from the classic preparation wouldn't hurt.

This dessert was made up of four parts, so I started by making the vanilla ice cream in advance to have one part completed and ready. I used the vanilla ice cream recipe from Eggs by Michel Roux which is nicely rich with six egg yolks and perfumed with seeds from a vanilla pod. Next, I made the puffs according to Ina Garten’s recipe in Barefoot in Paris. I like that she suggests pulsing the eggs into the pastry dough in a food processor rather than stirring and stirring by hand. That recipe is also available online. The great thing about choux pastry puffs is that you can refrigerate them or even freeze them, and then just re-warm them for a few minutes in the oven before serving. The tops will re-crisp and the airy insides will be as puffy as when they first came out of the oven. The third part of the dessert was the cranberry caramel sauce which was a simple matter of cooking sugar, water, and corn syrup until amber and then adding cranberries and pure cranberry juice. The berries and juice were stirred into the caramel and the mixture was brought back to a boil until the cranberries had all popped. Off the heat, salt and vanilla were added. After letting the sauce cool a bit, it was pureed in a blender, and then I strained it before letting it completely cool. Last but not least, the pecans were tossed with maple syrup, corn syrup, sugar, salt, and a mix of cumin, cinnamon, ginger, nutmeg, and cayenne. The nuts were baked until toasted through and allowed to cool before I chopped them.

The hint of spiciness and bit of salt in the nuts was perfect with the tart and sweet sauce. And, I think plain vanilla ice cream was the way to go here since it allowed the flavors in the toppings to shine. In the end, we were both completely happy with these changes to the traditional profiterole for Thanksgiving dessert, but I don’t think I’d get away with messing with the classic eclair.

I am a member of the Amazon Affiliate Program.

Monday, April 11, 2011

Pecan Squares Americana

These pecan squares were one more item I baked for the bake sale, but they’re not just any pecan squares. This recipe originated at the Americana Hotel in Miami Beach, it found its way to Maida Heatter so she could include it in her first dessert book, and it appears again in the recently released paperback edition of Maida Heatter's Cookies. This book presents a collection of cookie recipes that were previously included in some of her other books, and I received a review copy. I first learned about Maida Heatter years ago in an issue of Saveur in which she was named The Queen of Cake. This quote from that story explains why I instantly became a fan: “A stranger from the Miami area once looked Maida up in the phone book and called her for help with a recipe that she just couldn't make work. ‘I may have been crazy, but I invited her over to show her how to make it.’ (It turned out that the lady had been using margarine instead of butter and omitting the sugar, Maida recalls—still sounding a bit annoyed.)” I not only became a fan, but I realized she writes the kind of recipes you can definitely trust, so long as you actually follow the recipes. She really wants the reader to get things right, and the instructions for these pecan squares are a perfect example of that. She explains the how's and why's carefully, and I once again really enjoyed learning from her while baking.

In the intro to this recipe, she notes that someone who attended one of her classes suggested the use of foil to line the pan to make removing the squares simpler. So, that is step one. The pan was lined with foil, and she explains the best way to do that. Then, the pan was placed in the freezer because spreading the dough on a cold pan is easier, and the dough will cling to it. While the pan chilled, the dough was made by mixing butter until softened, and then sugar was added followed by an egg, salt, and lemon zest. Flour was slowly added until the dough was formed. Next were the instructions for spreading the dough in the chilled pan. It’s explained that the dough should reach all the way up the sides of the pan to contain the pecan filling. The dough was to be placed bit by bit around the sides of the pan and across the bottom and then pressed out to form smooth, even surfaces. The dough was pierced with a fork before it was chilled in the refrigerator while the oven preheated. More details were included for baking the dough to be sure it baked flat and didn’t bubble up in places. For instance, if it puffed, you were instructed to prick it with a cake tester and not to let the dough win the battle. The dough was then removed from the oven while the filling was made. For the filling, butter was melted with honey, and then granulated and dark brown sugars were added and cooked to dissolve. After it came to a boil, it was removed from the heat and cream and pecans were added. It sat for a few minutes before being spooned into the prepared crust, and then the pan went back into the oven for another 25 minutes. There are also careful instructions for turning the whole sheet of bars, once cool, out of the pan removing the foil, and turning the sheet back right side up. After it was back to right side up, it was chilled before being cut.

Yes, these were a lot of specifics for simple cookie squares, but I like that she offers all of those tips from her experience. The crust came out exactly right, the filling worked perfectly, and pan removal and cutting went just as it should have. The lemon zest in the crust was a nice addition to the buttery flavor as was the honey in the filling. These were like little pecan pies in cookie form. And, now I have several more cookie recipes from the book to look forward to, and I know they'll turn out great.


Wednesday, March 23, 2011

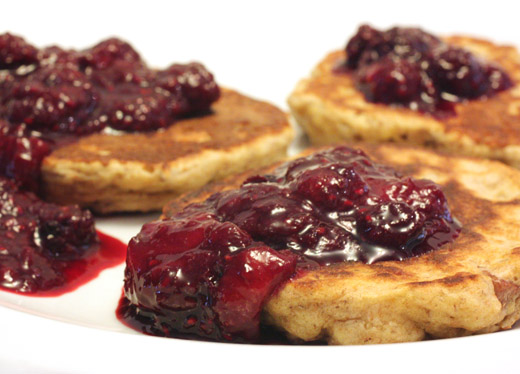
Pecan Pancakes with Mixed Berry Compote

While focusing more attention on healthy eating cookbooks lately, I hadn't baked much for a few weeks. That will change, of course, when my birthday rolls around next week. In the meantime, since not much baking has been happening, the thought of making pancakes was very appealing. As I pulled out the griddle, I realized it had been years since I last made pancakes. I don’t know how that happened. I guess I get easily distracted by scones, muffins, popovers, and every other baked good that adds a sweet component to a big breakfast or brunch meal, and I just overlooked pancakes for far too long. They are best when just made, but you can stow them in a warm oven while readying the rest of the morning meal. And, in this case, the berry compote for topping the pancakes can easily be made in advance. This recipe is one more from the breakfast chapter of Power Foods, and the intro touts the antioxidant properties of both the pancakes and the topping with ingredients like wheat germ, pecans, and berries.

The berry compote can simmer away while the pancakes are made, or it can be made in advance and then re-warmed for serving. Since berries aren’t in season just yet, I used a bag of frozen, mixed berries. The berries were combined with honey and lemon zest and left to simmer until thickened. For the pancakes, all purpose and whole wheat flours were whisked together with wheat germ, baking powder, baking soda, and salt. Separately, yogurt, melted butter, and an egg were combined and then added to the dry ingredients. Chopped pecans were added as well, and everything was mixed until just moistened. The batter was spooned onto a hot griddle brushed with melted butter, and this is a thick batter that needs some help in spreading. It requires some pushing with the back of a spoon to flatten into a cake. Then, they take only a few minutes of browning on each side.

I realized I kind of like flipping pancakes. I’d missed it. The batter sizzles on the griddle on the first side and then again after the flip. These were hearty, little pancakes with good, nutty flavor. And, the berry compote topping was sweet, tart, and just the right embellishment. I have a feeling I’ll be making pancakes more frequently now.


Blogging tips