Showing posts with label maida heatter's cakes. Show all posts

Thursday, August 16, 2012

Blueberry-Pecan Loaf Cake

This summer, Slow Food Austin organized a series of cooking classes for kids between the ages of seven and twelve. I volunteer as a board member of Slow Food Austin and helped with the classes. This was the first time we’d done this, and we had no idea of what to expect. We weren’t sure if the kids would be enthusiastic or bored or what the parents would think. As it happened, the classes could not have gone better. The Young Chefs, as we called them, were excited about food and learning to cook, and the parents assured us the classes were informative and fun. It was great to watch kids interact and talk about food. A couple of the students compared notes about food and travel while discussing what they’d each eaten when they visited New Orleans. I was amazed at this food enthusiast kind of talk among seven year olds. Then, we couldn’t believe it when a little boy declared he was going to sell his Nintendo DS so he could buy a Le Creuset pot just like the ones we used in the classes. These were kids after my own heart. Since everyone who helped with the classes needed to arrive early for set-up, I made it a habit to bring along something for breakfast. For the last class, I had some late season Texas blueberries to use, and I found this Blueberry-Pecan Loaf Cake in Maida Heatter's Cakes. Unlike a dense and buttery pound cake, this one is lighter and filled with berries, nuts, and citrus.

The fresh berries were washed and spread on a towel to dry. Once dry, they were tossed with a little flour. The rest of the flour was sifted with salt, sugar, baking powder, and baking soda. This cake batter included only one egg and two tablespoons of butter. Those were mixed with orange juice, and the dry ingredients were added. Last, orange zest and toasted, chopped pecans were folded into the batter. Maida offers a great tip by having you spread one-quarter of the batter in a prepared loaf pan and then folding the blueberries into the remaining batter. That way, there’s less chance of the blueberries sinking to the bottom. The remainder of the batter with the blueberries was then poured over the thin layer in the pan. The loaf cake baked for a little over an hour. Another good tip was to remove the loaf cake from the pan after it had cooled for ten minutes to prevent it from steaming in the pan which would cause a wet bottom crust.

Don’t get me wrong, I do love a buttery pound cake. But, that’s just not what this was. This was laden with juicy blueberries and crunchy nuts and smelled lovely from the orange juice and zest. I had to add an orange and confectioners’ sugar glaze because I can’t help myself, but it wasn't even required. The slices of this loaf cake made a great, grab-and-go breakfast the morning of the last Young Chef class. Maybe we’ve started future chefs or food bloggers on their way, but definitely we’ve gotten a group of kids to talk about food and think about how to prepare meals at home.

I am a member of the Amazon Affiliate Program.

Friday, March 23, 2012

Fig Bread

Even though I wasn’t exactly sure of what this recipe would produce, I completely trusted that it would be good. I wasn’t sure if it was going to be like a pound cake or more like a loaf of chewy raisin bread, but since Maida Heatter said it is “old-fashioned and kind-of-healthy-tasting… this is wonderful as a coffee cake” I wanted to try it. It’s from Maida Heatter's Cakes, and if Maida has included a recipe in one of her books, you know it’s well-tested and worth making. This fig bread is made with dried figs, of course, white and whole wheat flour, honey, buttermilk, just a half a stick of butter, and some walnuts. There’s no refined sugar or eggs, and that’s what caused my uncertainty about it. When I cut a slice of the bread, I discovered it was sweet from the honey and figs, but not too sweet, and tasted more decadent than expected for a whole wheat loaf. Maida suggests serving the fig bread plain or toasted, which she notes is “super,” or with butter, cheese, honey, or marmalade. I agree that it is super toasted and enjoyed it on its own with either no other adornment or just a thin coating of butter.

There’s always something interesting in Maida’s instructions. Here, to prepare the loaf pan, she recommends buttering the pan and then dusting it with wheat germ for a brown crust, oatmeal for a chewy crust, or dry bread crumbs. I went with wheat germ, and the crust was nicely browned. To start the bread, white flour, salt, baking powder, and baking soda were combined, and whole wheat flour was added and mixed to combine. Dried figs that had been stemmed and chopped were tossed in the dry ingredients to coat. In a separate bowl, honey, buttermilk, and melted butter were mixed, and toasted, chopped walnuts were added. The wet ingredients were folded into the dry ingredients, the batter was poured into the wheat germ-dusted pan, and it baked for about an hour.

As a reward for trusting the recipe, I got a fruit- and nut-filled bread that was perfect for breakfast. It wasn’t too rich or heavy, and it packed enough flavor of its own that toppings weren’t even necessary. It’s rare that I dive into a recipe without a pretty good idea of the outcome, but in this case, I knew I wouldn’t be disappointed.


Tuesday, July 5, 2011

Cinnamon Buns

Declaring something 'the best' is tricky, but I can easily proclaim something like these cinnamon buns to be 'my favorite' I've ever made. And, I've made lots of different cinnamon buns or rolls. In fact, cinnamon rolls are one reason this blog was started in the first place. I once spent most of a Saturday morning hunting through files and stacks of recipes trying to find the one for some cinnamon rolls I had made before. Several hours later, I remembered the recipe was from an old Better Homes and Gardens cookbook. This blog makes it so much easier to keep track of details like that. But, that was some other version of cinnamon rolls. The ones shown here today are now my favorites. They come from Maida Heatter's Cakes, and the secret is potatoes. I knew potato dough for breads is very tender and fluffy, but I had never considered making cinnamon buns from a potato dough. Maida explains that yeast likes potatoes, and indeed, the dough puffed very well while rising. The twelve buns filled a fifteen and a half inch by ten and a half inch pan. Fear not, there is no flavor of potatoes in the dough. The buns taste buttery, cinnamony, and sweet. The potatoes just affect the texture, and they do so in the best way possible.
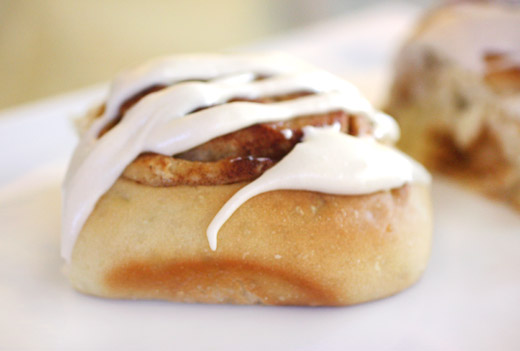
First, you're going to need some plain, mashed potatoes. Anything leftover that might have been seasoned with salt and pepper or garlic isn't going to work. Maida points out that three quarters of a pound of potatoes will produce the one cup of mashed potatoes needed. The plain mashed potatoes were warmed in a saucepan, and milk was slowly stirred into them followed by sugar, a little salt, and butter. Meanwhile, yeast was added to warm water in a measuring cup, and in a separate bowl, and egg was mixed with vanilla. Then, in the bowl of a mixer, the potato and milk mixture was combined with the water and yeast and egg. Flour was slowly added, and this produced a sticky dough. The dough was turned out onto a floured board, and kneading was easier with a dough scraper. When the dough felt smooth, it was placed in a oiled bowl and left to rise for an hour or a little longer. After rising, it was rolled out on a floured board into an eighteen inch square, covered with melted or very soft butter, and sprinkled with a mix of cinnamon, sugar, and nutmeg. I opted to leave out the raisins. Next, the dough was rolled into a log and cut into buns. I let the covered tray of buns rest in the refrigerator overnight, and then brought them to room temperature while the oven pre-heated the next morning. They baked for twenty minutes, and when cool, the glaze was drizzled on top. I added a few tablespoons of cream cheese to the butter, confectioners' sugar, vanilla and almond extracts, and cream in the glaze.

Usually, the best part of a cinnamon bun is the very middle, but these were that good all the way on the outside edge. For years, my favorite cinnamon bun or roll was one made with pumpkin puree, and when October arrives, I reserve the right to change my mind again. Until then, these cinnamon buns will hold the title.

I’m submitting this to Yeastspotting where you’ll find some seriously well-made bread.


Wednesday, June 22, 2011

Boston Cream Pie

It's not that Kurt doesn't think about mealtime, but he doesn't spend nearly as much time thinking about food as I do. He almost never asks what's for dinner or what's for dessert and very rarely makes any special requests. He says he trusts I have it covered, and it's true that I usually do. However, once in a while, especially when I've been on a light and healthy kick, he'll say something like "are we having Boston cream pie for dessert?" He loves it. I have made it a time or two, but since I'm always trying new recipes, it hadn't appeared on our table in years. So, when I was reading my review copy of Maida Heatter's Cakes and came upon her version of Boston cream pie, I had to give it a go. I mentioned previously how much I trust Maida's recipes, and she claimed this was the best version of Boston cream pie she's tried. Sold. She noted that she doesn't know why it's called a pie, and neither do I.

Two layers of sponge cake are filled with vanilla pastry cream, and the pastry cream is the first item to prepare so it can be chilled. This pastry cream was made in the usual way with eggs whisked in a bowl and set aside. Flour, salt, and sugar were combined in a saucepan, and milk was whisked into the mixture. That was brought to a boil over medium-low heat and stirred until thick. The hot milk mixture was slowly whisked into the eggs in the bowl, and then that was poured back into the saucepan where it was heated while stirring constantly. Once thickened, vanilla and almond extracts were added off the heat. The pastry cream was transferred to a bowl and left to cool with parchment paper pressed directly on the surface to prevent a skin from forming. The sponge cake was simple enough. Egg whites were whipped with some sugar until they held a soft shape, and egg yolks were mixed separately with sugar until very light in color. Vanilla, lemon juice, and some cold water were mixed with the yolks. The yolks were folded into the whites, then the dry ingredients including flour and baking powder were folded in as well. Last, melted butter was just barely folded into the batter. The batter was baked in a nine-inch round pan, and next time, I think I'll use an eight-inch pan because it spread out somewhat thin. Once the cake was baked and cooled, it was sliced in half and filled with the chilled pastry cream. The filled cake was topped with a simple chocolate ganache made with chopped semisweet chocolate and cream.

This was exactly what's expected from a Boston cream pie. The cake was tender and fluffy, the filling was rich and nicely vanilla-flavored, and the chocolate ganache was the perfect contrast on top. I don't know if it was the best Boston cream pie ever, but I'll probably eventually try several others for comparison's sake. Most importantly, Kurt was thrilled to open the refrigerator and see what was for dessert.


Blogging tips




