I have a little problem. I'm addicted to cookbooks, food writing, recipe collecting, and cooking. I have a lot of recipes waiting for me to try them, and ideas from articles, tv, and restaurants often lead to new dishes. I started losing track of what I've done. So now I'm taking photos and writing about what I've prepared—unless it's terrible in which case I forget it ever happened.
Back in 2010, the food truck trend was in full swing here in Austin, and it hasn’t stopped. That’s the year The Peached Tortilla truck appeared on the scene. I believe the first time I visited it was at a craft beer festival, and I remember the Asian flavors meet American and Tex-Mex street food vibe. Since then, some food trucks have transitioned into restaurants, others continue as trucks, and several have come and gone. The Peached Tortilla has evolved to include a restaurant right in my neighborhood as well as a location at the airport, a catering business, and an event space. And now, there’s a cookbook of which I received a review copy. The book includes classic and current dishes from the business as well as some of author and founder Eric Silverstein’s childhood favorites and some dishes inspired by his mother’s cooking. Silverstein had the unique experience of being born in Tokyo to his Chinese-American mother and Jewish-American father before the family moved to Atlanta, Georgia when he was 11. There’s a lot of varied inspiration for the recipes here. I’m always drawn to Laksa recipes, and the one here looks delicious with the homemade paste of chiles, herbs, and spices and the mix of shrimp stock, coconut milk, and fish sauce. Another favorite of mine is shrimp toast, and I’ll be turning back to the page with Mom’s Shrimp Toast served with Thai Chili Dipping Sauce. There are burgers with sauces and toppings, a hot dog, and even a tempura fish burger. But, the Asian Street Tacos chapter really grabbed my attention. The Banh Mi Taco and Pad Thai Taco make appearances as well as the Kimchi Queso and Roasted Cauliflower Taco. But, it was the Thai Shrimp Tostadas that called out to me first. Although in the book it is shrimp tostadas, the day I planned to make them scallops happened to be on sale and I couldn’t resist. I’ve made kimchi tacos before, but I hadn’t extended Asian flavors into tostada making. And, I love making tostadas. This one is built on a base of Thai slaw made with purple and green cabbage, julienned carrots, green onions, cilantro, and Thai Peanut Dressing. The scallops were tossed with more of the Thai Peanut Dressing before being sauteed, and I cut them into pieces after they were cooked. My preferred method for crisping tortillas for tostadas is to toast them under the broiler with just a brushing of oil and flipping them once browned on top. It’s quicker, easier, and uses a lot less oil than frying. The tostadas were built with a layer of slaw topped with chunks of scallops and garnished with cilantro leaves, chopped peanuts, and Sriracha.
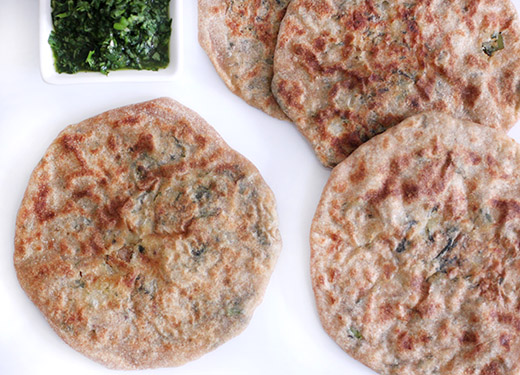
I had a little cookbook fling recently. I started cooking from Indian-ish: Recipes and Antics from a Modern American Family and couldn’t stop. I blame it on the cilantro chutney. I made a batch and got hooked on it. I wanted to pour it on everything at every meal. My only regret is that this happened just as my garden cilantro stopped producing in the heat of spring. This new book is from Priya Krishna, and I received a review copy. It’s a collection of her mother’s recipes that are mostly traditional Indian dishes recreated with other culinary influences here and there. There are roti pizzas, a tomato rice dish with cheddar cheese, and feta used in place of paneer. It’s Indian food the way the Krishna family came to make it in their home in Dallas, Texas. The dishes are mostly vegetarian with one short chapter that involves chicken and fish. And, let me just walk you through what I’ve already tried from the book. The Lima Bean and Basil Dip is a tasty and easy snack that’s perfect for cucumber slices or crackers or flatbread. Next, I had to try the Spinach and Feta Cooked like Saag Paneer. I used a mix of spinach and kale, and a mix of tofu and feta. The use of feta was inspired by a Krishna family trip to Greece, and it is a delicious twist. I’ll be returning to this recipe often. A few days later, I made the one and only chicken recipe in the book: Garlic-Ginger Chicken with Cilantro and Mint. The chicken was marinated in a lovely mix of garlic, ginger, mint, cilantro, oil, and lemon juice along with coriander, turmeric, red chile powder, and amchur. After cooking the chicken, I used it in roti tacos, as suggested in the book, with an avocado and tomato kachumber, or salad, and amazing cilantro chutney. This was how I became dependent on cilantro chutney. I even got inspired to make homemade roti although that recipe isn’t in the book. I just really enjoy making various flatbreads. The flavorful, marinated chicken with the fresh avocado salad and bright and spicy cilantro chutney became an ideal way to fill a roti taco. In fact, Kurt requested we have that meal every Sunday night. I should point out there are several Kachumber recipes in the book like Beet and Avocado Kachumber, Daikon Radish Kachumber, and Avocado Corn and Tomato Kachumber. I adapted the latter since I didn’t have corn on hand that day. The leftover roti I made became Roti Pizzas inspired by the book. I used different toppings than the ones listed, but loved the idea and the result. There are also several pages I’ve marked for more things I haven’t cooked just yet. Because I do so enjoy making flatbreads, the next recipe I tried was the Aloo (Potato) Parathas with, of course, more cilantro chutney. I was torn between making the Pesarattu (Lentil Pancakes) and the Aloo Parathas but decided on the Parathas since new potatoes had just come into season here. I brought some home from Boggy Creek Farm. The first step is to cook the potatoes and peel them once cooled. Next, the dough was made with whole wheat flour, water, a little oil, and salt. The dough was mixed and left to rest in the refrigerator. To make the filling, the peeled potatoes were mashed with red chile powder, crushed fennel seeds, clilantro, and salt, and I added cooked and chopped kale. There’s a tip in the head note about adding cheddar cheese, and that inspired me to make a different addition. I do add kale to everything. The filling was mixed until no lumps remained. The dough and filling were each divided into equal portions and rolled into balls. Working with one portion at a time, the dough was rolled into a round, and a potato filling ball was placed on top before pinching the dough up and around the ball of filling. The sealed dough pouch was turned over and then rolled out into a round. The formed parathas were cooked on a hot griddle with just a brushing of oil for a few minutes per side.


 has evolved to include a restaurant right in my neighborhood as well as a location at the airport, a catering business, and an event space. And now, there’s a cookbook of which I received a review copy. The book includes classic and current dishes from the business as well as some of author and founder Eric Silverstein’s childhood favorites and some dishes inspired by his mother’s cooking. Silverstein had the unique experience of being born in Tokyo to his Chinese-American mother and Jewish-American father before the family moved to Atlanta, Georgia when he was 11. There’s a lot of varied inspiration for the recipes here. I’m always drawn to Laksa recipes, and the one here looks delicious with the homemade paste of chiles, herbs, and spices and the mix of shrimp stock, coconut milk, and fish sauce. Another favorite of mine is shrimp toast, and I’ll be turning back to the page with Mom’s Shrimp Toast served with Thai Chili Dipping Sauce. There are burgers with sauces and toppings, a hot dog, and even a tempura fish burger. But, the Asian Street Tacos chapter really grabbed my attention. The Banh Mi Taco and Pad Thai Taco make appearances as well as the Kimchi Queso and Roasted Cauliflower Taco. But, it was the Thai Shrimp Tostadas that called out to me first.


 and couldn’t stop. I blame it on the cilantro chutney. I made a batch and got hooked on it. I wanted to pour it on everything at every meal. My only regret is that this happened just as my garden cilantro stopped producing in the heat of spring. This new book is from Priya Krishna, and I received a review copy. It’s a collection of her mother’s recipes that are mostly traditional Indian dishes recreated with other culinary influences here and there. There are roti pizzas, a tomato rice dish with cheddar cheese, and feta used in place of paneer. It’s Indian food the way the Krishna family came to make it in their home in Dallas, Texas. The dishes are mostly vegetarian with one short chapter that involves chicken and fish. And, let me just walk you through what I’ve already tried from the book. The