Sunday, September 30, 2012

Sunday Night Skillet Chicken and Rice and a Worlds of Flavor Menu

Give me a theme, and I’ll run with it. It’s fun to choose things that fit together in a given genre rather than having a wide open field of possibilities. Usually, for a special dinner menu, I only have the current season and any known food preferences for inspiration. But for this meal, I was sent a sample of RiceSelect. I knew I would be creating a menu that fit the concept of Worlds of Flavor, but I wasn’t sure which type of rice I would receive. When my sample of brown Texamati rice appeared, I decided right away that the meal would be full of Indian flavors. I pulled Modern Spice: Inspired Indian Flavors for the Contemporary Kitchen from the shelf, and started marking pages. The wonderful thing about this book from Monica Bhide is that “modern” part of the title. The recipes are designed to be fairly quick and very doable. This makes them perfect for a dinner party when you’re preparing multiple things. The menu for our Worlds of Flavor meal was:

Savory Mini Cheesecakes with Red Pepper and Green Tomatillo Chutney
Sunday Night Skillet Chicken and Rice with Tomatoes and Eggplant
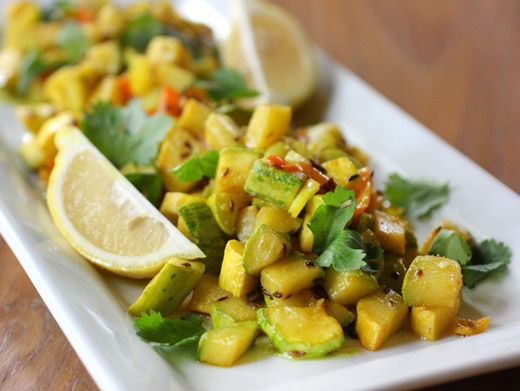
Pan-Fried Zucchini and Yellow Squash with Cumin
Mango-Saffron-Champagne Granita

For the hors d’oeuvre, the Savory Mini Cheesecakes were a huge hit. This is something that will make many appearances at future parties. If you can find pre-made, mini phyllo shells, these will be even simpler to prepare. I didn’t find them, so I cut whole wheat phyllo sheets into small squares. I layered the phyllo pieces in buttered mini muffin pans and brushed butter between each layer of phyllo. The cheesecake filling is a mix of cream cheese, sour cream, and an egg. That was spooned into each phyllo cup, and they were baked for 15 minutes. After cooling for a few minutes, the mini cheesecakes were topped with a tangy, spice-filled chutney made with curry leaves, asafetida, cumin seeds, fenugreek seeds, fennel seeds, onion seeds, black mustard seeds, dried red chiles, chopped tomatillos, red bell pepper, grated fresh ginger, a little sugar, lemon juice, and salt. As the chutney simmered and the house filled with the scent of those lovely spices, I was thrilled to have chosen this dish to start the meal.

The main course was one of those fabulous dishes that sits and simmers all by itself while you go about all the other things you need to do. To start, oil was warmed in a large saute pan, and a cinnamon stick and two bay leaves were added. Next, half a minced red onion, a few minced garlic cloves, and a couple of teaspoons of grated fresh ginger were sauteed until golden. I chopped, two big fresh tomatoes but canned tomatoes could have been used instead, and those were added next. The spices used here were a teaspoon of red chile powder, a teaspoon of ground turmeric, a tablespoon of ground coriander, and salt to taste, and those were added after the tomatoes had cooked for about ten minutes. A pound of boneless chicken that had been cut into big pieces was added and allowed to brown on all sides. I had two small, white eggplants from my CSA, so I chopped those into chunks and added them as well even though eggplant wasn’t part of the original recipe. After the chicken was browned, a cup of brown Texmati rice was added with two cups of water, and it was brought to a boil. The heat was reduced, the pan was covered, and the dish was left to do its thing for about 25-35 minutes. The rice should absorb almost all of the liquid and leave the finished dish only slightly moist.

As the chicken and rice simmered, I set about cooking the side dish which couldn’t have been easier. Zucchini, yellow squash, and sweet peppers were diced. Oil was heated in a large skillet, cumin seeds were added, and as soon as the cumin sizzled, the vegetables were dropped into to the pan. After about eight minutes, the vegetables were tender, and red chile flakes and turmeric were added. Some fresh lemon juice was squeezed over the vegetables just before serving. Dessert was already made in advance, and all that had to happen was to scrape the granita into pretty glasses and top with some lime zest for garnish. The granita was made by pureeing fresh, peeled chunks from two big mangos, some honey, a pinch of crushed saffron, some fresh lime juice, and a half cup of champagne. The puree was poured into a shallow pan and placed in the freezer. Icy crystals were scraped every hour or so as the granita sat in the freezer.

I’m still thinking about the sizzling spices and anticipating the flavors as each dish was started. The results were delicious from the start of the meal to the last bite of dessert. We were delighted to take part in a Worlds of Flavor meal.

This post is part of the DailyBuzz Food Tastemaker program with RiceSelect. I received the sample of brown Texmati rice and a stipend.

This post is brought to you by Rice Select.


I am a member of the Amazon Affiliate Program.

Tuesday, September 25, 2012

Grilled Tofu and Vegetable Tacos with Eggplant-Ancho Spread

Wait, wait, wait, it cannot be fall yet. For one thing, it’s still too warm to be fall, and for another, I still have to tell you about some summery dishes like these tacos with the eggplant and ancho spread. The tacos are filled with grilled yellow squash, zucchini, bell peppers, and tofu which were marinated first in white wine and olive oil with herbs. Grilling the marinated vegetables and tofu made them smoky-flavored and delicious, but it’s the eggplant-ancho spread I really want to discuss. I’ve pureed anchos into various sauces in the past, but this one was unique. By grilling an eggplant, the flesh became completely tender, and adding that to the anchos for the puree resulted in a lighter tasting spread with a creamy, smooth texture. Smoked paprika and cumin gave it added dimension as well. This was from the June issue of Food and Wine, and the recipe is online.

I made a couple of very minor changes to the original recipe. I marinated tomatoes with the rest of the vegetables, but I didn’t grill the tomatoes. While everything else was grilled, I left the tomatoes raw so they wouldn’t fall apart or become mushy. The marinade was made with white wine, olive oil, parsley, salt, and pepper, and I used basil instead of the suggested mint. I prefer basil to mint, and I have happily growing basil plants whereas every time I plant mint it dies. Pressed, drained, and sliced tofu, along with sliced vegetables, were marinated for just a few minutes before being grilled. For the spread, a whole eggplant was grilled and turned from side to side until charred and tender. When the eggplant was cool enough to handle, the flesh was scooped from the charred skin and left in a colander to drain. Anchos were stemmed and seeded and rehydrated in boiling water. The chiles were drained and added to the blender with the eggplant flesh, smoked paprika, cumin, a tiny bit of brown sugar, and olive oil. I used corn tortillas for the tacos, and I warmed them one at a time over the flame of a burner on the stove. The chopped grilled vegetables, grilled tofu, and raw tomatoes were packed into tortillas and topped with the spread.

I feel like I learned some kind of sauce-related secret here. For a velvety, smooth but light texture, add cooked eggplant flesh. I’m wondering what other sauces and spreads this could transform. And, I’m wondering how many other dishes I could top with this same eggplant-ancho spread.


Saturday, September 22, 2012

Lemon Shortbread Fingers with Sour Cherry Jam

There were two family birthdays in September which means it was time to test-drive some recipes for birthday cookies again. As usual, I had a stack of contenders waiting to be baked and tasted. One that seemed like it couldn’t possibly fail was this recipe for shortbread fingers from Donna Hay magazine. It’s from an article about holiday cookies from last year, and there are a few other options in that article that I want to try as well. The recipe isn’t available online, so I’ll include it below. It’s an easy-enough recipe, but plan ahead since you really do need to chill the dough in the freezer at two points in the process. With frozen, firm dough sandwiching a sweet and tangy sour cherry jam, long, skinny cookies are a cinch to cut. The shortbread bakes into golden crunchiness, and there’s just enough jam in the middle for good, fruity flavor without being too sweet. 

First, you need to make the jam, and it can be made in advance and stored in the refrigerator. It’s a quick puree of dried sour cherries, strawberry jam, and sugar. The original recipe suggested cooking the jam for a couple of minutes after it was pureed to thicken it. Mine was thick enough, and I skipped the cooking step. If your mixture seems runny, place it in a small saucepan, bring to a boil, and cook while stirring for a couple of minutes until it thickens. For the shortbread, butter and sugar were mixed until fluffy, and an egg and vanilla extract were added. Flour, baking powder, salt, and lemon zest were added and mixed to combine. Then, the dough was divided into equal parts, and each piece of dough was rolled, between sheets of parchment paper, into a rectangle. The dough rectangles will be stacked, so they need to be pretty close to the same size. The dough rectangles were chilled in the freezer. Once firm, one piece of dough was spread with jam and topped with the second piece of dough. The stacked dough was then returned to the freezer for an hour. Before cutting the long, finger shapes, the dough edges were trimmed, and then the cookies were cut and placed cut side down on silpat-lined baking sheets. The cookies baked for about 14 minutes and were cooled on the baking sheets. 

My assumption about this recipe was correct. It definitely didn’t fail, and the cookies were sturdy enough to be packed and shipped. Of course, they could have been filled with any flavor of jam, but sour cherry was a good match with the lemon in the shortbread. I’ll be adding this cookie recipe to the permanent file. 

Lemon Shortbread Fingers with Sour Cherry Jam 
from Donna Hay magazine

4.2 ounces (120g) (or 1 stick plus 1/2 tablespoon) butter at room temperature 
1 cup (220g) granulated sugar 
1 egg 
1 teaspoon vanilla extract 
1 3/4 cups (255g) all-purpose flour 
1 teaspoon baking powder 
1/4 teaspoon salt 
1 tablespoon finely grated lemon zest 

sour cherry jam: 
1/2 cup (100g) dried sour cherries 
1/4 cup (80g) strawberry jam 
1 tablespoon granulated sugar 

-Make the sour cherry jam: place the cherries, jam, and sugar in a food processor and puree until mixture forms a paste. Refrigerate until needed. 

-Make the shortbread: place the butter and sugar in the bowl of a stand mixer and beat until pale and fluffy. Add egg and vanilla and mix to combine. In a medium bowl, sift together flour, baking powder, and salt and add lemon zest. With mixer on low speed, add the dry ingredients and mix until just combined. 

-Divide the dough into two equal parts, and roll first piece of dough between sheets of parchment paper. You want the dough to form a rectangle roughly six inches by eight and one-quarter inches (16cm x 22cm). Repeat with second piece of dough. Place the parchment-covered dough rectangles on a baking sheet and set in the freezer for about 30 minutes. 

 -Remove the top layer of parchment from one dough rectangle and spread with the cherry jam. Top with the other dough rectangle, and cover with parchment. Place this sandwiched dough back in the freezer for an hour. 

 -Preheat oven to 350 degrees F (180C). Remove dough from freezer and discard top piece of parchment. Trim the edges of the dough to make a straight-sided rectangle. Cut long, skinny cookies about three-eighths of an inch wide, and place them cut side down on lined baking sheets. Bake for about 14 minutes or until the edges are golden. Cool on baking sheets. 


Tuesday, September 18, 2012

Mushroom-Farro Burgers with Tomato-Onion-Peanut Chutney

Mushrooms are easily one of my favorite ingredients. They appear here frequently in dishes of Italian, Chinese, Thai, Spanish, Mexican, or American origin, and I’m sure I’ve forgotten something. When I was offered a shipment of a variety of fresh mushrooms from Kitchen Pride Mushroom Farms, I was quick to say yes. Their mushrooms are cultivated nearby in Gonzalez, Texas, and they’re what I always buy at the grocery store and at the farmers’ markets. It didn’t take long for me to locate a recipe with mushrooms that was on my to-try list. These burgers are from Masala Farm by Suvir Saran, and I’d marked the page when I first read the book. They take some time to make if you don’t happen to have any leftover, cooked farro or potatoes, but you could always space out the steps by prepping some things a day ahead. I also made the Tomato-Onion-Peanut Chutney from the book, and that could definitely be made in advance and refrigerated for a few days. The burgers get a crispy outside surface from the panko coating and being browned in olive oil, and the mushrooms and farro give them a nice, chewy texture inside. The chutney cooks down to a jam-like consistency, and it’s sweet, spicy, savory, and more complex and interesting than ketchup could ever hope to be. I only made half the chutney recipe to go with the burgers, but in the future, I’ll make the full quantity and store any extra in the freezer.

Speaking of storing things in the freezer, I should learn to cook extra farro and store it there too. For the burgers, you need to cook farro and peeled red potatoes separately, and then let them cool before adding the other ingredients. The mushrooms were finely chopped and cooked in butter with rosemary and thyme before being transferred to a large mixing bowl with the farro and potatoes. Then, finely chopped shallots were sauteed, and the pan was deglazed with white wine. The shallots were added to the mushroom mixture with Parmigiano-Reggiano cheese. The mixture was mashed together with a potato masher, and burgers were formed. Each burger was pressed into a plate of panko breadcrumbs on both sides and set aside. While these steps were happening, I was also simmering the chutney. The chutney was started by cooking curry leaves, dried chiles, mustard seeds, and cumin seeds in canola oil. Turmeric was added followed by onion and then peanuts. After a few minutes, chopped, fresh tomatoes, and I used cherry tomatoes, tomato paste, sugar, curry powder, cayenne, and salt were added. The chutney simmered for about 40 minutes until thick. The burgers were browned in olive oil over medium heat until golden and warmed through.

These aren’t the kind of burgers you can throw on the grill, but they’re fantastic burgers just the same. They’re not sturdy enough to sit on or be flipped on the grill grate, and grilling wouldn’t result in the same crispy, browned surface you can only get from cooking in oil. They had great, savory flavor from the mushrooms, shallots, parmesan, and herbs. You could serve them on buns, but I chose to pair them with salad for a delightfully different take on burgers and ketchup.

I am a member of the Amazon Affiliate Program.

Saturday, September 15, 2012

Stuffed Mirlitons

The International Rescue Committee, which responds to humanitarian crises to help people rebuild their lives, has a program called New Roots that assists refugees with growing fresh produce for themselves and their communities.

“The IRC’s New Roots program is focused on connecting refugees with the land so they can grow their own fresh produce for themselves and for their families, connect with their local communities, and, in some cases, sell their produce at local farmers markets and to local businesses. To date, the IRC has been instrumental in connecting refugees with gardens or farms in eight of the cities where we assist refugees and we would like to see New Roots expand across our network (we resettle refugees in 22 cities across the country).”

They have a fundraising goal of $45,000, and they’re getting closer to it each day. One of the eight cities with an active New Roots program is Dallas where a pre-existing community garden that had fallen into disuse was restored two years ago. Currently, a group of women from Bhutan who had former gardening knowledge are growing enough produce to provide for family meals and to sell at White Rock Local Market. Jim Stokes, the Employment Supervisor in the Dallas office, explained: “It’s a nice way to empower these ladies who have skills.” Some of the most popular vegetables being grown are long beans, Malabar spinach, and pumpkin or squash vine tips. I didn’t even know squash vines could be eaten, but I was sent a recipe for vines that are cut into one-inch lengths and sauteed with mushrooms, bell pepper, tomato slices, and lots of spices including Szechuan pepper. I can't wait to try this as soon as I can get some vine tips. Edible Dallas/Fort Worth recently included a story about this New Roots garden, and a type of squash that goes by many names. The ladies from Bhutan call it iskus, but it’s also known as chayote or mirliton. I remembered a cooking class I attended where I learned a recipe for stuffed mirliton that I had never made at home. It was time to try cooking this squash.

Mirlitons are pear-shaped with a squeezed-in end that looks like it’s smiling at you. They look like they would have the texture of a zucchini, but the flesh is actually firmer and requires a little more cooking time. Hollowing them out, mixing the chopped and cooked flesh with seafood, and stuffing the shells is a common use of this squash in Louisiana. Ham is usually involved, but I, of course, skipped it. My version of the stuffing is a mix of chopped shrimp, crab meat, diced sweet peppers, onion, garlic, parsley, oregano, thyme, panko, and egg. The stuffing in the squash shells is topped with breadcrumbs tossed with parmesan, parsley, and oregano before being baked.

If you happen to be in the Dallas area, stop by White Rock Local Market for the fresh, locally-grown vegetables you expect to find and maybe a type of squash or two you haven’t seen before. And, learn more about the IRC and the New Roots program online.

Stuffed Mirlitons
Adapted from a recipe by Sara Roahen for Central Market Cooking School.

4 mirlitons
1 cup panko breadcrumbs
1 teaspoon fresh oregano
1/4 cup finely grated parmesan cheese
pinch cayenne
2 tablespoons plus 1/4 cup parsley, finely chopped
2 tablespoons butter
1 tablespoon olive oil, plus more for drizzling
1 cup onion, finely chopped
1/4 cup sweet pepper, finely chopped
2 cloves garlic, minced
1 teaspoon fresh thyme leaves
1 fresh bay leaf 
3/4 pound shrimp, peeled, deveined, and diced
1 egg, beaten
1/4 pound crabmeat
salt, pepper, and hot sauce to taste

Place whole mirlitons in a large pot and cover with water. Bring to a boil, and cook for 20-30 minutes until tender when poked with a knife. Drain, and let mirlitons cool. Cut each mirliton in half lengthwise, remove the pits, and carefully scoop out the squash flesh leaving some attached to the skin for sturdiness. Dice the squash flesh, and place the mirliton shells in a baking dish.

Preheat oven to 400 degrees F. Mix together the panko breadcrumbs, oregano, parmesan, cayenne to taste, and two tablespoons of the parsley, and set aside.

In a large saute pan over medium heat, melt the butter with one tablespoon of olive oil. Add onion and sweet peppers, and cook for a few minutes until softened. Add garlic, thyme, bay leaf, remaining parsley, and diced mirliton. Cook over medium-low heat, white stirring occasionally, until the vegetables are all completely tender, about 15 minutes. Add shrimp and cook until opaque which should only take a minute or two. Then, add the beaten egg, about three-fourths of the breadcrumb mixture, and salt, pepper, and hot sauce to taste. Stir to combine, and then gently fold in the crabmeat so as to keep the lump meat intact.

Divide the stuffing among the mirliton shells, mounding it up, and sprinkle the remaining breadcrumb mixture on top. Drizzle the mounds with olive oil, and bake for about 30 minutes or until the topping is golden brown. If you’re not happy with the color of the breadcrumb topping after 30 minutes, you can always place the stuffed mirlitons under the broiler for a few minutes for more browning.


Monday, September 10, 2012

Sesame-Crusted Miso Salmon with Cilantro Sauce

This year’s wild salmon season is coming to an end, but you can still get freshly caught Coho salmon through September. I just received some from the Copper River/Prince William Sound Marketing Association. Coho, sometimes called Silver salmon, is slightly lighter in color than Sockeye, and its flavor is milder as well. I had an idea about using the Coho for an hors d’oeuvre, and combined two different recipes. First, I remembered a crusted salmon dish from Martha Stewart's Hors d'Oeuvres Handbook. In that recipe, salmon was cut into small chunks, and each piece was pressed into a mix of spices and then seared. The flavors were Moroccan, and there was a citrus dipping sauce made with yogurt. That sounded lovely, but I also had my eye on a salmon recipe from Power Foods. That one is a recipe for a main dish, but I was interested in the miso marinade and used it for small chunks of salmon rather than full servings. It's served with a cilantro, lime, ginger, and chile sauce. So for my version, I marinated chunks of salmon in a miso sauce and then pressed each chunk into a mix of black and white sesame seeds. The chunks were seared and then served with little picks for dipping into the cilantro sauce. They looked a lot like Martha’s spice-crusted hors d’oeuvre but had different flavors.

Step one was to make the marinade. A cup of white miso, a third of a cup of rice vinegar, a quarter cup of brown sugar, and a third cup of water were cooked in a saucepan just to dissolve the miso and brown sugar. Miso should not be brought to a boil. The mixture was left to cool to room temperature, and the salmon was skinned and cut into bite-size chunks. The salmon chunks were covered with the cooled marinade and then refrigerated for an hour. Next, the cilantro sauce was by pureeing cilantro, lime juice, shallot, jalapeno, garlic, fresh ginger, and vegetable oil. After an hour, the salmon chunks were removed from the marinade, excess marinade was shaken off each piece, and the pieces were pressed into a mix of black and white sesame seeds. I seared the pieces, seed side down, in a saute pan with a little oil, and then briefly flipped each piece to brown the miso marinade lingering on the top side. I served the salmon with a cocktail pick in each piece and the cilantro sauce on the side.

The cilantro sauce was a bright-tasting and lively match to the miso and sesame on the salmon. And, the miso marinade coated the salmon well to give each bite sweet-savory flavor and color from being caramelized in the pan. The little salmon chunks were hard to resist, but the marinated and seed-crusted idea would be just as good with full-sized fillets.

I am a member of the Amazon Affiliate Program.

Thursday, September 6, 2012

Almond Rosemary Cake with Lemon and Creme Fraiche Glaze

“Rustic” is such a handy word when it comes to describing food. My homemade sourdough baguettes are always “rustic” which means I’m sloppy about shaping the loaves, and when my pastry doesn’t turn out as perfectly as it could, all is well if the word “rustic” is added to its title. However, there are times when “rustic” isn’t a euphemism for messy. Sometimes, a thing is “rustic” because it’s simple, charming, or well-textured. This almond cake is that kind of rustic. When I saw it in the June issue of Food and Wine, it went directly into my to-try stack of recipes. I have a not-so-successful history with almond cakes, so I headed into this recipe with a little concern. In the past, almond cakes I’ve made have been dense, dry, and dull. Thankfully, there were a few tricks to making this cake that prevented all of that. The cake batter is made with polenta and minced rosemary which added interest in both the flavor and texture departments. Also, the eggs were whipped with sugar to a fluffy state, and folding the mixture into the dry ingredients lightened the batter. One last trick was the use of a sugar and lemon syrup that was poured over the warm cake and prevented it from becoming dry.

Let me run through the details and the minor changes I made the original recipe. Skin-on, raw almonds were toasted, chopped, and ground in a food processor. I added some of the sugar to the almonds in the food processor to prevent them from forming a paste. The dry ingredients were combined, and I always sieve dry ingredients. I used whole wheat pastry flour instead of all-purpose, and polenta, baking powder, and salt were also included. After sieving those, I added the ground almonds, minced rosemary, and lemon zest. In a stand mixer, the eggs were mixed with the remaining sugar using the whisk attachment for about ten minutes until tripled in volume. Then, creme fraiche and cooled, melted butter were added. The egg mixture was folded into the dry ingredients in three additions. For baking, an eleven-inch springform pan is suggested, but I used a ten-inch pan. The cake baked for 25 minutes while the syrup was made. Sugar, water, and lemon juice were boiled and reduced for five minutes, and then I added a sprig of rosemary to steep in the syrup as it cooled. When the hot cake was removed from the oven, the syrup, minus the rosemary sprig, was poured over the top, and it was left to cool completely. Once cool, it was glazed with a mix of confectioners’ sugar, creme fraiche, and lemon juice and topped with pieces of rosemary.

I finally got over my losing streak with almond cakes. This is in no way light and fluffy like a chiffon, but it definitely wasn’t as dense as other almond cakes I’ve attempted. The sugar syrup worked like a charm in warding off a dry texture too. Next time, I might add a bit more minced rosemary to the batter since its flavor was very subtle, and those extra flecks of green will just make the cake even more “rustic” in a very good way.


Tuesday, September 4, 2012

Chilled Noodles with Vegetables and Crushed Peanuts

Labor Day supposedly marks the end of summer, but the end of our summer’s heat is nowhere in sight. I’m really not complaining since this summer has been so much less intense than last year, but at this point in the season, no matter how relatively mild the year may be, it’s still been hot for many, many days in a row. So, as I was going through old recipe files the other day, something that understandably caught my attention was an old article about chilled noodle salads. Nice, cold, crisp salads are always welcome on hot days, but don’t chilled noodles make a salad seem even colder? Maybe they retain their coldness longer than vegetables do, or maybe I’m just imagining that. Either way, I was convinced that chilled noodles and vegetables was the way to go for a few late summer meals. That article I found in the files was just a starting point. From there, I went on to look up noodle salads in a few books and eventually found the recipe that I worked from for this dish in Vegetarian Cooking for Everyone. The cooked and cooled noodles were mixed with a rice vinegar dressing made with ginger and chopped chiles, and then I served it as a composed salad with the vegetables arranged on top. The changes I made to the original were only out of convenience. Rice noodles were easier to find than mung bean noodles, and I had some arame which I used instead of buying the suggested dulse.

The skinny rice noodles were covered with boiling water and left to soften which only takes a couple of minutes. Then, they were drained, rinsed under cold water, and transferred to a big mixing bowl. By immediately tossing the noodles with some dressing, they’re less likely to stick together in a big clump. The dressing was made with rice vinegar, vegetable oil, a little sesame oil, a scan teaspoon of sugar, a big pinch of salt, grated fresh ginger, and finely chopped serrano chiles. I added some chopped peanuts and cilantro leaves to the noodles before tossing with the dressing, and then the bowl was refrigerated while the vegetables were prepped. The dried arame was soaked in cold water for a few minutes until soft, and carrots, cucumber, red bell pepper, and another chile were julienned. Green onions were sliced on a diagonal, and the salad was ready to be composed. A trick I learned from Martha Stewart years ago is to separately dress each item of a composed salad. So, after noodles were placed in bowls for serving, each type of vegetable was tossed in a bowl with a little of the dressing before being placed on top of the noodles. Last, more cilantro and crushed peanuts were used for garnish.

The contrast of crunchy vegetables and peanuts with squishy noodles was a good one, and the ginger and chiles offered pops of flavor. Icy cold, chilled noodles will be a great remedy to our ongoing heat until whenever summer really ends.

I am a member of the Amazon Affiliate Program.

Blogging tips