I have a little problem. I'm addicted to cookbooks, food writing, recipe collecting, and cooking. I have a lot of recipes waiting for me to try them, and ideas from articles, tv, and restaurants often lead to new dishes. I started losing track of what I've done. So now I'm taking photos and writing about what I've prepared—unless it's terrible in which case I forget it ever happened.
Have you heard about the national bake sale for Japan? It’s happening in multiple cities this Saturday, April 2, and Austin is one of those cities. As soon as word started spreading about organizing a bake sale in Austin, the positive response was overwhelming. There are currently over 100 volunteer bakers and about 40 businesses contributing to the Austin event. There will be five locations around town for the sale, and all donations will go directly to Americares for relief efforts in Japan. Each location will have an incredible variety of both sweet and savory treats on offer, and for anyone who is unable to take part in Saturday’s event, there’s an online giving page with FirstGiving where all donations also go directly to Americares.
To be able to contribute, in some way, to the recovery process in Japan by baking sounded perfect to me. The timing couldn’t have been better since I just received a review copy of the new book Milk and Cookies which is from the New York bakery of the same name. The book will be released on April 20. It presents recipes for cookie dough bases from which many varieties can be made. For instance, there’s vanilla base dough, dark chocolate base dough, oatmeal, peanut butter, and sugar cookie base dough. Each base has a chapter dedicated to it with different additions for several unique cookies. From the peanut butter base dough, you might make peanut butter-milk chocolate bites or peanut butter and jelly cookies. There are also chapters for special cookies like mocha-cherry drops, carrot cake cookies, and ice cream sandwich cookies, family favorites like biscotti and sfogliati crown pastries, and brownies and bars like Kahlua brownies and pecan bars. Last weekend, I decided to test a recipe for white chocolate blondies to find out if they were bake sale-worthy. The cookie dough itself was made with melted white chocolate, and after baking, the blondies were covered with a white chocolate glaze. The cut bars were chewy, and there were hazelnuts and chocolate chips to add crunch.
First, a pound of white chocolate, and yes, that’s a lot but this recipe makes a lot of blondies, was melted with butter. I used Callebaut white chocolate disks. Next, flour, baking powder, and salt were combined and set aside. Six eggs were mixed in a stand mixer, sugar was added, and then the cooled white chocolate mixture was incorporated. The dry ingredients were added, and last chocolate chips and toasted, chopped hazelnuts were stirred into the dough. The dough was baked in a large sheet pan and allowed to cool before the blondies were topped with a glaze made with cream and more white chocolate.
As a white chocolate fan, these blondies were a big hit with me. The white chocolate in the dough gave the crumb of the bars a dense but tender texture. The semisweet chocolate chips and hazelnuts added crunch and kept the bars from being too sweet. These will definitely be contenders for what I bring to the bake sale, but I have my eye on that peanut butter cookie chapter too.
The adage “we eat with our eyes” is sometimes associated with visuals of gooey, melting cheese or thick, rich, chocolate sauce, but here, it came into play simply because of color. This is an uncomplicated dip made from just a few ingredients so it wasn’t the process of making it that was so interesting, but that bright pink color was something I couldn’t forget. I’m already a fan of beets whether they’re red, golden, or candy cane striped so I knew I’d like the flavor of grated beets in a sour cream dip. Mostly though, I wanted that color of a dip on the table surrounded by crisp, white vegetables like cauliflower, Belgian endive, and celery hearts. I saw the recipe in the December issue of Food and Wine, and I kept it in mind until I finally had an occasion to make it.
Red beets were peeled and then grated on a box grater. Meanwhile, finely chopped red onion was sauteed in some olive oil, and then the grated beets were added. Water was poured over the onion and beets, and the saute pan was covered so the vegetables could simmer for about five minutes. The cover was removed, red wine vinegar and honey were added, and the mixture was cooked while stirring until the liquid evaporated. Once cooked and allowed to cool a bit, the vegetables were combined with sour cream, and it was ready to serve.
A dip made with golden beets would have been just as delicious, but I might not have remembered it so well. And, certainly any vegetables could be served with this dip, but the pale, just barely green colors of those suggested made for a striking platter with the bowl of pink dip.
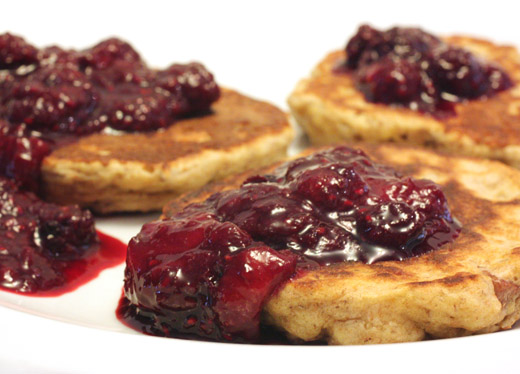
While focusing more attention on healthy eating cookbooks lately, I hadn't baked much for a few weeks. That will change, of course, when my birthday rolls around next week. In the meantime, since not much baking has been happening, the thought of making pancakes was very appealing. As I pulled out the griddle, I realized it had been years since I last made pancakes. I don’t know how that happened. I guess I get easily distracted by scones, muffins, popovers, and every other baked good that adds a sweet component to a big breakfast or brunch meal, and I just overlooked pancakes for far too long. They are best when just made, but you can stow them in a warm oven while readying the rest of the morning meal. And, in this case, the berry compote for topping the pancakes can easily be made in advance. This recipe is one more from the breakfast chapter of Power Foods, and the intro touts the antioxidant properties of both the pancakes and the topping with ingredients like wheat germ, pecans, and berries.
The berry compote can simmer away while the pancakes are made, or it can be made in advance and then re-warmed for serving. Since berries aren’t in season just yet, I used a bag of frozen, mixed berries. The berries were combined with honey and lemon zest and left to simmer until thickened. For the pancakes, all purpose and whole wheat flours were whisked together with wheat germ, baking powder, baking soda, and salt. Separately, yogurt, melted butter, and an egg were combined and then added to the dry ingredients. Chopped pecans were added as well, and everything was mixed until just moistened. The batter was spooned onto a hot griddle brushed with melted butter, and this is a thick batter that needs some help in spreading. It requires some pushing with the back of a spoon to flatten into a cake. Then, they take only a few minutes of browning on each side.
I realized I kind of like flipping pancakes. I’d missed it. The batter sizzles on the griddle on the first side and then again after the flip. These were hearty, little pancakes with good, nutty flavor. And, the berry compote topping was sweet, tart, and just the right embellishment. I have a feeling I’ll be making pancakes more frequently now.
It was the week of St. Patrick’s Day, last week, and I had a great, big, gorgeous head of green cabbage from Farmhouse Delivery, and oh yeah, I’m mostly Irish. Still, I sat there with that cabbage wondering what to do with it. Somehow, the obvious solution of Irish cooking with cabbage wasn’t clicking for me, so I did a quick recipe search for something different. I found just the right dish in Vegetarian Cooking for Everyone. As usual, when looking for ideas for cooking a particular vegetable, you can find several from Deborah Madison. This was a dish built around steamed cabbage, and the flavors are Asian-influenced. The recipe actually calls for savoy or napa cabbage, but I proceeded with a head of round, green cabbage instead. And, I know, we’re talking about tofu and steamed cabbage here, but trust me, even Kurt liked it. In the book, the dish is presented with options. The tofu could have been left plain and simply steamed with the cabbage, but there were suggestions to try a sesame marinade on the tofu or to fry the tofu rather than steam it. I did marinate the tofu, and then I roasted it in the oven while the cabbage steamed. Most importantly, both the cabbage and the tofu were topped with a quick peanut sauce and garnishes of cilantro and chopped peanuts. So, simple cabbage and tofu became vehicles for big flavor.
The tofu should sit in the marinade for at least an hour but the longer the better. The sesame marinade was a mix of sesame oil, soy sauce, rice wine vinegar, a pinch of sugar, chili oil, and finely chopped green onion and cilantro. The tofu was cut into slabs, placed in a wide, shallow dish, covered with the marinade, and placed in the refrigerator. I turned the tofu pieces after a few hours. I decided to roast the tofu in the oven to make it more hands-off than frying. So, while it roasted, I cooked rice and steamed the sliced cabbage. The peanut sauce was a quick version from the front of the book, and it included natural peanut butter, rice wine vinegar, chopped cilantro, minced garlic, soy sauce, light brown sugar, and chile oil. It seemed a little thick when mixed, so I added a tablespoon or two of water to make it drizzleable. The steamed cabbage was spooned onto a base of cooked rice, and it was topped with chunks of tofu, drizzled with peanut sauce, and sprinkled with cilantro, sliced green onion, chopped peanuts, and sliced dried chiles.
The flavors here literally built up from the base going from simple rice to cabbage, then from marinated tofu to peanut sauce. It was fresh, healthy, simple and savory, bold, and spicy all at the same time. I love finding a different way to use a vegetable, especially when it turns into something this good.
The Lenten season is well underway, and that means different things for me today than it did when I was a kid. Growing up, my family and I always observed Lent and the traditional rules of not eating meat on Fridays and giving something up for the 40-day period. Some people gave up candy or ice cream or whatever, but in my family, we always gave up eating between meals. 40 days of no snacks also pretty much meant 40 days of no candy since it wasn’t easy to pass off a pile of jolly ranchers as dessert. These days, things have changed. I don’t eat much meat in the first place, so telling myself I’m not going to eat meat but will eat fish on a Friday doesn’t mean much. Also, since the real idea is to simplify and be a little less decadent, sitting down to a meal of lobster just because it’s Friday is missing the point. As for not eating between meals, I let that go years ago when I couldn’t determine what might be a meal and what might be a snack depending on what I was doing each day. So, I just give up popcorn which kills me every year because I have a serious popcorn problem. And, rather than focusing solely on giving something up, I like to take on something good as well. This year, I’m cooking even more vegetables than usual and spending even more time with my healthy eating types of cookbooks. I recently picked up a copy of Power Foods which showcases 38 of the big players among nutrition-packed fruits, vegetables, proteins, and grains with recipes for every meal of the day as well as snacks. So far, I’ve only cooked from the breakfast chapter, but I see many healthy dishes for Lent and the rest of the year coming from these pages.
The little, oat bran-applesauce muffins looked like a perfect way to have a healthy, grab-and-go breakfast on hand. They’re mini muffins, so you can have one for a tiny breakfast if you’re not that hungry or grab a few on a morning when you need more energy. With no refined sugar, they’re sweetened only with applesauce, dates, and some honey. They were made by reducing applesauce with chopped, pitted dates to cook off some liquid while plumping the dates. Once cool, that mixture was combined with wheat bran, buttermilk, one egg, two tablespoons of honey, some grated fresh ginger, and vanilla. The dry ingredients were whisked together, and those were flour, ground flaxseed, baking soda, salt, ground allspice, and rolled oats. The dry ingredients were stirred into the applesauce mixture, the mini muffin cups were filled, and the muffins baked for about 20 minutes.
The ginger and allspice smelled lovely as the muffins baked, and I thought those flavors were even better after the muffins had sat for a day. Yes, they do contain wheat bran and flaxseed and no actual sugar, but the dates and applesauce give them sweetness and keep the texture very tender. I have several other pages in the book marked, and I predict it will still be getting a lot of use beyond these 40 days.
I never make granola the same way twice. I love the recipe with olive oil and maple syrup from the NY Times. It’s great with plain yogurt. Every time I make it, I use different nuts or dried fruit depending on what I have in the kitchen that day. Almonds and dried cranberries is one favorite variation. However, despite the use of olive oil in that recipe, I would never in a million years have thought to take the entire thing in a savory direction. When I saw a savory granola in Saveur’s Chef’s 100, that was something I had to try. Daniel Humm of Eleven Madison Park in New York makes a savory granola that’s served on a tomato salad with mozzarella ice cream and is also used in a beet salad. He started by using puffed rice as a way to add texture to different dishes, and from there he added other flavors to the puffed rice until it seemed to become a savory granola. I loved the idea of it and of adding something grainy and crunchy to dressed, roasted beets. As with any granola, it’s very easy to mix and match ingredients to make use of what’s available and to bring in whatever flavors you wish, and my version ended up a little different from the recipe in the magazine.
First, if we’re calling this granola, I needed some oats to be included. I used half the suggested quantity of puffed rice and then an equal amount of oats. The original recipe suggests basil leaves, but I don’t have basil plants yet this year, so I used parsley leaves instead. Also, I did have some pine nuts in the freezer but not quite enough, so I threw in some pepitas as well. To begin, the parsley leaves were fried in canola oil and then left to drain and cool. The puffed rice, which is not sweetened, oats, pine nuts, pepitas, some finely grated parmesan, minced garlic, salt, and piment d’espelette were combined, and the fried parsley leaves were added. Honey was melted and added as a binder, and I also added a little olive oil to the mixture before it was spread on a baking sheet and popped into a 250 degree F oven for about 40 minutes.
The parmesan and garlic make this granola unmistakably savory, and the honey and piment d’espelette give it a sweet-heat personality. But, the crunch is what this is all about. Adding that contrasting texture to roasted beets and carrots topped with a shallot vinaigrette was a fun twist. As soon as I have basil plants with lots of leaves, I want to try this again. A basil-scented, savory granola sprinkled over balsamic-drizzled, sun-ripened tomatoes is in my future.
You know when you’re flipping through your stack of to-try recipes and there’s one that you know will be good but you keep putting it back in the pile and thinking you’ll try that one next time? It’s like you think you already know how that one is going to turn out and you think it’ll be good but you don’t foresee any surprises with it and so you keep putting it back in the stack. I do that a lot. So it was with this fish dish, and I was wrong about it. This is from the October 2010 issue of Food and Wine, and it combines a simply cooked piece of fish coated with Dijon mustard with a chive puree and crispy olives and some potatoes on the side. I thought I knew how the fish would taste after being cooked with a layer of mustard on top, and I thought I knew what the chive puree and olives would be like with it. The flavors were even better. The mustard was mellowed as it seared into the fish, and the bright, fresh, herb puree and salty hit of the oil-cooked olives exceeded expectations.
The puree was made first by very briefly blanching chopped chives and a little spinach in boiling water and then draining and rinsing with cold water. They were squeezed dry before placing them in a blender with extra virgin olive oil and some salt and pureeing. I veered off the recipe path just a bit by roasting sliced potatoes rather than boiling and then slicing. Also, for the olives, rather than cooking in oil in the microwave, I sauteed the chopped olives in oil in a pan on the stove until they were crisp. I used turbot fillets rather than cod, and any white flakey fish with good oil content would work here. I basted them with Dijon mustard, seared them for a few minutes in a pan on top of the stove, then flipped them and placed the pan under the broiler for another couple of minutes. To serve, the fish was topped with the olives, and the sauce and potatoes were placed to the side.
Crisping the olives intensified them, and crispiness itself is always desirable anyway. The mustard protected the fish, preventing it from becoming dry while cooking, and after cooking, a mellow version of its flavor seeped into the fish flesh. So, intense, tasty olives and calm Dijon flavor on the fish got a jolt of herbiness from the chive puree, and what I had thought this was going to be like wasn’t even close. I suppose the moral of this story is that you can’t always trust your own instincts, and you shouldn’t put off trying recipes in your to-try stack.
I had two cookie recipes in mind, and I was trying to decide which one to bake for a party. I called in Kurt to make the final choice. Without even asking for details, he instantly pointed straight at these chocolate mint sandwiches and said: make those. Well, that settled that, not that there was anything wrong with the other option. I knew he’d like the mint, and they do look fetching on the back cover of Chewy Gooey Crispy Crunchy Melt-in-Your-Mouth Cookies. They’re thin and crisp chocolate wafer cookies sandwiched with a layer of mint-flavored white chocolate, and this was just one of four ways these cookies were presented in the book. With several of the cookie recipes, Alice Medrich included “upgrades” or variations on the theme. In this case, the base recipe was plain chocolate wafers. The possible upgrades for these were spicy wafers with cinnamon, cayenne, and ground black pepper added to the dough, extra-bittersweet wafers with added ground unsweetened chocolate, and the version I made with white chocolate and mint sandwiched between two wafers.
The dough requires some time in the refrigerator before being cut into cookies which means it can be made well in advance. It was entirely mixed in a food processor. First, flour, cocoa, sugar, salt, and baking powder were pulsed, and then chopped, softened butter was mixed in by pulsing. Last, milk and vanilla were added through the feed tube while the machine was running. The dough was formed into a log, wrapped in parchment, and chilled for at least an hour. Possibly the most difficult part of this recipe was cutting the dough into thin rounds. The log was marked at one inch lengths, and each inch of dough was cut into six skinny, little, fragile cookies. The rounds were baked, and as soon as they came out of the oven, small circles were cut in half of them. I used the big end of a piping tip to cut the circles. When the cookies were cool, white chocolate was melted and mixed with mint extract for the filling. Scant half teaspoons of white chocolate filling were spread on half of the cookies which were topped with the ones with holes.
Naturally, I thought the half teaspoon of filling was not nearly enough. I would have preferred to slather on a thick, generous layer of mint white chocolate, but I was wrong. It was just enough to add sweetness and richness and let the chocolate of the cookies shine through. Kurt made a great choice with this one.
Last year’s winner in the piglet Tournament of Cookbooks on food52 was Good to the Grain by Kim Boyce with Amy Scattergood and with good reason. The book inspires the use of various whole grains in baking for added flavor and different textures, and I’ve been enjoyingbaking from it lately. It was also just listed among the finalists for this year's IACP Cookbook Awards. Boyce apprenticed as a pastry chef with Sherry Yard at Spago and then worked with Nancy Silverton at Campanile in Los Angeles. She later left professional baking to start a family and became interested in adding whole grains to what she prepared at home. After many experiments and eventually coming to appreciate what’s unique about each type of whole grain, she arrived at a collection of nutritious recipes resulting in Good to the Grain. These days, she and her husband are focused on growing a wholesale pastry business which produces recipes similar to those in the book for local cafes in Portland, Oregan. I had to ask, what are you reading?
Kim:
I've been reading Novella Carpenter's Farm City. Last summer I saw her speak and was captivated and moved by her often hysterical and touching stories of cultivating a farm and eventually a community on land that she didn't own. Her story was quite inspiring and I found myself putting the book down so that it would last longer and longer.
My staple cookbook that is always on my nightstand is Lindsey Shere's classic Chez Panisse Desserts. I like to find inspiration by just opening up the book and reading the page I turn to. Her flavor combinations are simple and clean, something that I admire and strive for in my own pastries.
These cute, little appetizers caught my eye when they appeared in the December issue of Living magazine. They looked like the kind of bite-sized food that would be popular at a party, so I made them for Oscars night. Sadly, I was once again completely wrong about all of my Oscar win predictions, but I was right about these mini turnovers. They’re kind of like everyone’s favorite artichoke dip tucked into pockets of puff pastry. The filling is a bechamel into which parmesan and pecorino are melted before the chopped artichokes are added, and it’s cooled and allowed to set up a bit before it’s used. Even though there are a few steps involved in preparing these, they can be made in stages. Once they’re all assembled, they can sit in the freezer until you’re ready to bake them. The quantities in the original recipe result in about 70 turnovers which is quite a lot. That’s great for a big party, but for a smaller gathering, you might want to cut the recipe in half or leave some in the freezer for another time. And, speaking of that original recipe, I wasn’t able to find it online, so I’ll include it below.
The sauce started with melted butter and minced shallot and garlic. Flour was added, and then white wine was whisked into the roux. Once reduced a bit, milk was whisked into the sauce and when it thickened, the chopped artichoke hearts, shredded parmesan and pecorino, some thyme, and lemon zest were added. I actually made the filling a day in advance, so once it was cool, I stored it in the refrigerator overnight. The next day, I rolled a sheet of puff pastry out to just over 15 inches by 21 inches and cut it into 35 three-inch square pieces. A tablespoon of filling was placed in the center of each square. The pastry was folded over the filling into a triangle and then two corners were folded in to meet in the center making a neat packet. When all 35 were filled, they were placed on a parchment-lined baking sheet and placed in the freezer, and the process was repeated with a second sheet of puff pastry. They were baked straight from the freezer after being brushed with egg wash.
They came out of the oven golden and flakey, looking like ideal partners for cocktails, and the wine, lemon zest, and thyme in the filling gave it more interesting flavor than the stand-by artichoke dip. They were one of the big winners of the night since they were long gone well before best picture was announced.
Mini Artichoke Turnovers from December 2010 Living
4 tablespoons butter
1 large shallot, minced
2 teaspoons minced garlic
3 tablespoons all purpose flour
1/2 cup dry white wine
1 cup whole milk, warmed
salt and pepper
pinch cayenne
3 cups canned artichoke hearts, rinsed, drained, and chopped
1/2 cup finely grated Parmesan
1/2 cup finely grated Pecorino Romano
1 tablespoon chopped thyme
1 1/2 teaspoons lemon zest
2 packages all butter, frozen puff pastry, thawed
1 large egg, lightly beaten
-Melt the butter in a small saucepan over medium heat, and add shallot and garlic and cook for one minute. Add flour and cook, stirring constantly, for about two minutes. Whisk while slowly pouring in the wine and allow to cook until reduced by half, about two minutes. Whisk in milk, bring to a boil, and allow to thicken while stirring. Season with salt, black pepper, and cayenne.
-Remove from heat and stir in artichoke hearts, cheeses, thyme, and lemon zest. Let cool completely, and refrigerate until ready to use.
-Preheat oven to 400 degrees F. Roll out puff pastry to a 1/8 inch thickness, about 15 inches by 21 inches, on a lightly floured surface. Cut into 35 3-inch squares.
-Arrange 1 tablespoon artichoke mixture in the center of each square. Brush two perpendicular edges with water, and fold over to form a triangle and press to seal. Brush a corner of the triangle with water and join it to the opposite point to form a little folded-in packet. Transfer to a parchment-lined baking sheet. Repeat with remaining dough and filling. Refrigerate or freeze until firm, 30 minutes to 1 hour. (Or, freeze for up to two months.)
-Brush turnovers with egg wash. Bake until golden, about 20 minutes.
When you think of Southern food, a few classic dishes like biscuits, chicken and dumplings, pimento cheese, and shrimp and grits always come to mind. A new book called Quick-Fix Southern by Rebecca Lang sets out to make those classics and several new dishes doable when time is lacking. I received a review copy of this book, and in it I found recipes for snacking, picnics, salads, parties, casseroles, and of course, Southern sweets. There are cooking tips like chopping greens into thin ribbons to speed up cooking time or cooking everything for shrimp and grits together in the oven instead of separately on top of the stove to reduce active time. And, there are some classics like fried green tomatoes and okra fritters that don’t take long to prepare anyway. Beyond the Southern classics, there are also dishes like catfish tacos, warm curried fruit, and a key lime martini. When I got to the sweets chapter, I was drawn to the ambrosia since citrus is still in season. It’s a simple salad with supremed ruby red grapefruit and navel oranges, pineapple chunks, and a layer of whipped cream.
In the book, the ambrosia is composed as a trifle, but I served it in individual portions. I also took the liberty of garnishing with pomegranate seeds because I still had a couple of homegrown, tiny pomegranates on hand. I have a dwarf pomegranate shrub which actually produced fruits, albeit very small fruits, this year, and those fruits were packed with delightful seeds. So, to begin making this dessert, fresh pineapple was cut into chunks, and navel oranges and red grapefruits were cut into segments. The fruits were placed in a sieve and allowed to drain. Be sure to save the juice that collects for another use or mix it with a little vodka for a quick cocktail. Next, white chocolate was melted and allowed to cool, and cream was whipped. There was no added sugar as the white chocolate added just enough sweetness to the cream. The whipped cream was whisked into the melted white chocolate in two steps, and then it was time to layer it with the mixed fruits.
Coconut usually makes an appearance in ambrosia, and I missed it here a little. Some freshly grated coconut pieces that had been toasted would have been a nice addition, but that would have made this a slightly more complicated and time-consuming dish. As it was, there were certainly no complaints. The layers of fruit and rich, white chocolate whipped cream made for a Southern-style dessert full of fresh flavors with just enough decadence.
I mentioned my growing collection of different types of flour the other day, and now there’s one more variety in the bin. Coconut flour joined the party as soon as I saw these cookies in Good to the Grain. I bought Bob’s Red Mill coconut flour which is made from ground, organic coconuts, and it has the same sweet, warm smell of fresh coconut. I was thinking this flour would be good in pancakes, and as luck would have it, there’s a buttermilk coconut pancake recipe on the back of the flour package. But, about these cookies, they’re made with just coconut flour and barley flour with no all-purpose or wheat flour included. There’s also coconut milk in them, and each ball of dough was rolled in shredded, unsweetened coconut before being placed on a cookie sheet. Three sources of coconut was a sure sign that Kurt was going to be happy with these. They were tender, cakey cookies full of coconut flavor. Warm from the oven, they were melt-in-your-mouth good, but I also liked them after they’d been refrigerated overnight. I usually don’t go for cold cookies, but these were an exception to the rule. Once cold, they were a little firmer, and for whatever reason, I like shredded coconut when it’s cold.
Making this dough was just a little different from most other cookie recipes. The dry ingredients were sifted together, and those were barley flour, coconut flour, salt, baking soda, and baking powder. Then, eggs were beaten in a stand mixer and then granulated and brown sugars were added and mixed with the eggs. Next, the dry ingredients were added and mixed until combined before room temperature butter was added. I felt a little uncomfortable adding the butter after the dry ingredients, but following the butter, coconut milk and vanilla were added. Last, some of the shredded unsweetened coconut was mixed into the dough which came together just fine. I used a scoop to make balls of dough which were rolled in more shredded coconut, and the cookies baked for about 20 minutes.
When I asked Kurt if he liked the cookies, his response was: of course, they’re made with coconut. So, if you like coconut, you’ll like these cookies. I liked these cookies for the true coconut flavor, for the just-right level of sweetness, and for the tender, cakey texture. Now, I’m off to attempt coconut pancakes and experiment with other ways to use this flour.