


I’ve made it my mission to convert those who think they don’t like beets. With red, golden, and Chioggia, roasted, raw, and fried, there are so many ways to enjoy the humble beet that I think beets deserve a second chance or third or fourth. When Leela at She Simmers mentioned the beet challenge, I decided right away I had to contribute something. I almost always roast beets whole and then peel and chop them. More often than not, my roasted beets end up in a salad of some sort. I spotted this warm beet salad in the May issue of Living magazine. It’s very simple to assemble, and the flavors were eye-poppingly good. One more item of business: the pretty plate in the photo above was sent to me as part of a fun plate swap organized by Cheryl at A Tiger in the Kitchen. My new plate came from Heather at BodaciousGirl. Thanks Cheryl and Heather!
The beets were roasted with a splash of olive oil and a sprinkling of salt and pepper. Once removed from the oven and cool, they were peeled and sliced. A vinaigrette was made with shallots, Banyuls vinegar, and extra virgin olive oil. I was intrigued by the use of Banyuls vinegar, and I have another recipe that recommends it as well, so I splurged on purchasing a bottle even though it’s an expensive vinegar. It’s a French vinegar made from sweet wine, and the flavor is milder than typical red wine vinegar. Its taste is closer to wine than vinegar usually is but there is some acidity. Certainly, this salad would also be delicious with a vinaigrette made with another red wine vinegar, but the flavor of the Banyuls was very nice here. The vinaigrette was set aside while the parmesan dressing was made by warming cream, adding shredded parmesan, and stirring until smooth. There was supposed to have been some thyme in the cream and parmesan mixture, but my plants failed to survive the summer heat, and I forgot to buy thyme at the grocery store, so I skipped it.
 The salad was assembled by placing the sliced beets on a platter, the warm parmesan cream dressing was spooned onto the beets, and then some arugula micro greens, and any baby greens could be used here, were strewn about on the warm dressing. Those greens were drizzled with the shallot vinaigrette, and last but certainly not least, some chopped pistachios were added. This could be the dish to change the minds of all the beet haters out there. If it’s the earthiness of the beet root that they object to, then they should taste beets with this simple, warm, parmesan dressing. The richness blends with the flavor of the beets in a lovely way, and the greens and vinaigrette perk up the salad and keep it from being too heavy while the pistachios add crunch and one more layer of flavor. I already like beets, but trust me, this is a really, really good beet salad.

The beets were roasted with a splash of olive oil and a sprinkling of salt and pepper. Once removed from the oven and cool, they were peeled and sliced. A vinaigrette was made with shallots, Banyuls vinegar, and extra virgin olive oil. I was intrigued by the use of Banyuls vinegar, and I have another recipe that recommends it as well, so I splurged on purchasing a bottle even though it’s an expensive vinegar. It’s a French vinegar made from sweet wine, and the flavor is milder than typical red wine vinegar. Its taste is closer to wine than vinegar usually is but there is some acidity. Certainly, this salad would also be delicious with a vinaigrette made with another red wine vinegar, but the flavor of the Banyuls was very nice here. The vinaigrette was set aside while the parmesan dressing was made by warming cream, adding shredded parmesan, and stirring until smooth. There was supposed to have been some thyme in the cream and parmesan mixture, but my plants failed to survive the summer heat, and I forgot to buy thyme at the grocery store, so I skipped it.
The salad was assembled by placing the sliced beets on a platter, the warm parmesan cream dressing was spooned onto the beets, and then some arugula micro greens, and any baby greens could be used here, were strewn about on the warm dressing. Those greens were drizzled with the shallot vinaigrette, and last but certainly not least, some chopped pistachios were added. This could be the dish to change the minds of all the beet haters out there. If it’s the earthiness of the beet root that they object to, then they should taste beets with this simple, warm, parmesan dressing. The richness blends with the flavor of the beets in a lovely way, and the greens and vinaigrette perk up the salad and keep it from being too heavy while the pistachios add crunch and one more layer of flavor. I already like beets, but trust me, this is a really, really good beet salad.

Tweet


 I moved on to round two. The other recipe I’ve used before, honey pecan caramels, suggests taking the sugar and cream mixture to a final temperature of 248 degrees F, and that’s what I did the second time. I used the same ratio of one cup beer to one cup cream. I used sugar, corn syrup, and just a little honey which was brought to the same 305 degrees F before the butter and warmed cream and beer mixture were added. For round two, I smartly started with a five-quart pan. When the final mixture reached 248, I turned off the heat, added vanilla, and poured it into a prepared pan with pretzels and cashews. Somewhere between round one and two I decided some nuts would go well with the pretzels. I also added a sprinkling of sea salt on top. After sitting overnight, the caramels had become firm enough to cut but were still tender and chewy. They were the same texture as the honey pecan caramels I had made before. This was success with beer in a caramel. As for the flavor, I wasn’t sure how noticeable the beer would be to someone who didn’t know it was there. I detected a maltiness, and there was a hint of a little something extra in these caramels, but there wasn’t an overwhelming flavor of beer. After they sat for a day, I thought the beer flavor had become more noticeable, but it was still subtle. The color was darker than that of other caramels, and the pretzels and cashews were nice additions. This was a fun, learning experience and an interesting use of beer in a sweet treat.

 For the stew, the sauce was made with five cups of stock. Again, I wasn’t sure if the braising liquid, which was all beer, would be too beery for the sauce. It had been flavored with the chicken and vegetables while in the oven, but I decided to use only four cups of it and one cup of plain chicken stock so as to hedge my bet. Some finely chopped shallots were browned in 12 tablespoons of butter with some finely chopped sage and rosemary, and then three-fourths of a cup of flour was added to form a roux. The stock and braising liquid were stirred into the roux to form the sauce, and after thickening, one quarter cup of cream was added as well. The chicken, potatoes, carrots, and celery were added with a package of frozen peas and some chopped parsley. Once well mixed, that all went into a baking dish which was placed in a 375 degree F oven for 15 minutes. Then, the stew was removed from the oven and topped with biscuits that were made with parsley in the dough. After brushing an egg wash on the biscuits, the stew went back into the oven for another 30 minutes.
 After all my worrying about the dish tasting too beery, in the end, the flavor from the beer was actually very subtle. I could smell the beer in the dish, and the flavor was there but it was nicely mixed with the chicken and vegetables and biscuits and herbs. This whole process may seem labor-intensive, but each step was very easy. The original recipe in

 These cookies are found at the beginning of the book with a few other versions of the chocolate chip variety like the

 With apple chunks, walnuts, apple cider, and blackberries in the muffins, these were full of delicious. The syrup glaze on top kept the muffins moist and gave them a little shine. The walnuts were particularly nice with the flavor of apples and cider. This was a practical choice for satisfying my apple cake craving, but that doesn’t mean I won’t change my mind and bake a big, full cake in the very near future.

 The hint of caramel from the Kahlua and the smooth Baileys added just enough sweetness to the espresso and tequila. A small, six ounce serving was just enough for a caffeine jolt with a kick, and the dusting of cinnamon and crushed chocolate-covered espresso beans on top was delicious. I’ll definitely be mixing more of these, but what should I call them next time?

 I know it looks like something that makes you think dessert better be really good, but it’s not like that, I promise. That pizza parlor thing I mentioned about the tomatoes, garlic, and oregano give the dish a lively flavor while forming a sauce. The fresh, crunchy, sauteed vegetables contrast with the chewy wheat berries and give lots of varied texture. Admittedly, I like hippie food, but the flavors here were so good it might not belong in that much maligned category.

 The flan was removed from the roasting pan with water and left to cool on a rack, and then it was unmolded onto a plate. That’s the scary part, but just like last time, it popped out without any problems. The remaining caramel in the pan was then pooled onto the inverted flan. I have to admit the caramel is the real reason I like flan so much, but the custard was delicious too. The persimmon flavor was mild, but by adding fruit, the custard is prevented from tasting too much of egg. Next time, I might add a larger pinch of cinnamon, but I’m not complaining about the results here at all. I should really consider making flan more often than once each October, but at this rate, it has been a special, appreciated dessert each time.

 I always wish blue cornmeal were really blue instead of grayish-pale blue, but regardless of the color, it made a nice crepe with a sweet nuttiness about it. The tenderness of the crepes made them very easy to fold and turn around the filling. It was a little strange to sit down to a meal of breakfast tacos with fork in hand and the aroma truffle oil in the air, but I could get used to this sophisticated variation.

 The spice mix was made by toasting broken cinnamon sticks, cloves, cumin seeds, coriander seeds, fennel seeds, peppercorns, and sweet paprika in a dry skillet. Once the heat made the spices aromatic, they were placed in a coffee grinder which I use just for spices. Salt was added, and the mixture was ground to a powder. The spice mixture was rubbed onto the chicken, and I always loosen the skin over the breast so as to season under the skin as well. Then, cilantro, one halved lemon, and on halved head of garlic were placed in the cavity. I left the chicken in the refrigerator for a few hours to absorb the flavors, and then it was roasted in a 400 degree F oven for just over an hour. For the sauce, shallots and one red chile were sauteed in olive oil until the shallots were caramelized. That mixture was added to a food processor with one half pound of pitted, green Spanish olives, parsley leaves, sherry vinegar, lemon juice, and olive oil. That was pureed until very smooth.
 Not only did those spices smell wonderful as the chicken roasted, they also really permeated the meat. Then, there was the sauce. The sauteed shallots sweetened the brininess of the olives, the parsley gave it herby freshness, and the oil smoothed it out nicely. It complemented the chicken well, and served as a nice dressing with some mixed baby greens. I can also report that the leftover chicken made one of the best chicken salads I’ve had. This was a twist on roasted chicken I'll be repeating often.

 So, for my first dumpling adventure, I chose the vegetarian crystal dumplings and chiu chow dumplings. Both are made with wheat starch dough, and this was a fun dough to make. Wheat starch was combined with tapioca starch because the tapioca gives it more elasticity. The two starches were combined in a mixing bowl with a little salt, and just boiled water. After stirring in the water, a little canola oil was added. I doubled the dough recipe, but before kneading it, I divided it in two equal parts. I thought kneading would be easier that way. The dough was kneaded for a couple of minutes on a flour-free surface, and it quickly became smooth and white. It’s noted that it should feel like Play-Doh, and it really does.
 To backtrack just a bit, it’s actually a very good idea to prepare the dumpling filling a day or two before assembling the dumplings. My first choice was the vegetarian filling including dried shitakes, dried wood war mushrooms, shallot, garlic, jicama, carrot, and scallions. The dried mushrooms were soaked and then drained and chopped, and the other ingredients were either minced or finely diced. The shallot and garlic were sauteed, and then the mushrooms, jicama, and carrot were added. A seasoning mixture of sugar, soy sauce, and reserved mushroom soaking liquid was added to the saute pan followed by the scallions and then a small amount of cornstarch dissolved in water. That cooked together just briefly, and then the mixture was left to cool. I decided to go all out and make a second filling as well because since I was doing this whole homemade dumpling thing, I thought why not. And, I thought two kinds of dumplings would be even more fun than one.
 The second filling I made was for chiu chow dumplings. That filling is flavored with dried shrimp and includes some kind of meat, usually pork but I used ground chicken thighs, and it includes some vegetables which make it less dense. It’s made by sauteing garlic and chopped dried shrimp before the ground chicken was added. Once the meat was browned, chopped re-constituted dried shitakes were added, with finely diced jicama, and chopped peanuts. A seasoning mixture of sugar, oyster sauce, soy sauce, shaoxing rice wine, and water was then added to the saute pan. Once again, a cornstarch slurry was added along with scallions. Both fillings were refrigerated overnight before being made into dumplings.
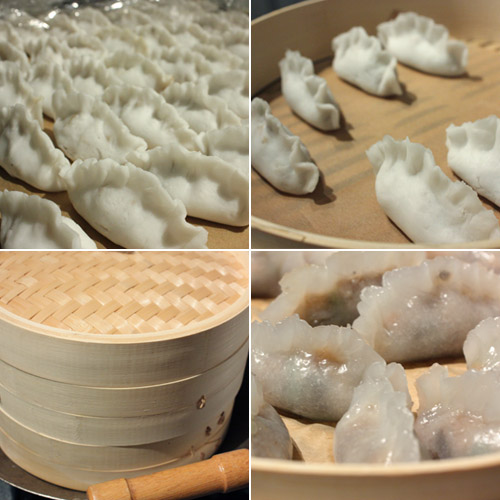 Does the whole process take some time? Yes. Is it worth it? Definitely. I was thrilled with the dumpling dough and how easy it was to shape. I was also really thrilled that every step of the process turned out exactly as described in the book. The quantity of filling for each type of dumpling was exactly right. The texture of the dumpling wrappers was chewy and springy and delightful. The fillings were full of umami, and I really mean that. There are a lot of savory flavors at work in each, and I kept thinking that both were very good examples of umami. The freshly made chile garlic sauce was bright and hot but not painful in small doses. The whole experience from cooking and assembling and steaming to eating was a fun one, and there will be a lot more dumplings in my kitchen in the future.

 This recipe is a keeper for how quick and full-flavored it was. Chickpeas and swiss chard are always a great match, but the pesto perked them up and gave the soup a tangy freshness. Meals like this make our eating light and healthy kick last a little longer, but soon enough I’ll be deciding what to make for a tempting, rich dessert.