I have a little problem. I'm addicted to cookbooks, food writing, recipe collecting, and cooking. I have a lot of recipes waiting for me to try them, and ideas from articles, tv, and restaurants often lead to new dishes. I started losing track of what I've done. So now I'm taking photos and writing about what I've prepared—unless it's terrible in which case I forget it ever happened.
I've been fascinated by the idea of Scotch eggs for a while now. Traditionally for Scotch eggs, hard-boiled or soft-boiled or even pickled eggs are encased in a sausage mixture, coated in breadcrumbs, and fried. Since I don't eat red meat, I'd never attempted to make them or even tasted one. Then, along came this lovely vegetarian version with an outer layer made with beets. They couldn't be more perfect. The beets give the outside a good contrasting color to the white and yellow of the egg inside. Just in time for Easter, I found these on Mess in the Kitchen the other day and headed straight to the kitchen. The beet mixture was actually first imagined as a veggie burger and then was used for coating Scotch eggs. I made just a couple of changes to the recipe so as to use what I had on hand, and I was beyond thrilled with the results. The mixture held together very well, and the outside fried to a crisp around the soft-boiled eggs. Not only do you get a tender soft-boiled egg surround by a crispy, tasty, fried coating, there's another bonus to making Scotch eggs. You know how fresh eggs can be difficult to peel after boiling? If there are any uneven surfaces on the eggs after they're peeled, you'll never see them once they're coated with the beet mixture. Everything about these eggs made me very happy.
I decided to go with soft-boiled rather than hard-boiled eggs thinking that the eggs would cook a little more in the hot oil causing the yolks to set, and that's exactly what happened. I used the smallest ones from the carton I had, but you can really use any size of eggs you'd like. I placed five eggs in a saucepan, covered them with water, added a pinch of salt, and brought the water to a boil. As soon as the water bubbled, I turned the heat to low, covered the pan, and let the eggs cook for eight minutes. I drained the eggs and peeled them while still warm, and they were fresh enough to still be difficult to peel but, delightfully, that didn't matter here. For the beet mixture, I peeled two medium beets and chopped them. The beets were placed in a food processor with a chopped leek, about three ounces of firm tofu that I squeezed a bit to remove some water, two chopped green onions, about three tablespoons of flaxseed meal, a quarter cup of toasted breadcrumbs, two peeled and chopped cloves of garlic, an egg, and salt and pepper. The mixture was processed until a paste developed. If the mixture is too dry, try adding a tablespoon or two of water, and if it's too wet add a little more breadcrumbs. The beet mixture was pressed around each egg, and I had extra which I formed into two veggie burgers for another day. Once the eggs were encased in the beet mixture, I rolled each one in some remaining breadcrumbs before frying. I fried them, two or three at a time, in about an inch of grape seed oil in a saucepan, turning from time to time, for about five minutes total.
Did I mention how much I enjoyed these eggs? I already want to make them again for a party and use quail eggs for a daintier portion. They'd look great cut in half and lined up on a serving tray. Or, I could imagine going the other direction and using duck eggs. One Scotch duck egg cut in half with some smoked salmon on top of each piece would make a lovely brunch meal. Obviously, I'll be making this recipe repeatedly.
Spring is here, and I'm having a thing with asparagus. I keep bringing it into every meal. It partners so well with eggs like in a baked egg dish with parmesan I've been making for years or even just simply roasted and then topped with softly scrambled eggs. For dinner meals, I've been making different grain dishes with asparagus and other spring players like scallions, leeks, and peas. This barely risotto was my favorite of those so far, and it's anotherrecipe from Power Foods. I have bookmarks sticking out of several pages of that book, and last week, I asked for votes on Twitter about which of two dishes to try next. It was this risotto or stuffed poblanos, and it was a very close race. Of course, I made the poblanos too, so watch for those soon. In making the barley risotto, I embellished the dish just a tad by adding some pea shoots I had from my CSA and by sprinkling a little lemon zest on top. Otherwise, I stuck to the instructions for a simple, light, spring meal. And, unlike a traditional Arborio rice risotto, this one doesn’t require constant stirring.
To start, a little olive oil was heated in a large pan, and pearl barley and chopped leeks were added. Once the leeks had softened, white wine was added and minimal stirring ensued until the wine evaporated. Then, water was added, brought to a boil, and left to simmer until absorbed with just an occasional stir here and there. Vegetable broth was added next and the mixture was stirred occasionally over about 10 or 15 minutes until the barley was cooked through and the liquid had thickened. I placed a big handful of pea shoots on top and let them steam for the last few minutes. Then, thawed, frozen peas were added with grated parmigiano reggiano and thinly sliced mint leaves. I served the risotto with lemon zest and shards of parmigiano on top.
It's a light dish with no butter and just a half cup of grated cheese, but chewy, nutritious barley rounds it out and makes it filling. The spring vegetables shine, and the mint points up their flavors. I know zucchini is coming soon, along with summer tomatoes in every color, but I need a little more time with asparagus first.
Whether they’re regional specialties or family favorites, sandwiches are well-loved in many sizes, flavors, and forms, and there’s a new book completely devoted to them. The Encyclopedia of Sandwiches is by Susan Russo from Food Blogga, and the photography is by Matt Armendariz from Matt Bites. I’ve known about this book for a while since I had the pleasure of testing a recipe for it, and I recently received a review copy. The sandwiches appear in the book in alphabetical order, and there are options made with waffles, bagels, doughnuts, English muffins, cookies, pound cake, rolls, buns, and many, many different types of bread. There’s also background information on where types of sandwiches originated and suggested alternative fillings in some cases. I was unfamiliar with a few of them like the chow mein sandwich and the chip butty, but there are also well-known favorites like the dagwood, the po’boy, and sliders. There are breakfast sandwiches like the Denver sandwich and the classic breakfast sandwich on an English muffin, there’s dessert with the pound cake sandwich and the ice cream sandwich, and there are classics like the Elvis and the lobster roll. It’s a fun book to peruse for sandwich ideas, and everything is so beautifully presented, I was instantly hungry when I started turning pages. The falafel pitas was my first stop since I can’t resist the mix of crunchy fried patties and cool, crisp toppings.
The sandwich recipe itself is followed by one for quick and easy falafel which involves using canned chickpeas rather than soaked, dried beans. To make the falafel, minced onion and garlic were briefly sauteed before being added to a food processor with rinsed and drained canned chickpeas, chopped parsley and cilantro, cumin, cayenne, and salt. Flour and baking powder were added, and the mixture was pulsed until it formed a paste. Then, balls were shaped from the mixture, they were rolled in sesame seeds, and they were flattened before being fried for a few minutes. I also followed the recipe in the book for tzatziki, and that was a quick mix of diced cucumber, Greek yogurt, lemon juice, salt, cayenne pepper, and fresh mint. The sandwiches were built in halved pita with falafel patties, some tahini, chopped lettuce, cherry tomatoes, and tzatziki.
Pita is such a perfect container for a sandwich. In the book, it’s also used for kofta pockets and spiedini pockets. Here, the falafel fit nicely with the toppings and tzatziki, and it’s just enough bread without being too much. The flavors and textures and the hot and the cold made this great. Now, I’m eyeing the toasted chocolate sandwich, or maybe next I should try the torta or the pepper and egg sandwich. With so many good options, I'll being trying lots of different sandwiches soon.
These pecan squares were one more item I baked for the bake sale, but they’re not just any pecan squares. This recipe originated at the Americana Hotel in Miami Beach, it found its way to Maida Heatter so she could include it in her first dessert book, and it appears again in the recently released paperback edition of Maida Heatter's Cookies. This book presents a collection of cookie recipes that were previously included in some of her other books, and I received a review copy. I first learned about Maida Heatter years ago in an issue of Saveur in which she was named The Queen of Cake. This quote from that story explains why I instantly became a fan: “A stranger from the Miami area once looked Maida up in the phone book and called her for help with a recipe that she just couldn't make work. ‘I may have been crazy, but I invited her over to show her how to make it.’ (It turned out that the lady had been using margarine instead of butter and omitting the sugar, Maida recalls—still sounding a bit annoyed.)” I not only became a fan, but I realized she writes the kind of recipes you can definitely trust, so long as you actually follow the recipes. She really wants the reader to get things right, and the instructions for these pecan squares are a perfect example of that. She explains the how's and why's carefully, and I once again really enjoyed learning from her while baking.
In the intro to this recipe, she notes that someone who attended one of her classes suggested the use of foil to line the pan to make removing the squares simpler. So, that is step one. The pan was lined with foil, and she explains the best way to do that. Then, the pan was placed in the freezer because spreading the dough on a cold pan is easier, and the dough will cling to it. While the pan chilled, the dough was made by mixing butter until softened, and then sugar was added followed by an egg, salt, and lemon zest. Flour was slowly added until the dough was formed. Next were the instructions for spreading the dough in the chilled pan. It’s explained that the dough should reach all the way up the sides of the pan to contain the pecan filling. The dough was to be placed bit by bit around the sides of the pan and across the bottom and then pressed out to form smooth, even surfaces. The dough was pierced with a fork before it was chilled in the refrigerator while the oven preheated. More details were included for baking the dough to be sure it baked flat and didn’t bubble up in places. For instance, if it puffed, you were instructed to prick it with a cake tester and not to let the dough win the battle. The dough was then removed from the oven while the filling was made. For the filling, butter was melted with honey, and then granulated and dark brown sugars were added and cooked to dissolve. After it came to a boil, it was removed from the heat and cream and pecans were added. It sat for a few minutes before being spooned into the prepared crust, and then the pan went back into the oven for another 25 minutes. There are also careful instructions for turning the whole sheet of bars, once cool, out of the pan removing the foil, and turning the sheet back right side up. After it was back to right side up, it was chilled before being cut.
Yes, these were a lot of specifics for simple cookie squares, but I like that she offers all of those tips from her experience. The crust came out exactly right, the filling worked perfectly, and pan removal and cutting went just as it should have. The lemon zest in the crust was a nice addition to the buttery flavor as was the honey in the filling. These were like little pecan pies in cookie form. And, now I have several more cookie recipes from the book to look forward to, and I know they'll turn out great.
Last week, I mentioned that I was baking for the Austin Bakes for Japan bake sale which was held on Saturday. As I wrote about that, I hoped there would be a good turnout, I hoped we’d have a lot to offer at each sale location, and I really hoped the fundraising would be a success. All of those things happened and exceeded our highest hopes. There were beautiful baked goods overflowing the tables at all five locations of the sale, and people kept coming to visit the sales, choose treats to take home with them, and leave behind donations. The positive response and generosity of the community were stunning. Kathryn was our leader of the efforts to organize this event, and all of her hard work resulted in the bake sale going perfectly. The other team leaders who helped with planning as well as overseeing bake sale locations were Carly, Rachelle, Shelley, and Stephanie. As of the end of Saturday, the fund raising total was over $11,400, and because the online giving page is still active, the total is now over $11,700. Thank you to everyone who contributed to this event and for all the wonderful generosity.
So, this being a bake sale, I had a perfect excuse to pull out some recipes and bake several things in a couple of days. Timing was an issue since I couldn’t bake everything at the very last minute, and that’s how I decided on biscotti for one item. They’re cookies that last well, so I baked them two days before the sale. I remembered there were several good biscotti versions in Chewy, Gooey, Crispy, Crunchy Melt-in-Your-Mouth Cookies, and that’s where I found this recipe. As with all the recipes in this book, this one included an upgrade option for tweaking the main ingredients. It’s a kind of healthy type of biscotti with whole wheat pastry flour, oats, walnuts, and dried fruit, and the upgrade was the addition of sunflower seeds, sesame seeds, hemp seeds, and flaxseed meal. There were also additionl tips and an overview of biscotti making. For instance, in the US we have adopted biscotti and made it our own. So while the traditional Italian biscotti or cantucci are very dry and crunchy and usually flavored with anise, our American biscotti are slightly cakey in comparison with lots of additional flavors.
This breakfast biscotti recipe is of the American style, and this was an easy cookie dough to prepare since everything was just whisked and then stirred together. All purpose flour was combined with whole wheat pastry flour, baking powder, and salt. In a separate bowl, brown sugar and oats were mixed. Then, milk and butter were heated until the butter melted, and that was added to the oat mixture and left to stand for a few minutes. Eggs and vanilla were added followed by the flour mixture, and then I added toasted chopped walnuts, dried cranberries, sunflower seeds, sesame seeds, hemp seeds, and flaxseed meal. The dough was transferred to a silpat-lined baking sheet, and using wet hands, I formed it into a long, rectangular shape, not too wide. By using wet hands to shape the dough, it will become shiny as it bakes. I needed the biscotti to fit into the cellophane bags I had already bought, so I made the shape about four inches wide. The first baking was at 325 degrees F for about 35 minutes. The pan was removed from the oven and left to cool, and the oven was turned down to 300 degrees F. Once cool enough to handle, the baked dough was transferred to a cutting board and cut into half inch or so slices. The slices were set on a baking sheet, on their edges, and the second baking was for 25 minutes. I always worry biscotti might not be completely crunchy, so I moved the cookies around on the sheet and gave them five more minutes in the oven just to be sure.
My biscotti anxiety exists because I’ve tried a few recipes in the past that just didn’t work quite right, but there was no need to worry here since this came from Alice Medrich. Her tips such as using wet hands to shape the dough and standing the cookies on their edges for the second baking as well as the timing and ingredients all worked very well. The biscotti were deliciously crunchy and the nuts and seeds added to that effect. Since I packed them all up for the bake sale, I’m going to have to make another batch just to enjoy at home.
Even though I always start pondering cake options weeks in advance of my birthday, I usually end up choosing something lemony or berry-filled or both, unless I decide on butterscotch. I always have to try something different, it’s never the same cake twice, but the flavors are usually similar. I’ve been enjoying baking from Flour since receiving a review copy last fall. Not only has everything from the book been completely delicious, the recipes have also just worked really well. Even if you have a standard approach to apple pie, and I did, the one from this book might change your mind about it. The techniques resulted in the best apple pie I’ve ever made. So, I’ve come to trust this book, and I’m thrilled that Joanne Chang is working on a second one. I knew there would be a good option for a birthday cake in Flour. The name of the cake in the book is lemon-raspberry cake with lemon buttercream, but I had fresh, local strawberries to use instead. It’s intended as a three layer cake with lemon curd mixed with buttercream and berries between each layer. I cut the quantity down to two layers for the cakes and stored the extra buttercream and lemon curd in the freezer for another use. This was a special occasion cake, meaning there are a few parts to making it, although none of them are difficult.
I started by making the lemon curd in advance, and I used meyer lemons for the juice. The next day, I made the cakes which began by creaming together butter and sugar and then adding vanilla and lemon zest. A mixture of flour, baking powder, and salt were added alternately with milk. Last, egg whites were beaten until they held peaks, and they were folded into the cake batter. While the cakes baked and cooled, I gathered ingredients for the French buttercream. First, a sugar syrup was made in a saucepan, and it was brought to 238 degrees F. Eggs and egg yolks were mixed in a stand mixer until pale, and then the syrup was slowly added to the eggs while mixing on low speed. Once all the syrup was added, the speed was increased to medium, and it was mixed until fluffy and cool. Next came the butter, and this was an obscene amount of butter. Three cups of butter were cut into chunks, and the chunks were slowly added while mixing until the buttercream became smooth and lovely. A pinch of salt was added, and the frosting was completed. One last item to make was the lemon syrup which was a mix of lemon juice, sugar, and water which was brought to a boil to dissolve the sugar and then left to cool. That lemon syrup was brushed on top of each cake layer before the filling and toppings were added. A little of the lemon curd was mixed with a little of the buttercream to make the filling that was placed between the cake layers. And, I need to pause for a moment while I remember that mixture of lemon curd and buttercream because it was delightful. I placed some of it in a plastic bag so I could pipe a quick circle of the mixture around the edge, and that held the berries in place preventing berry juice from running on the outside of the cake. Sliced strawberries were placed on the curd-buttercream layer inside the circle barrier. The other cake layer went on top, it was brushed with lemon syrup, and the remaining plain buttercream was used to frost the top and sides of the layers. Last, some lemon curd was spread on top of the cake, and I decorated with a few whole strawberries.
The cake met my requirements perfectly for lemony-ness and berry flavor. Lemon curd, buttercream, and fresh strawberries couldn’t possibly disappoint. The cake layers themselves were light as can be, and the brushed-on lemon syrup kept them from becoming dry. With the strawberries, it was a cake for spring, and I bet the lemon flavors would be great with blueberries too. I’m not sure I can top this, so I might have to bake the same cake again next year.
I grew up in Illinois, the very center of the Midwest US, where we used to say that every recipe had a can of soup in it. Yes, despite being the agricultural mecca of the country, the Midwest was known as a land of casseroles more so than one of fresh, fabulous food, but all of that might have changed in the last few years. I received a review copy of the new book Heartland the Cookbook and learned of several new things about the food scene there. The number of artisan food purveyors has drastically increased. There's now La Quercia in Iowa which makes prosciutto from heritage Berkshire pigs, foraged foods are showing up on high-end restaurant menus, microbreweries and microdistilleries are making small batch products, and Prairie Fruits Farm in Champaign, Illinois and other small dairies are making chevre. Years ago, I attended the University of Illinois at Urbana-Champaign, and I don't recall any local cheese purveyors in town back then. I was thrilled to read about this change and the growing focus on local foods. I also learned that the Midwest now has thirty-three Slow Food chapters making it second only to the California Oregon Washington region. In addition to delivering all of that great news, the book is also full of beautiful photos of rural landscapes and, of course, food.
The recipes include breakfast dishes, breads, nibbles and drinks, salads and soups, main courses, and desserts. Several of the dishes recommend locally made items like that chevre from Champaign, Illinois or Chicago-made Vosges chocolate that's used in a hot fudge sundae with salted caramel sauce. I haven't made it back to the Midwest for a visit lately, so instead of using specific products from there, I cooked with the spirit of the book by using what I could get locally in Austin. There's a recipe for four seasons flatbread which showcases seasonal items in different toppings. The flatbreads themselves are made from no-knead recipes also in the book. I chose the no-knead sour caraway rye dough topped with a fresh herb cheese, sliced radishes, and chives. I used a feta, spinach, and herb spread made by Full Quiver Farm, and I found pretty, Easter egg radishes, and some green garlic which I added to the toppings, at the farmers' market last weekend. The no-knead dough was as simple as dough gets. Bread flour, rye flour, instant yeast, salt, cocoa powder for color, caraway seeds, molasses, yogurt, and water were mixed in a large bowl. Since there's no kneading, you do need to mix thoroughly with a spoon, but then the dough just sits to rise for a couple of hours and that's it. The dough was patted into an oval on a baking sheet, and it baked until browned and crisp on the surface. Once cool, the cheese was spread on top, and it was covered with sliced radishes and green garlic and chopped chives.
Fresh, early spring flavors of radish and green garlic and a thin layer of rich cheese were complemented nicely by the rye flatbread with caraway, cocoa, and molasses. As soon as local heirloom tomatoes appear, I'll use them for the flatbread version made with clover honey dough. The other recipes I'm looking forward to trying are prairie panzanella made with cornbread, an heirloom bean ragout in an acorn squash, and the next time we use the grill, I'm making the smoked goat cheese. Mostly, I'm looking forward to my next visit to the Midwest where I'll be seeking out some of the food artisans I learned about in the book.
I’m submitting this to Yeastspotting where you’ll find some seriously well-made bread.






 . I have bookmarks sticking out of several pages of that book, and last week, I asked for votes on


 is by Susan Russo from


 . This book presents a collection of cookie recipes that were previously included in some of her other books, and I received a review copy. I first learned about Maida Heatter years ago in an issue of Saveur in which she was named


 , and that’s where I found this recipe. As with all the recipes in this book, this one included an upgrade option for tweaking the main ingredients. It’s a kind of healthy type of biscotti with whole wheat pastry flour, oats, walnuts, and dried fruit, and the upgrade was the addition of sunflower seeds, sesame seeds, hemp seeds, and flaxseed meal. There were also additionl tips and an overview of biscotti making. For instance, in the US we have adopted biscotti and made it our own. So while the traditional Italian biscotti or cantucci are very dry and crunchy and usually flavored with anise, our American biscotti are slightly cakey in comparison with lots of additional flavors.


 since receiving a review copy last fall. Not only has everything from the book been completely delicious, the recipes have also just worked really well. Even if you have a standard approach to apple pie, and I did, the one from this book might change your mind about it. The techniques resulted in the best apple pie I’ve ever made. So, I’ve come to trust this book, and I’m thrilled that Joanne Chang is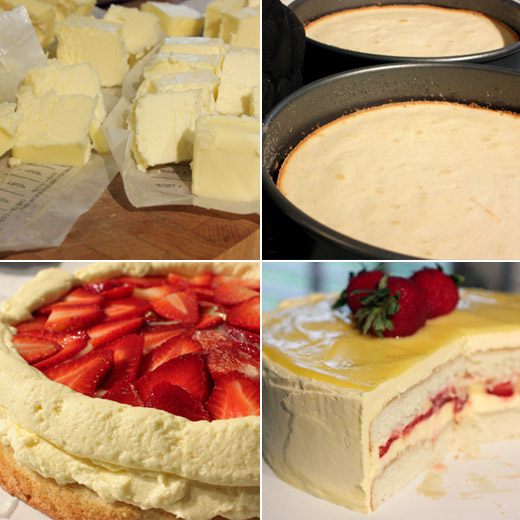


 and learned of several new things about the food scene there. The number of artisan food purveyors has drastically increased. There's now La Quercia in Iowa which makes prosciutto from heritage Berkshire pigs, foraged foods are showing up on high-end restaurant menus, microbreweries and microdistilleries are making small batch products, and Prairie Fruits Farm in Champaign, Illinois and other small dairies are making chevre. Years ago, I attended the University of Illinois at Urbana-Champaign, and I don't recall any local cheese purveyors in town back then. I was thrilled to read about this change and the growing focus on local foods. I also learned that the Midwest now has thirty-three
