I have a little problem. I'm addicted to cookbooks, food writing, recipe collecting, and cooking. I have a lot of recipes waiting for me to try them, and ideas from articles, tv, and restaurants often lead to new dishes. I started losing track of what I've done. So now I'm taking photos and writing about what I've prepared—unless it's terrible in which case I forget it ever happened.
A recipe with smoked salmon is sure to grab my attention. So are ones with cute stacks of things made in mini versions. There were a lot of great ideas in Dorie Greenspan’s Around My French Table, but these savory waffles were first on my list of things to try. There are two ways you could go with these waffles. You could make whole waffles, cut them into quarters, top them as you please, and serve them in one, single layer. They’d be great as small bites for a cocktail party. Or, as I did, you can make mini waffles by just placing a spoonful of batter in the center of each waffle square assuming you’re using a square waffle maker. Then, the mini waffles can be topped and stacked into towers for brunch. The toppings here are creme fraiche, smoked salmon, and chopped chives, but in the book, salmon roe is also shown as an optional topping. You could get creative and use these as vehicles for all kinds of things though. For instance, the pate de jardin made by Kocurek Family Charcuterie that I brought home from the farmers’ market was another delicious thing to set atop these waffles. The batter for them was made with chopped green onions, chives, and smoked salmon in it, so the savory flavors ran through each bite.
Making the batter was as easy as it always is for any pancake or waffle. Flour, baking powder, salt, and pepper, in this case, were whisked together. In a separate bowl, milk, eggs, and melted butter were combined and then added to the dry ingredients. Everything was stirred together but just barely. As usual, some lumps are fine. Last, chopped smoked salmon, green onions, and chives were folded into the batter. I heated my waffle maker, and mine happens to make kind of big dents in waffles rather than little, dainty ones. In this case, a daintier dent might have been nicer, but mine worked well enough. When the machine was hot, I spooned a bit of batter into the center of each of the four waffle squares. They cooked for the usual amount of time which for my machine is about six minutes. When they were all done, I stacked three mini waffles per serving with creme fraiche and more smoked salmon between each layer.
There’s enough butter in these waffles to give them good, rich flavor which fit well with the salty, savoriness of cured salmon. Salmon, chives, and creme fraiche is a mix that works every time. Sweet, syrup-covered waffles are a welcome treat at brunch too, but having a buttery, crisp waffle without the sugar was a fun change of pace. One other suggestion from the book was to offer these with various toppings in a build-your-own setup for a party. I like that idea too, and I’m already thinking of more topping ideas.
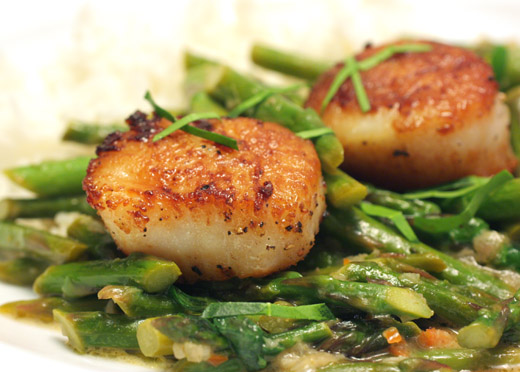
Scallops plus asparagus and Thai flavors was all I needed to know. I saw this dish in the food section on The New York Times site last week, and it immediately became a part of our weekend dining plans. With the current fling I’m having with asparagus and scallops’ unwavering appeal, this meal was sure to be a hit. That being said, I made some minor changes to the suggested preparations. First, Kurt and I both prefer for large scallops to be seared. While we agree on that point, Kurt also feels that sauce should never cover scallops once they’re seared because tampering with that seared bit of crust on the surface should be illegal. So, rather than cooking the scallops in the sauce as was recommended, I seared them separately and set them on top of the asparagus and sauce for serving. Another change I made was simply due to laziness. I didn’t feel the need to make fish stock for a mere one-third cup, so I used water and added a little fish sauce instead. Last, since I have a cute, little kaffir lime tree growing in a container on my front porch, I grabbed a few leaves from it to slice thinly for garnishing.
I made the curry paste mostly as directed by the recipe. Shallots, cores of lemon grass bulbs, ginger, garlic, anchovy paste, coriander, lime juice, and lime zest were mixed in a food processor. Oil was heated in a saute pan, and the curry paste was added. Asparagus, and I used more than suggested because I couldn’t help myself, was cut into small pieces and added to the curry paste. Then, I added water and fish sauce instead of fish stock, more coconut milk than suggested because I used more asparagus than suggested, and sriracha, and allowed the asparagus and sauce to simmer. Meanwhile, I seared the scallops in a separate pan, and all the while jasmine rice was steaming. The rice was served on the side, and the scallops were set on top of the asparagus and sauce making sure that nothing sauce-like came in contact with the top of the scallops.
The spiciness level can be determined by the amount of sriracha added, and I boosted it just a bit, but I didn’t want to overshadow the flavor of the scallops. The simple curry paste was a breeze to make, and I’m now certain I need a mortar and pestle. It was such a small amount to pulverize, it took longer to make the paste in a small food processor, with several stops to stir, than it would have by hand. Still, it made a flavorful sauce for this fresh, spring-like dish.
I wasn't sure if anyone grew rhubarb in central Texas. For the last couple of years when I was looking for it, I never saw any at our farmers' markets. Some people even told me that rhubarb is more common in the north than it is in the south. Then, all of sudden this spring, I started hearing rumors of locally grown rhubarb being available at markets and farm stands. I stopped by the farm stand at Boggy Creek Farm one morning, and they indeed had freshly cut rhubarb. It wasn't as big or as red as the stalks I see in the grocery store, but it was grown with no chemicals right here in Austin, so I was proud to bring it home. I had a mash-up of a plan in mind for it. In Martha Stewart's Baking Handbook, there were ideas from two different tarts that I wanted to combine into one dessert. The rhubarb tart recipe in the book suggests cooking big pieces of rhubarb in a sugar syrup with a vanilla bean and beet wedges. The beet wedges give the syrup and the rhubarb more red color. Once the rhubarb was tender, it was removed, and the syrup was reduced to a thick glaze. The other tart from the book was made with a pistachio crust, was filled with a creme fraiche and whipped cream mixture, and was topped with berries and whole pistachios. I wanted both.
I made the pistachio dough as instructed by finely grinding shelled pistachios and adding them to butter mixed with confectioners' sugar. Egg yolks were added to that followed by flour, salt, and a little cream. The dough was soft and slightly sticky, so it was necessary to chill it before rolling. Then, rather than making individual tartlets as shown in the book, I made one rectangular tart. There was extra dough, so I did make a few tartlets as well to freeze and use another time. The tart crust was blind baked with pie weights and then allowed to cool. Going back to the rhubarb tart in the book, I cooked the cut pieces of rhubarb as suggested with sugar, water, a vanilla bean, and one beet cut into wedges. Since my rhubarb was more green than red, it required a little extra cooking time to become tender and sweet. Then, it was removed and allowed to dry on paper towels. The sugar syrup was strained and then poured into a clean pan to reduce until thick. One more flip back to the pistachio tarts to make the filling which was a mix of creme fraiche, cream, and sugar. That was spread in the cooled crust and then topped with halved strawberries, whole pistachios, the drained rhubarb, and last was drizzled with the cooled red, sugar syrup glaze.
The glaze was bright red from the beet, full of vanilla flavor, and was delightful. It was so pretty, I wanted to boil it to a higher temperature so I could turn it into lollipops. The pistachio crust was a winner too. It was easy to shape it in the tart pan, and the faint green tint contrasted well with the filling and toppings. I had no uncertainty about the creme fraiche and whipped cream layer under the strawberries and rhubarb, and it was tangy and rich as it should be. So, this mix of two tarts made one pleasing dessert.
Easter morning is all about sweets and treats and the beginning of a day of indulging. That makes it a great day for coffee cake, and I had a list of options from the March issue of Living magazine. These recipes were all shown with possible variations, and the one that caught my eye was the sour cherry and cream cheese version of the yeasted coffee cake. The dough was rolled up just like when making cinnamon rolls, and then it was swirled into a spiral before baking. The filling was to have been fresh or thawed, frozen sour cherries, but neither were available. Instead, I used dried sour cherries that I plumped in some orange juice. The brioche-type dough was easy to make, handled very well, and expanded nicely in the oven. I didn’t realize the cream cheese filling mixture would bake into the dough when spread thin. That did make the cake very tender and delicious, but clumps of cream cheese here and there would have offered more of a cheese Danish experience. I’ll try that next time when fresh cherries arrive and I make this again.
To start the dough, yeast was added to warm milk, and sugar, an egg, and an egg yolk were combined and then whisked into the yeast mixture. That was added to flour with salt in a mixer. It was mixed with a dough hook while butter pieces were added. It looked like it would never come together, but letting the machine do its thing for about eight to ten minutes resulted in a smooth dough. It was left to rise for an hour and a half, and then the filling was made. Meanwhile, I covered a cup and half of dried sour cherries with orange juice and let them sit. Then, softened cream cheese was mixed with an egg yolk and confectioners’ sugar. When the dough had doubled in volume, it was rolled out into a big square. The cream cheese mixture was spread across the surface leaving about an inch border all around. As I mentioned above, some clumps of cream cheese might be interesting rather than spreading it completely evenly. I drained the soaking dried cherries and sprinkled them across the cream cheese layer. The dough was then rolled up into a log shape which was turned into a spiral. The spiral-shaped cake was placed on a parchment-lined baking sheet and covered with plastic wrap. It was allowed to rise for half an hour before being baked. The baking started at 350 degrees F for 55 minutes, and then the temperature was reduced to 325 degrees F for an additional 15 minutes. When the cake was cool, it was drizzled with a confectioners’ sugar glaze.
I was so happy with the pretty shape of the cake, it might not have even mattered if it didn’t taste good. And, of course, it tasted great too. Rich and lovely yeasted brioche dough studded with chewy, dried sour cherries was a fitting cake for Easter morning. I’m sure I can think of some other mornings suited to this treat too. For instance, aren’t Tuesdays deserving of coffee cake? They should be.
Stuffed peppers have a reputation for being a little on the heavy side as food goes. There are meat and rice filled options. Sometimes polanos are stuffed and then breaded and fried. Other times, they're stuffed and covered with cheese and then broiled until gooey. Those options have their desirable qualities, but you rarely hear about a light and healthy kind of stuffed pepper. I've found one, though, that's definitely worth mentioning. It was a couple of weeks ago when I couldn't decide whether to make these stuffed poblanos or a spring barley risotto, and happily, I eventually made them both. This is also from the book Power Foods, and I've been enjoying everything I've tried from it. I'm finding that all the dishes I've tried from that book have a light and healthy feel to them but are still very satisfying. The filling for these poblanos is a mix of quinoa, sauteed mushrooms, black beans, and corn. They're topped with a little goat cheese and set into a smoky sauce of pureed chipotles, garlic, and cilantro. That sauce with some spiciness and the flavor of the roasted poblanos themselves brought some spunk to the quinoa filling, and there was just enough rich tanginess from the goat cheese on top.
I went my own way with the roasting of the poblanos. In the book, you are instructed to roast them on a baking sheet in the oven, but I always roast them right over the gas flame on top of the stove unless I roast them on the grill. I use tongs to turn them as they roast and char. Then, let them cool until you can touch them, then peel off the char, and cut down one side so you can remove the seeds. The poblanos can be roasted in advance if you'd like to get a head start. Next, the quick sauce was made by pureeing canned chipotles chiles, garlic, some salt, and water in a blender. To start the filling, quinoa was simmered while mushrooms were sauteed. Once cooked through, black beans and thawed, frozen corn were added to the mushrooms. Some of the goat cheese was stirred into the mushroom mixture with the cooked quinoa. That was spooned into the four roasted poblanos. The sauce was poured into a baking dish, the poblanos were set on the sauce, the remaining goat cheese was sprinkled on top of the poblanos, and the dish baked for about 20 minutes.
A heavy filling, crispy, fried coating, and thick, gooey, melted cheese layer were not needed here. Instead, flavors of chiles mingled with the quinoa, mushrooms, beans, and corn. There was added interest from the bits of goat cheese on top that browned as the poblanos baked. The lightness of the dish was nothing like what a stuffed pepper usually is, and that made it even better.
I have an Earth Day story to share today. Back in 1992, I attended an Earth Day event at which I learned about the environmental damage caused by large animal feedlots and how consumption of beef and pork was rising sharply around the world. I wanted to do something and put my money where my mouth was literally I suppose, so it was then and there that I decided to stop eating red meat. And, what does that have to do with panna cotta? Well, even though I had stopped eating red meat, I continued to use gelatin which is made from collagen extracted from cattle and pigs, and gelatin is needed for dishes like panna cotta. I had read about other gelling agents, but hadn't tried any other alternatives until now. For Earth Day, and to learn something new, I decided to experiment with agar agar powder which is a natural substance derived from red algae.
Also, in celebration of Earth Day, I had just received a basket full of samples from the Central Market Organics line. I've shopped at Central Market since the first-ever store opened in Austin, and I bring home items from the Organics line every week. I was thrilled to receive this basket of samples which included organic rice milk, organic coffee, organic peanut butter dots breakfast cereal, and organic agave syrup, in addition to organic almond milk, strawberry preserves, oatmeal, and tea. My plan for this panna cotta came together when I saw the rice milk, coffee, and peanut butter dots. Maybe I should explain the peanut butter part of that. I've been hooked on the mix of flavors of coffee and peanut butter since my first peanut butter espresso milkshake years ago. Add a banana, and it's even better. And, since I remembered seeing a dessert in the book Delicious Days which involved a layer of gelled Kahlua on top of a coffee-flavored panna cotta, my idea was to re-create that in a completely vegetarian incarnation and top it with crushed peanut butter dots cereal for added flavor and texture.
After reading up on using agar agar, I realized this might require some testing and tweaking. I found a recipe online for a vegan panna cotta made with coconut milk and soy yogurt. I didn't want to add coconut to the mix of flavors I had in mind, so I tried this recipe with rice milk instead. After pulling ideas from the Delicious Days recipe, I simmered rice milk, agave syrup, seeds from a vanilla bean, and crushed coffee beans with agar agar powder. The mixture was simmered and strained into a bowl, and soy yogurt was whisked into it. It's necessary to cook agar agar for it to dissolve, but it will set up at room temperature if necessary. Also, it sets up very firm, so less is better. The general ratio is two teaspoons of agar agar powder to two cups of liquid, but I found the result of that to be too rigid. I wanted the panna cotta to have a little wobble. I also found my first experiment to be a little too virtuous. There was no richness, and the coffee and vanilla flavors seemed flat in the finished dessert. So, I decided this wasn't going to be vegan but just vegetarian. I tried again with the same initial process of simmering rice milk with agave syrup, vanilla seeds, crushed coffee beans, and a little less agar agar powder. Then, I poured that through a sieve into a bowl and whisked in cream. One taste before it was even set and I knew this was going to be a winner. I poured the mixture into ramekins and placed them in the refrigerator for an hour. The next step, also taken from the Delicious Days recipe, was to simmer some Kahlua with agar agar powder and then pour that over the set panna cotta in the ramekins. After they had chilled and the Kahlua layer had set, I turned out the desserts onto plates and sprinkled crushed organic peanut butter dots cereal on top.
Working with agar agar does take a little getting used to, but it's completely flavorless and dissolves once simmered. Depending on the texture you want, it might require some testing. I'm happy to have learned to use a vegetarian alternative to gelatin though, and I can't wait to try it in homemade marshmallows. As for the flavor of the final dessert, I was delighted. The coffee and vanilla with a little richness from cream was divine especially with the sweet liqueur of the gelled Kahlua layer. I always like a mix of textures too, so the crunch of the organic peanut butter cereal worked well and reminded me of those incredible milkshakes. I hope you find a delicious way to celebrate Earth Day too.
Vegetarian Coffee Power Panna Cotta (adapted from Enlightened Cooking and Delicious Days)
1 1/4 cup organic rice milk
1/4 cup organic agave syrup
1 1/2 teaspoon agar agar powder
seeds scraped from 1 vanilla bean
3 tablespoons coffee beans, crushed so that they can be sieved out without leaving graininess behind
1 c cream
1/2 cup Kahlua
3/8 teaspoon agar agar powder (I realize that's an odd measurement, but 1/2 teaspoon is a little too much.)
1/4 cup crushed organic peanut butter dots cereal
-Place rice milk, agave syrup, 1 1/2 teaspoons agar agar powder, vanilla seeds, and crushed coffee beans in a medium saucepan and stir to combine. Let sit for a few minutes before bringing to a simmer. Simmer while stirring occasionially for about eight minutes.
-Pour rice milk mixture through a sieve into a heat-proof measuring pitcher. Add cream and whisk to combine. Divide evenly between four six ounce ramekins and place ramekins in the refrigerator for one hour.
-For the Kahlua gelee layer, place Kahlua and 3/8 teaspoon agar agar powder in a small saucepan and bring to a simmer while stirring. Simmer and stir until agar agar has dissolved. Carefully pour or spoon Kahlua on top of set panna cotta in ramekins. Let ramekins chill again for at least one hour.
-To serve, place hot tap water in a wide bowl. Dip bottoms of ramekins into hot water for about 15 seconds. Then, use a pairing knife to loosen edges of panna cotta all around the ramekin. Invert ramekin over a plate and use the knife to pull out the panna cotta if necessary. Top with crushed peanut butter dots cereal.
I've been fascinated by the idea of Scotch eggs for a while now. Traditionally for Scotch eggs, hard-boiled or soft-boiled or even pickled eggs are encased in a sausage mixture, coated in breadcrumbs, and fried. Since I don't eat red meat, I'd never attempted to make them or even tasted one. Then, along came this lovely vegetarian version with an outer layer made with beets. They couldn't be more perfect. The beets give the outside a good contrasting color to the white and yellow of the egg inside. Just in time for Easter, I found these on Mess in the Kitchen the other day and headed straight to the kitchen. The beet mixture was actually first imagined as a veggie burger and then was used for coating Scotch eggs. I made just a couple of changes to the recipe so as to use what I had on hand, and I was beyond thrilled with the results. The mixture held together very well, and the outside fried to a crisp around the soft-boiled eggs. Not only do you get a tender soft-boiled egg surround by a crispy, tasty, fried coating, there's another bonus to making Scotch eggs. You know how fresh eggs can be difficult to peel after boiling? If there are any uneven surfaces on the eggs after they're peeled, you'll never see them once they're coated with the beet mixture. Everything about these eggs made me very happy.
I decided to go with soft-boiled rather than hard-boiled eggs thinking that the eggs would cook a little more in the hot oil causing the yolks to set, and that's exactly what happened. I used the smallest ones from the carton I had, but you can really use any size of eggs you'd like. I placed five eggs in a saucepan, covered them with water, added a pinch of salt, and brought the water to a boil. As soon as the water bubbled, I turned the heat to low, covered the pan, and let the eggs cook for eight minutes. I drained the eggs and peeled them while still warm, and they were fresh enough to still be difficult to peel but, delightfully, that didn't matter here. For the beet mixture, I peeled two medium beets and chopped them. The beets were placed in a food processor with a chopped leek, about three ounces of firm tofu that I squeezed a bit to remove some water, two chopped green onions, about three tablespoons of flaxseed meal, a quarter cup of toasted breadcrumbs, two peeled and chopped cloves of garlic, an egg, and salt and pepper. The mixture was processed until a paste developed. If the mixture is too dry, try adding a tablespoon or two of water, and if it's too wet add a little more breadcrumbs. The beet mixture was pressed around each egg, and I had extra which I formed into two veggie burgers for another day. Once the eggs were encased in the beet mixture, I rolled each one in some remaining breadcrumbs before frying. I fried them, two or three at a time, in about an inch of grape seed oil in a saucepan, turning from time to time, for about five minutes total.
Did I mention how much I enjoyed these eggs? I already want to make them again for a party and use quail eggs for a daintier portion. They'd look great cut in half and lined up on a serving tray. Or, I could imagine going the other direction and using duck eggs. One Scotch duck egg cut in half with some smoked salmon on top of each piece would make a lovely brunch meal. Obviously, I'll be making this recipe repeatedly.