I have a little problem. I'm addicted to cookbooks, food writing, recipe collecting, and cooking. I have a lot of recipes waiting for me to try them, and ideas from articles, tv, and restaurants often lead to new dishes. I started losing track of what I've done. So now I'm taking photos and writing about what I've prepared—unless it's terrible in which case I forget it ever happened.
You might not think there would be much to learn at a cooking class about cookies, but that really depends on who’s teaching the class. I signed up for a cookie class at Central Market Cooking School last December that was taught by Alice Medrich, and I walked away with a few pages of notes. She was demonstrating cookies from her new book Chewy Gooey Crispy Crunchy Melt-in-Your-Mouth Cookies which combines some of her all-time, favorite recipes with updates for what everyone likes to cook today. I shared some photos from the class on my Facebook page as well. Throughout the class, little, eye-opening details, the kinds of things that don’t always get mentioned, were pointed out and explained. She talked about how a home cook needs to decode a recipe. When a cookie recipe states to whip or cream something “just until,” it’s important to pay close attention and not overdo it. There are times when the butter and sugar should not be creamed to a point where it’s too light and fluffy as that can add too much air to the dough. She continued to talk as she worked, and turned a square baking pan upside down, cut a piece of foil, and wrapped it over the bottom of the pan. Then, she flipped the pan over and placed the foil inside it. I’d never thought of doing that to get the foil to the right size and shape to line the inside of a pan for brownies. Then, she spoke of flavors and adding different spices to brownies or chocolate cookies. Rather than mixing the spice into the batter or dough, it can be sprinkled on top after baking. That way, you have a different flavor experience. You smell the spice as soon as you lift the item toward your mouth, and it’s more pronounced. Also, then you can flavor one batch several different ways. So, the evening progressed with several different cookie recipes being prepped and then tasted. Every cookie we were served was fantastic, but the one I couldn’t stop thinking about over a month later was the peanut butter cloud.
This is in Medrich’s new book, and it’s a simple meringue cookie with a swirl of peanut butter running through it. Ordinarily, a meringue serves as a vehicle for other flavors, but here, the added peanut butter was mixed into the sweet, crisp, light as air cookie and chopped salted peanuts were sprinkled on for added crunch. Egg whites were whisked in a mixer with cream of tartar and eventually, sugar was added. During the class, Medrich pointed out that if you add the sugar too early while whisking the egg whites, you’ll get a glossy but limp meringue. For firmer meringue, add the sugar, after the whites have become opaque, very slowly over a two minute period. Then, dot the top of the meringue with well-stirred, natural peanut butter, and just barely fold it into the egg whites. The peanut butter should be streaked throughout the meringue. I piped the meringue into small cookie-cloud shapes onto baking sheets and topped them with the chopped nuts. The cookies baked at 200 degrees F for one and a half hours, and then they remained in the oven after it was turned off until they were cool.
The crackly texture and the sweetness of the meringue mixed with peanut butter and salted chopped peanuts just worked so well together. Thankfully, my home-baked versions stood up to my memory of them from the class. And, now I need to finish reading through the book to get several new ideas for what to bake next.
It’s the start of a new year and time to eat a little lighter, but we do like our scones. I’m a little surprised that this is only the fifth time I’ve posted about scones because Kurt and I both enjoy them in all flavors, shapes, and sizes. They can be decadent though. So, I was happy to try this slimmed down recipe from Flour since I’m becoming convinced this book can do no wrong. Joanne Chang set out to make less indulgent scones that didn’t rely on extra sugar for flavor. Instead, these are packed with dried fruit and frozen cranberries, and the not-too-sweet dough is made with a little canola oil instead of a lot of butter. They’re also topped with a vanilla glaze which gives them instant visual appeal. I even went one step further and used some whole wheat flour in place of some of the all-purpose. The result was a scone that’s good enough to look forward to each morning without a trace of guilt.
These scones were also very easy to make. There was no butter to cut into the flour, and the dough wasn’t even rolled out or cut to form the scones. To start, I mixed whole wheat flour with all-purpose flour, sugar, baking powder, baking soda, salt, and cinnamon in a big bowl. Then the fruit was added, and that included dark raisins, golden raisins, chopped dried apricots, I used chopped dried pineapple instead of dried apples, dried cranberries, chopped candied ginger, and I used frozen cranberries since fresh ones are no longer available. In a small bowl, eggs, yogurt, and buttermilk were whisked together, and then that was stirred into the flour mixture. The dough was scooped one-half cup at a time onto a baking sheet, and the scones were ready to bake. There was a note in the recipe stating that once the scones are scooped onto a baking sheet, they can be frozen and then baked directly from the freezer. So, I made them in advance and baked them from the freezer so we could have freshly baked scones for breakfast. They just require about five extra minutes in the oven if frozen. After baking and cooling, a confectioners’ sugar and vanilla glaze was spooned over each one.
The mix of fruit was delightful with the cranberries’ tartness and the ginger’s zing. The crumb of the scone was lighter, less dense, and a little like a cross between a scone and a muffin. Obviously, they’re not as rich as an ordinary scone, but when we’re feeling like being less decadent, I now have a trusted alternative to enjoy.
It’s true that I have trust issues with recipes. If I’m skeptical, I may proceed as instructed, but I try to be prepared should I feel the need to change course. So, although I was intrigued by a pasta recipe that suggested a topping of breadcrumbs in place of parmesan, I had a wedge of parmigiano reggiano ready and waiting just in case. This came from Delicious magazine a few months ago, and I can’t seem to locate the recipe online so I’ll include it below. Spicy breadcrumbs were made by toasting chunks of day-old bread that had been tossed with olive oil and dried chile flakes and then processing them to crumbs once cool. They were tasty breadcrumbs, and they were certainly going to add a flavorful, crispy element to the pasta dish, but I wasn’t convinced they could completely replace the experience of a good parmigiano reggiano. I had just received some fennel from my CSA, and making fresh pasta is one of my most favorite kitchen tasks, so with some back-up parmesan to shred over each plate of pasta should it be necessary, I was ready to experiment.
I made the fresh pasta from Stir: Mixing It Up in the Italian Tradition since this has become my go-to pasta recipe. I cut the fresh pasta sheets into thin spaghetti and let the strands dry for a bit while working on the breadcrumbs. Half a loaf of day-old bread, and I used some leftover Norwich sourdough which had been stored in the freezer since Christmas, was cut into chunks and tossed with extra virgin olive oil, salt, and red chile flakes. The bread chunks were toasted on a sheet pan in the oven until dry and crisp, and they were left to cool. Then, they went into a food processor with some fronds from the fennel and were pulsed until crumbly. Next, the fennel bulbs were prepped by slicing them thinly with a mandoline or Benriner. Lemon rind was supposed to have been cut into thin ribbons, but Kurt isn’t a fan of big pieces of citrus rind in savory dishes, so I zested the lemon with a microplane instead. Last, garlic was minced, and cooking could commence. While water for the pasta boiled, olive oil was heated in a large saute pan. The fennel and garlic were gently cooked over medium heat so as not to brown the fennel but just to allow it to soften. The lemon zest was added, and after a short dunk in the boiling water, the drained pasta was added with lemon juice and more olive oil. Everything was tossed about in the pan to combine and warm through, and then it was served topped with the breadcrumbs.
This dish ended up delivering two surprises. First, I had assumed the fennel would retain its anise bite since it was so gently cooked. Although it didn’t even brown in the pan, it did soften and become sweeter and was not at all like sharp, raw fennel. The bright lemon juice and zest mingled nicely with it. The other surprise was that the breadcrumbs were delicious and satisfying in a way that I didn’t expect at all. With the salt, chile flakes, and fennel fronds, the crunchy bits of bread were all the dish needed. At the end of the meal, the wedge of parmigiano reggiano had gone completely untouched.
Spaghetti with Fennel, Chile, Lemon, and Breadcrumbs adapted from Delicious magazine
half a loaf of day-old bread such as a sourdough rustic loaf or ciabatta
2 teaspoons dried chile flakes
1/2 cup extra virgin olive oil
3 garlic cloves, minced
2 organic lemons (organic is important here since the peel will be used)
3 fennel bulbs
12 ounces long strands of thin pasta (make fresh pasta if you have time)
Salt and pepper to taste
-Pre-heat oven to 400 degrees F. Cut or pull the bread into chunks and place on a baking sheet. Toss the bread chunks with two tablespoons of the olive oil, the dried chile flakes, and a big pinch of salt. Spread the pieces into an even layer and bake for about 10 minutes until golden and crisp. Then, set aside and allow to cool.
- Zest one lemon and then cut both in halve to be juiced. Remove and discard the outer leaves of the fennel and reserve 1/2 cup of the fronds. Thinly slice the fennel, and using a Benriner is the quickest way to do it.
- Place the fennel fronds and cooled bread chunks in a food processor and pulse until crumbly.
- Boil a large pot of salted water for the pasta, and time the cooking of the pasta for it to be ready when the fennel and lemon zest have cooked (fresh pasta will cook must faster than dried). Meanwhile, heat three tablespoons olive oil in a large saute pan over medium heat. Add the sliced fennel to the saute pan, and cook while stirring for a couple of minutes. Add the minced garlic and continue to cook for three minutes until the fennel begins to soften. Add the lemon zest, reduce heat to low and cook for another five minutes or so. The goal is for the lemon and garlic flavors to meld with the fennel, but the fennel should only gently cook and not brown. When the pasta has cooked, drain it and add it to the saute pan. Add the juice from the two lemons and the remaining olive oil, and toss to combine.
- Serve the pasta and fennel topped with a generous handful of the breadcrumbs, and I promise you won’t need a single shred of parmesan.
I’m submitting this to Yeastspotting where you’ll find some seriously well-made bread.
After growing up in Illinois where icy, cold wind can whip right across the flat, open land and chill you to the core, I can’t really complain about winter in Austin, Texas where I live now. That is, I can’t complain about the temperatures. What I can and do frequently complain about is winter allergy problems. January is ‘cedar fever’ time, thanks to the abundant pollen from mountain cedar, or ash juniper, trees. Coughing, sneezing, congestion, and lack of sleep become a way of life, and I’m willing to try any and every home remedy I can to combat those issues. One common allergy remedy is avoiding dairy. That seems simple enough except for the fact that I really enjoy eating cheese, and I bake quite a lot with things like butter, cream, and milk. However, when I’d suffered allergy symptoms to the point of almost losing my voice, I decided to put more serious effort into avoiding dairy until the worst part of the season passed. I remembered from reading In the Kitchen with A Good Appetite that author Melissa Clark’s husband doesn’t eat much dairy, and she had created a frozen treat for him using coconut milk. If I could still have something a lot like ice cream for dessert, while not having cream, I could do this dairy-free thing for a short while.
Not only is this an ice cream kind of dessert with no cream, it also has no eggs. It’s made with coconut milk which is naturally rich, but the end result is still a bit lighter than an average ice cream recipe. You begin by warming coconut milk and sugar in a saucepan until the sugar dissolves. Then, chopped bittersweet chocolate, cocoa powder, dark rum, and a little salt were added, and that was whisked until the chocolate was melted and the mixture was smooth. Once again, I used a mix of regular cocoa powder and some black onyx cocoa powder which gives the mixture a good, dark color. The coconut mixture was then transferred to a measuring pitcher and chilled before being refrigerated for a few hours. Once completely cold, it was churned in an ice cream maker.
The chocolate coconut sorbet was creamy and richly chocolate-flavored. There’s a suggestion in the recipe to serve it with shredded coconut and a chocolate sauce to make it reminiscent of a Mounds bar, but instead, I topped it with toasted, shredded coconut, chopped almonds, and pieces of candied orange peel. All those crunchy, chewy toppings made it an especially fun dessert, and the almonds took it in more of an Almond Joy direction in the end. And, you know, I didn’t miss the dairy one bit.
I suppose I can’t say that I’d never made popovers before. I did make mini popovers in a mini muffin tin a couple of years ago, and technically, you can make even full-sized popovers in a regular muffin tin. But, what I’m showing here today were my first, proper popovers made in a popover pan. I had clipped this recipe from Food and Wine back in September of 2009, and one thing led to another as it often does in my kitchen, and I only recently acquired a popover pan so I could try this. The effort is so minimal and the result so lovely, there are sure to be many, many popovers in my future. How often do you just whisk a few ingredients together with no need for a mixer and no complicated steps and end up with golden, crisp little breads that are so airy, light and delicious on the inside? The orange zest was an added benefit to their flavor, and adorned with a simple berry jam, they made my morning for a few days in a row.
You start with two bowls. In one of them, whisk together eggs, sugar, orange zest, milk, and melted butter. In the other bowl, whisk together flour, baking powder, and salt. Then, whisk the wet ingredients into the dry, but just until only small lumps remain in the batter. That’s it. The cups of the popover pan were brushed with melted butter, and the pan was warmed in a 425 degree F oven for five minutes before each cup was filled halfway. The popovers baked for 30 minutes and puffed and browned.
The flavor, the texture, and even the aroma while these baked, were more complex than the process of making them. I was amazed that such a simple technique produced these delicate yet crisp morning treats. They were divine warm from the oven, and re-heating them the next day and the day after that worked fine too. Now, I can set about altering the flavor or making some just plain or trying a savory version. My new pan will definitely be getting a lot of use.
What happens when five top Texas sommeliers team up with photographers, bloggers, and tweeters for a high-speed afternoon of food and wine pairings for a Wine Ride? Well, we found out. Five teams were formed, four locations were chosen, wine and food options were selected, and off we went. Team June was led by June Rodil, Beverage Director of Congress Austin, with photographer Loren Root of Loren J. Root Photography, myself as the food blogger, and facilitweeter Megan Myers of Stetted. Each team traveled to the four chosen locations in a different order and was carefully timed for a brief ten minutes at each spot as the sommelier tasted, pondered, and shared insights before declaring a best pairing from two wines and multiple food options presented. The goal of the Wine Ride was to educate everyone in attendance about the wines and how the pairings were chosen. At the end of the race, each sommelier discussed their pairings and were videotaped. Voting for the sommelier and viewing of those video presentations is taking place at sommsunderfire.com. The winning sommelier will win a spot to compete in the first ever Somms Under Fire. The second part of this event concerns a blog post submitted by each team. The winning team’s photographer, blogger, and facilitweeter will each win an all-access media badge to Somms Under Fire. Voting for the Team Blog Post is found at keepercollection.com, and we hope your vote will be for Team June!
Watching June throughout the event, as she tasted in an intentional order each time, explained her thought process, and described the flavors was a great bit of education in wine and food pairing. She explained her general wine pairing approach and how she helps other people pick wines. She said choosing a wine should start simply enough with narrowing the field of options to what you really like. If there are wines on a list that are types you don’t like, just rule them out, and don’t force something on your palate that you don’t like. Next, it’s important to match the weight or body of a wine to that of the food that’s being served. A light, crisp wine feels out of place with a rich, unctuous meat dish. Then, flavors come into play. The sweetness of a wine and how it would balance with the food is a big consideration. Once you’ve narrowed your options based on those points, you can begin to think about what to enhance about both the food and the wine. The flavors of both will be affected by the pairing, and the result should be an improvement in the experience of what’s on the plate and what’s in the glass. Specifics about how that happens were revealed each time June discussed her pairings during the Wine Ride.
Our first stop was Antonelli’s Cheese Shop where June was given six different cheeses varying from Coupole (a fresh, young goat's milk cheese from Vermont Butter and Cheese Co.) to Tomme Crayeuse ("crayeuse," meaning chalk, is a cow's milk cheese from the Savoie region in France), served with 2008 Domaine D’Ardhuy Ladoix Rouge Les Chagnots Monopole and N.V. Thierry Massin Brut Champagne. Ladoix is a Burgundy commune in the Cote de Beaune which focuses mostly on reds made from Pinot Noir and Thierry Massin is a grower-producer from the Cote des Bars, the most southern sub-region of Champagne, with soils similar to that of Chablis and whose main focus is the Pinot Noir variety. June wanted to acquaint herself with the cheeses first to form an initial impression of which wine she thought would be right with each. None of the cheeses were overwhelming in aroma and the flavors all included some salty minerality. The champagne was light and refreshing and was great with cheeses that were creamy and dry and made you want to take a drink. That made the champagne and the coupole a consideration. However, while working along the stronger side of the cheeseboard with the Ladoix, June said “the earthiness is singing to me.” The fruity, fresh, cherry tones of the wine were working, and anything heavier than the Ladoix would have overpowered these cheeses. Ultimately, her choice was the Pleasant Ridge Reserve, which is an artisanal farmstead cheese from Wisconsin’s Upland Cheese Co., and the Ladoix because both tasted better together. The Pleasant Ridge Reserve is made from cow’s milk in the style of traditional French alpine cheese and was recently named America’s best cheese in 2010 by the American Cheese Society. Pairing it with the Ladoix brought out more flavors at the finish than were there at the start, and that’s the sign of a great pairing, says June. The ten minute time limit flew by, so with the first pairing completed, we rushed out the door and on our way to stop number two.
The next location on our list was Fino where four meat dishes awaited with one glass each of 2008 Chateau St. Jean de la Gineste Corbieres Vieilles Vignes (a blend of 85% Carignan and 15% Grenache from one of the largest wine regions in the south of France, Corbieres) and 2008 Domaine d’Ardhuy Bourgogne Rouge (a 3rd generation Burgundy producer putting fruit from 50 year old vines into this Bourgogne Rouge). In this situation, it was all about highlighting a protein in the best way possible. Both wines had a cleansing effect with these dishes. There was a chicken ballantine with nice, salty chicken skin and a peppery taste on the finish that paired well with the Corbieres. The pork belly was topped with a sweet and spicy mustard-based sauce which met well with the lush, richness of the wines, but the sweetness in the sauce dimmed the wines’ fruit. June noted, “Sometimes you just want to be happy and not think about a pairing too hard. You just want it to go together.” Sweetness was also an issue with the jamon serrano croquettes in that the ham’s sweetness didn’t work with the Bourgogne. Ultimately, the best combination was the beef short ribs with the Corbieres. The wine’s sweetness was there, and the salt, the stock in the sauce, and the earthiness of the mushrooms all came forward. It was just right without even having to think about it. Time was up, and on we raced.
We arrived at Central Market Cooking School where Chef Christina Lee had prepared six dishes and glasses of 2008 Simon Bize Bourgogne Blanc Les Champlains (a predominantly Savigny Les Beaunes producer, with great value Burgundy) and 2008 Dominique Mugneret Bourgogne Rouge were poured. This was a lot to taste and compare in ten short minutes. There was salmon with a smoked gouda panko crust, cod with chive buerre blanc, chicken pot pie, lasagna with creamed swiss chard and rabbit confit, roast chicken with polenta, and pork tenderloin with mushroom ragu. June immediately felt like all the dishes could work with a white wine pairing. The chard lasagna was good with the Simon Bize, but the wine was mineral- and salt-driven while the lasagna was more delicate. In the end, the lasagna tasted bland with the wine. The polenta was a good salt pairing with the Simon Bize and offered good, clean flavors with the Bourgogne. Both wines were also good with the pot pie, but that dish didn’t improve anything about the experience of the Bourgogne. In the end, with the chilly, drizzly weather we had that day, June found the warm, comforting chicken pot pie and the balanced minerality of the Simon Bize were perfect together. The toasty flavors in the golden crust of the pot pie worked especially well with the lemon and salt aspects of the wine. Back on the road, we headed to our last location.
Our fourth and final spot was Foreign and Domestic where two pairings were prepared. First, another savory pairing was to be completed in ten minutes followed by a dessert pairing in an additional ten minutes. For the savory options, a chestnut soup with fried peanuts, lacquered quail on potato puree with grilled celery, and parsnip puree ravioli in fennel broth with roasted grapes waited with a glass of 2007 Domaine Michel LaFarge Bourgogne Aligote Raisin Dores (Aligote being the “second” white variety grown in Burgundy, able to withstand tougher growing conditions and producing wines slightly higher in acidity than their Chardonnay counterparts) and a glass of 2007 Jean Noel Gagnard Chassagne-Montrachet L’Estimee (a village mostly famous for its whites, the reds from this region typically drink well young and provide excellent value for the money). In this case, June pointed out both wines were similar in weight and the Aligote could work in a red wine scenario. She explained that soup is difficult to pair because it’s also a liquid. It’s like you’re thinking about drinking two things at the same time. The ravioli was a complex dish with a lot of flavors including roasted grapes and brussels sprouts, and there was the creaminess of the sauce to also consider. It brought out the tannins in the red but the dish itself wasn’t enhanced by that wine, and the white dumbed down the creaminess. With the quail, the red was a solid pairing yet made the wine more tart while the white enhanced the gaminess but none of the other flavors. The cream-based chestnut soup with fried peanuts on top truly came alive with the Aligote. The rusticity of the peanuts tasted fresher and more exciting. In fact, June said this particular pairing brought out such great flavors, it gave her "jazz hands." With our last ten minutes remaining, we quickly moved over to the dessert table.
Here, chocolate mousse, caramel-topped rice pudding, and a blood orange sorbet with hazelnuts sat with two wines that were not dessert wines. They were the 2007 Domain Michel LeFarge Bourgogne Passetoutgrain (unlike the majority of red Burgundy which is 100% Pinot Noir, Passetoutgrains is a blend which must contain a minimum of 15% Gamay) and the N. V. Paul Berthelot Champagne Brut Reserve Premier Cru (another grower-producer, this complex wine actually has all three grapes: Pinot Noir, Chardonnay and Pinot Meunier). June discussed the difficulty of pairing desserts with non-dessert wines and how the sweetness of the food can make wine more astringent. She started with the champagne which made the sorbet taste a bit like pixie stix and didn’t improve the experience of the champagne. Then, the red with the rice pudding resulted in a mineral taste of blood in the wine and was not a match at all. The red with the chocolate mousse was good but didn’t do either justice. It was the rich caramel and bready quality of the rice pudding that brought out the toastiness in the Champagne, and that was June’s choice for the dessert pairing.
The Wine Ride ended at Uchiko where the teams met and each gave a final presentation of their chosen pairings. June went through each of her choices:
The Pleasant Ridge cheese and the D’Ardhuy Bourgogne pairing brought out nice, supple fruit in the wine and the earthiness of the cheese.
The beef short ribs and the Corbieres was a match of lush fruit in the wine and a lush protein where the earthiness wasn’t tamed and both were rich and juicy.
The chicken pot pie was the favorite dish of the spectators at that location and with good reason. It was perfectly paired with the Chardonnay.
When a dish is brightened and surprises you with added flavor because of a wine, it’s a great pairing. So, the chestnut soup and Aligote were picked.
Last, the most difficult pairing was choosing a dessert with a non-dessert wine. But, the lovely, yeasty Champagne and rice pudding worked well together, and the wine did not become astringent.
So, what was June’s number one, most perfect pairing of them all for the day? If a pairing gives you "jazz hands," you know you’ve got a winner. June’s perfect pairing was the chestnut soup and Aligote at Foreign and Domestic.
The race came to an end, but the fun hasn’t stopped yet. Be sure to vote in both categories:
I had a couple of little butternut squashes that I’d been neglecting, and a turnip collection sat hopeful but lonely in the vegetable bin. It was time to find a good winter dish where they’d be put to use. That didn’t take long once I grabbed my copy of Plenty. The recipe really is called the ultimate winter couscous, but I don’t think that means you have to stick to it too precisely. You could use any type of winter squash, and turnips weren’t even mentioned in the ingredient list, but I was sure they’d be fine. What was in that list was carrots, parsnips, shallots, dried apricots, chickpeas, chopped preserved lemon, harissa, and lots of spices. The vegetables were to be roasted until tender and sweet, and I could imagine the smell of the spices filling the kitchen before the oven was even warmed. I think this is the ultimate winter dish because it really couldn’t go wrong. It was full of warm spice flavors, sweet roasted charm, and perky acidity and heat.
First, big chunks of all the vegetables needed to be roasted, and I used carrots, parsnips, turnips, and butternut squash. Shallots were added to the roasting pan along with cinnamon sticks, star anise, bay leaves, ground ginger, ground turmeric, hot paprika, chile flakes, olive oil, and salt. After roasting for a bit, chopped dried apricots, chickpeas, and a little water were added to the pan. Just before the vegetables were ready, couscous was added to boiling water with saffron and olive oil. After the couscous had absorbed the water, butter was added, and the couscous was mixed and fluffed. When the roasting pan was removed from the oven, a big spoonful of harissa and some chopped preserved lemon rind were stirred into the vegetables. The couscous was served topped with the roasted vegetables and some chopped cilantro leaves.
This was such a fragrant dish, and it hit on just about every flavor you can name. The preserved lemon added little sparks of brightness here and there while the cilantro brought some fresh herbiness. The flavors of all the vegetables had become sweeter and more intense from roasting, and the spices permeated each bite. This was an ultimate winter dish, and I’ll remember it next time my butternut squash or turnips or parsnips are feeling overlooked.






 which combines some of her all-time, favorite recipes with updates for what everyone likes to cook today. I shared some photos from the class on my Facebook page as well. Throughout the class, little, eye-opening details, the kinds of things that don’t always get mentioned, were pointed out and explained. She talked about how a home cook needs to decode a recipe. When a cookie recipe states to whip or cream something “just until,” it’s important to pay close attention and not overdo it. There are times when the butter and sugar should not be creamed to a point where it’s too light and fluffy as that can add too much air to the dough. She continued to talk as she worked, and turned a square baking pan upside down, cut a piece of foil, and wrapped it over the bottom of the pan. Then, she flipped the pan over and placed the foil inside it. I’d never thought of doing that to get the foil to the right size and shape to line the inside of a pan for brownies. Then, she spoke of flavors and adding different spices to brownies or chocolate cookies. Rather than mixing the spice into the batter or dough, it can be sprinkled on top after baking. That way, you have a different flavor experience. You smell the spice as soon as you lift the item toward your mouth, and it’s more pronounced. Also, then you can flavor one batch several different ways. So, the evening progressed with several different cookie recipes being prepped and then tasted. Every cookie we were served was fantastic, but the one I couldn’t stop thinking about over a month later was the peanut butter cloud.


 since I’m becoming convinced


 since this has become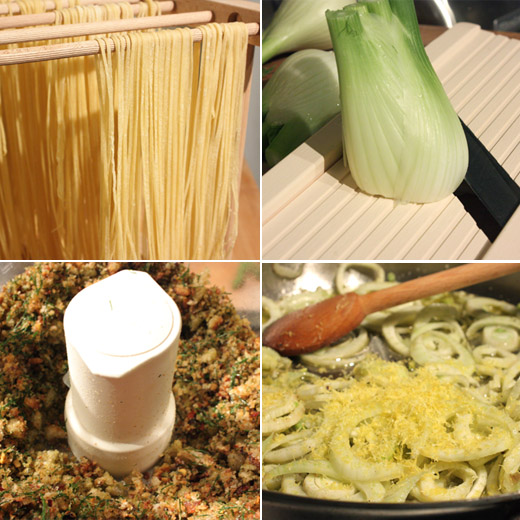


 that author Melissa Clark’s husband doesn’t eat much dairy, and she had created a frozen treat for him using coconut milk. If I could still have something a lot like ice cream for dessert, while not having cream, I could do this dairy-free thing for a short while.


 . The recipe really is called the ultimate winter couscous, but I don’t think that means you have to stick to it too precisely. You could use any type of winter squash, and turnips weren’t even mentioned in the ingredient list, but I was sure they’d be fine. What was in that list was carrots, parsnips, shallots, dried apricots, chickpeas, chopped preserved lemon, harissa, and lots of spices. The vegetables were to be roasted until tender and sweet, and I could imagine the smell of the spices filling the kitchen before the oven was even warmed. I think this is the ultimate winter dish because it really couldn’t go wrong. It was full of warm spice flavors, sweet roasted charm, and perky acidity and heat.
