Showing posts with label pine nuts. Show all posts

Thursday, October 19, 2017

Black Sesame Otsu with Soba Noodles and Tofu

The first thing I noticed about Cherry Bombe: The Cookbook was the variety among the recipes. When I started flipping through my review copy, it was immediately clear that there are a lot of different styles and cultural influences here, and I like that a lot about it. The recipes are all tried and true favorites from women who have been featured in or have inspired the makers of Cherry Bombe magazine. And, several of the recipes are family favorites rather than trendy dishes from the latest restaurant menus. The chapters are organized by Mains, Soups and Salads, Sides, Apps Snacks and Sips, Cookies Cakes and Pies, and Sweet Treats. I’ll be watching for the first local beets of fall so I can try the Pink Spaghetti with Beet and Ricotta Sauce by Elettra Wiedemann of Impatient Foodie. Jessico Koslow contributed the Lemongrass and Ginger-Brined Chicken that looks fantastic with a simple arugula salad. The “Million Ingredient” Autumn Salad from Naomi Starkman of Civil Eats includes delicata squash, persimmons, and pomegranate seeds and would be great on a Thanksgiving menu. Speaking of fall menus, the Pumpkin-Swirled Mashed Potatoes with Vegan Rosemary Gravy looks like a delicious way to celebrate the season. For a twist on a classic cocktail, Gail Simmons’ Charred Pineapple Margarita is on my to-try list. And, the Candied Grapefruit Pops, involving grapefruit segments skewered on sticks and dipped into caramelized sugar, looks like such a fun citrusy treat. I started cooking from the book with the Black Sesame Otsu with Soba Noodles and Tofu from Heidi Swanson because the unique black sesame paste drew me in. 

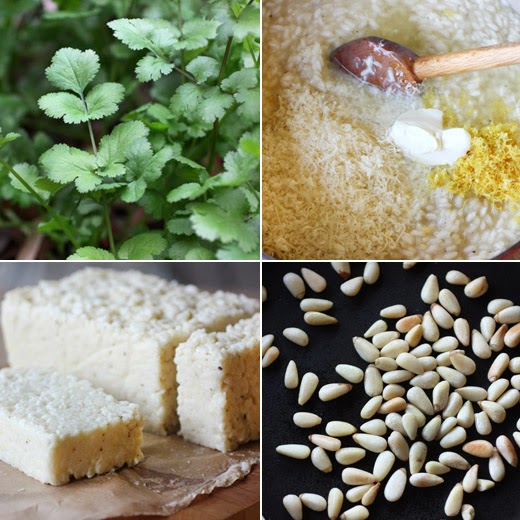
That paste is sort of like pesto but taken in a different direction. Pine nuts and sunflower seeds were toasted in a dry pan on the stove. Black sesame seeds were added to toast briefly at the end. The nuts and seeds were crushed in a mini food processor, but a mortar and pestle would also work. Shoyu, mirin, sesame oil, rice vinegar, and some ground cayenne pepper were added. Drained tofu was to be cut into sticks and browned in olive oil in a skillet. My preferred method for browning tofu has for years been broiling. I toss the tofu pieces with oil, season them, and arrange them on a sheet pan. I place the sheet pan under the broiler, and every four minutes or so, I turn each piece of tofu so an uncooked side faces up until all sides are browned. The browned tofu was set aside while the soba noodles were boiled. Some of the water from boiling the noodles was used to thin some of the black sesame paste. A big spoonful of the sesame paste was set aside to use as garnish. The drained, rinsed, and drained again noodles were tossed with the thinned sesame paste and sliced green onions. The noodles were served with tofu pieces, more sliced green onions, and a dollop of the reserved sesame paste. 

I appreciated this recipe’s use of a couple of very Italian techniques that were reinterpreted with Asian flavors. The sesame paste paired nicely with the soba, and the notes in the book suggest several other uses as well such as serving it with spinach, roasted potatoes, or broccoli. I’d like to try all of those ideas. Or, I might revel in the variety by turning to a recipe found a couple of pages later which is a Caesar Brussels Salad. There’s a lot to explore here.  

Black Sesame Otosu with Soba Noodles and Tofu
Reprinted from Cherry Bombe: The Cookbook. Copyright © 2017 by Cherry Bombe, Inc. Photography by Alpha Smoot. Published by Clarkson Potter/Publishers, an imprint of Penguin Random House, LLC.
 

This unique soba noodle salad is refreshing and distinctly Heidi. The writer-photographer-globetrotter-shopkeeper has a knack for creating meditative meals that touch on her travels and delight the taste buds in the subtlest way. Her inspiration here was a dish she discovered at a tiny restaurant in San Francisco, her home base. The umami-packed black sesame paste that flavors this salad can be made a few days in advance and also tastes great on spinach, roasted potatoes, broccoli, and other veggies. 

Makes 4 servings 

1 teaspoon pine nuts 
1 teaspoon hulled sunflower seeds 
1/2 cup black sesame seeds 
1 1/2 tablespoons organic cane sugar 
1 1/2 tablespoons shoyu, tamari, or soy sauce 
1 1/2 teaspoons mirin 
1 tablespoon toasted sesame oil 
2 tablespoons brown rice vinegar 
1/8 teaspoon cayenne pepper 
Fine sea salt 
12 ounces soba noodles 
12 ounces extra-firm tofu 
Olive oil 
1 bunch scallions, white and light green parts only, thinly sliced 

Toast the pine nuts and sunflower seeds in a large skillet over medium heat, shaking the pan regularly, until golden, about 3 minutes. Add the sesame seeds to the pan and toast for a minute or so. Remove from the heat as soon as you smell a hint of toasted sesame. Transfer the nuts and seeds to a mortar and crush with a pestle; the texture should be like black sand. (Alternatively, you can use a mini food processor.) Stir in the sugar, shoyu, mirin, sesame oil, vinegar, and cayenne. Taste and adjust the seasoning if needed. Set aside. 

Bring a large pot of water to a boil. Salt the water generously, add the soba, and cook according to the package instructions until tender. When done, reserve some of the cooking water and drain the noodles. Rinse the noodles under cold running water. 

While the noodles are cooking, drain the tofu, pat dry with a paper towel, and cut into matchstick-size slivers. Season the tofu with a pinch of salt and toss with a small amount of olive oil. Cook the tofu in a large skillet over medium-high heat, tossing every few minutes, until browned on all sides. 

Reserve a heaping tablespoon of the sesame paste, then thin the rest with 1/3 cup of the reserved noodle cooking water. In a large bowl, toss the soba, half the scallions, and the sesame paste until well combined. Add the tofu and gently toss again. Serve topped with a dollop of the reserved sesame paste and the remaining scallions.

I am a member of the Amazon Affiliate Program. 

Tuesday, July 18, 2017

Eggplant Crostini

When seasonal dishes collide with beautiful presentation, the combination gets my attention every time. In Simple Fare: Spring and Summer, that beauty of presentation extends to the book itself with a clean, modern layout and large, stunning photographs reminiscent of the style of Donna Hay. As I read my review copy, I quickly fell for this simplicity that comes packed with special touches. The author, Karen Mordechai, believes “food should capture your spirit.” What you cook and what you’re drawn to evolves as you do, and food “is at the foundation of our cultures.” By sourcing the best of the current season and sharing meals with family and friends, “we help sustain a beautiful cycle of goodness.” The Burnt Carrots dish is just carrots roasted with a coating of maple syrup and olive oil, but it’s served with marinated labneh, toasted hazelnuts, and nigella seeds. The Ricotta Gnudi is plated with an easy mix of brown butter and purple basil leaves, but the dumplings are made with a mix of plain, homemade if possible, ricotta and smoked ricotta. The Cured Eggs are shown with two variations. They can be pickled with a beet to turn the outside pink or with saffron to turn it yellow, and the pink option looks lovely in the bowl of White Miso Soup. There’s nothing too complex or time-consuming about these dishes, but they all offer nice, added touches. For instance, for the Eggplant Crostini shown here, there’s a flavorful tahini spread that holds everything in place on the toasted bread, a tangy black garlic dressing, and toppings of pickled red onion, toasted pine nuts, and fresh basil. I had just brought home some farm-fresh eggplant that was perfect for it. 

Wedges of eggplants were cut and tossed with olive oil, salt, and pepper before being roasted until browned and crisp. The tahini spread was made by mixing tahini with a minced garlic clove, some lemon juice, and olive oil. Next, the dressing was made by pureeing black garlic cloves with pomegranate molasses, lemon juice, sumac, cocoa powder, salt, and olive oil. I had made the pickled red onion in advance by thinly slicing an onion and covering the slices with a brine of white vinegar, lime juice, and salt with a bay leaf. The roasted eggplant wedges were tossed with some of the dressing before building the toasts. To put it all together, toasted bread was spread with the tahini mixture, the dressed eggplant wedges were nestled into the spread, more dressing was drizzled on top, and garnishes of pickled red onion, toasted pine nuts, and basil leaves were added. 

I love a composition that’s put together well like this. The tahini spread is an excellent glue to keep everything in place as you pick up each piece of bread. A great punch of flavor is delivered here by the black garlic dressing. The sweet and funky, fermented garlic combined with pomegranate molasses, lemon, and sumac made the roasted eggplant sing. Simple, fresh food with interesting details, that’s as pretty as it is tasty, never goes out of style.  

Eggplant Crostini
Recipe reprinted with publisher's permission from Simple Fare: Spring and Summer. 


This eggplant dish is warm and bright. It works well as a starter or as a light meal, served with a side of greens. The roasting technique is inspired by a method from London-based chef Yotam Ottolenghi. 

For the eggplant 
3 to 4 (about 31⁄2 pounds/1.6 kg total) eggplants 
4 tablespoons (60 ml) olive oil 
1⁄2 tablespoon salt 
Freshly ground black pepper 

For the tahini spread 
3⁄4 cup (180 ml) tahini 
1⁄2 garlic clove 
Juice of 1 lemon 
4 tablespoons (60 ml) olive oil 

For the black garlic dressing 
3 black garlic cloves, peeled 
1 teaspoon black sesame paste 
1 teaspoon pomegranate molasses 
Juice of 1⁄2 lemon 
1⁄2 teaspoon sumac 
1⁄2 teaspoon unsweetened cocoa powder 
1⁄4 teaspoon salt 
3 tablespoons olive oil 

For the toast 
1 loaf miche, cut into slices 1⁄2 inch (12 mm) thick 
1⁄4 cup (60 ml) olive oil 
1⁄2 cup (75 g) Pickled Red Onion 
1⁄4 cup (35g) pine nuts, toasted 
1⁄4 cup (10 g) fresh basil leaves, torn 

Preheat the oven to 400oF (205oC). Cut each eggplant into half lengthwise, and cut each half into half widthwise. Cut each quarter into thirds to create thick wedges. In a large bowl, toss the wedges with the olive oil, salt, and some pepper. Arrange the wedges on two parchment-lined baking sheets and roast until golden and slightly crisp, but not dry, 35 to 40 minutes. 

For the tahini spread: Combine the tahini, garlic, lemon juice, and olive oil in a food processor and blend until smooth. The mixture should be spreadable, but not overly thick. If you wish to thin your tahini, add a thin stream of up to 1⁄2 cup (120 ml) ice water to the mixture with the motor running until your desired consistency is reached. Set aside. 

For the black garlic dressing: Pulse the garlic, sesame paste, molasses, lemon juice, sumac, cocoa powder, and salt in a food processor to form a paste. With the motor running, add the olive oil in a slow and steady stream until completely incorporated. Remove the eggplant from the oven and, while still warm, gently toss it in a large bowl with the black garlic dressing until completely coated. Set it aside to let the flavors meld. 

For the toast: Heat a grill to medium-high or a grill pan over medium- high heat. Brush each slice of bread with the olive oil and toast for about 2 minutes on each side, until lightly brown. 

To serve, spread each piece of toast with a bit of the tahini spread and top with a few wedges of warm eggplant. Garnish with pickled red onions, a sprinkling of pine nuts, and basil leaves.

I am a member of the Amazon Affiliate Program. 

Wednesday, August 17, 2016

Grated Zucchini with Pine Nuts and Poppy Seeds

My virtual travel via cookbook reading has now taken me to Central Asia into Uzbekistan and the surrounding areas. I was intrigued to learn more about the food from this part of the world, and a review copy of the new book Samarkand: Recipes and Stories from Central Asia and The Caucasus made that possible. Samarkand is a city along the Silk Route in the Zerafshan River valley in Uzbekistan where trade brought immense prosperity from the sixth to the thirteenth centuries. Trade also brought a mix of cultures and cuisines, and the book includes dishes from the different ethnic groups that have influenced this city’s food. There are strong similarities to Turkish food but also elements of Russian and even Korean. A variety of spices are used for flavoring dishes but not to add heat, and herbs and fresh and dried fruits are used frequently. There are several fresh vegetable dishes in the book like a salad of Radish, Cucumber, and Herbs made with scallions, cilantro, and dill and Walnut-Stuffed Eggplant Rolls with pomegranate seeds, mild green chile, and garlic. Among the hearty soups, I’m most curious about the Apricot and Red Lentil Soup with cumin seeds, thyme leaves, lemon juice, and dried apricots. One chapter is devoted to Roast Meats and Kebabs and another to Plovs and Pilafs. Plov is a layered pilaf popular throughout the region. It’s a celebratory dish that represents “hospitality, community, and identity.” One of the pilafs I have to try is the Pumpkin Stuffed with Jeweled Rice which involves partially cooked rice with dried fruit, orange blossom water, saffron, sliced almonds, chopped pistachios, and spices that gets spooned into a hollowed and partially cooked pumpkin to finish cooking together. And, from the Breads and Doughs chapter, I did try the Kyrgyz Swirled Onion Flatbread. I was amazed to find the process for forming these flatbreads to be the same as that of making the Scallion Flatbreads I learned in a class taught by Grace Young. (The recipe is also found in her book The Wisdom of the Chinese Kitchen.) Rather than using scallions and sesame oil, here onions were caramelized in butter and spread on flattened dough. Circles of dough were rolled into ropes, twisted into spiral shapes, and then rolled flat again to disperse the onion filling throughout a flattened dough round. The rounds were then cooked with just a little oil in a hot skillet and were crisped on the surfaces and deliciously chewy in the middle. The other dish I tried was fresh and bright for summer with zucchini, yellow squash, and lots of bright flavors. 

The Grated Zucchini with Pine Nuts and Poppy Seeds salad was easy to put together once all the ingredients were gathered. First, I tried to track down dried rose petals. Our Middle Eastern grocery store would normally have them, but they were out the day I was looking. I ended up using dried whole rose buds intended for tea, and I snipped off the stem end and loosened the petals. Pine nuts are easier to find, and they were toasted and cooled before being added to the dish. Ground sumac is also easy enough to locate these days, and it adds a lovely, lemony flavor. I used a mix of green and yellow zucchini from the farmers’ market, and they were grated into a big bowl. Poppy seeds, the toasted pine nuts, dried rose petals, zest and juice of a lemon, olive oil, ground sumac, cilantro leaves, and salt and black pepper were added, and the salad was served. 

The salad was crunchy, lemony, and so pretty with the mix of colors. And now, there are so many more flavor combinations I look forward to trying from the book. The Grape and Pistachio Orzo pasta salad with basil and Green Beans with Hazelnut Tarator are two I’m eyeing. When I can’t jump on a plane, virtual travel through food is the next best thing. 

Grated Zucchini with Pine Nuts and Poppy Seeds 
Recipe reprinted with publisher’s permission from Samarkand

Raw zucchini has a pleasing crunch and nutty flavor that pairs well with the sweet taste of poppy seeds and pine nuts. In summer, a mix of green and yellow zucchini looks lovely with the pink rose petals. 

Serves 4 

4 small or 2 large zucchini, unpeeled 
1 tablespoon poppy seeds 
2 tablespoons pine nuts, lightly toasted 
2 teaspoons dried rose petals 
zest and juice of 1/2 lemon 
2 tablespoons olive oil 
1 teaspoon sugar 
1/2 teaspoon ground sumac 
a handful of cilantro leaves 
sea salt and freshly ground black pepper 

Coarsely grate the zucchini into a bowl using a box grater. Toss with the remaining ingredients and season with salt and pepper. An extra pinch of salt flakes over the top is good as well. Serve immediately (it will soon get watery). 

I am a member of the Amazon Affiliate Program. 

Sunday, June 7, 2015

Tomato Leaf Pesto

Tomato season is in full swing here in Austin, and I’ve been bringing home as many as the two of us can consume. A tomato is possibly the easiest type of produce to put to good use in the kitchen, but I had no idea that the leaves of the plant can be used as well. I received a review copy of the new book The CSA Cookbook by Linda Ly and learned about eating tomato leaves and a few other ways to use even more of edible plants. The goal of the book is to share ideas for using every bit of what shows up in a CSA box including the less popular vegetables. But, it’s also a great reference for gardeners who have entire plants at their disposal. I’ve eaten sweet potato leaves when they show up in our CSA in late summer, but I didn’t know leaves from pepper plants are edible too. And, entire squash plants are edible from the vines and leaves to the blossoms, vegetables, and seeds. Now I want to grow my own so I can make Sicilian Squash Shoot Soup. There’s even a recipe for Quick-Pickled Sweet ‘N’ Spicy Radish Pods which appear after the plant flowers. Not all the recipes are for such unusual parts of the plant though. There’s also Rosemary-Roasted Carrots, Carrot Top Salsa, Green Onion Pancakes, and Fennel Apple and Celery Slaw to name a few. But, let’s get back to those tomato leaves. I’ve always loved the smell of tomato vines and leaves, and I couldn’t wait to try a pesto made with the leaves. We all know that I can’t grow tomatoes myself to save my life, but Springdale Farm was kind enough to let me purchase some leaves from their plants. They suggested Brandywine tomato leaves since they have a nice-looking shape, and I was thrilled to take them home and turn them into pesto. I also took home several of their tomatoes to serve with the pesto. 

I am capable of growing some herbs, and I do have a few pots with basil plants. This pesto is made with a mix of basil leaves and tomato leaves. The rest of the ingredients are the usual suspects in traditional pesto. Pine nuts were toasted, Parmigiano Reggiano was grated, garlic was peeled and chopped, and extra virgin olive oil was ready to be added. Everything was pulsed in a food processor. I liked the suggestion in the book of using this pesto in a take on Caprese salad. I sliced some fresh mozzarella from Full Quiver, topped the cheese with fresh tomatoes, and spooned the pesto over them. I had a few extra tomato leaves to use to decorate the platter. 

As usual, Kurt was suspicious of this new spin on a classic recipe. He wasn’t sure the tomato leaves would be a welcome ingredient in pesto. All concerns were forgotten when he tasted it though. The flavor is like a traditional basil pesto with an added, herby dimension. It was fresh and delicious as part of a Caprese. If I ever attempt to grow tomatoes again, now I know I can at least eat the leaves if no fruit appears on the vines. And, I have lots of new ideas for other plants too. 

Speaking of tomato season, I've been helping plan a Tomato Dinner to be held at Springdale Farm this Tuesday, June 9. The dinner will benefit Springdale Center for Urban Agriculture and Slow Food Austin. Tickets are still available. The participating chefs are planning some incredible dishes for this feast on the farm.

Tomato Leaf Pesto 
Recipe reprinted with publisher’s permission from The CSA Cookbook

When I think of summer bounties, I think of basil and tomatoes—the poster children for the season. Something about the sweet, savory, and ever-so-slightly peppery aroma of basil makes a fruity, subtly smoky, vine-ripened tomato sing. When you combine both of their characteristics into an otherwise traditional pesto, the result is a sauce that is unmistakably basil-scented, but with a note of warm and earthy tomato leaf. 

Slather it on a thick slice of mozzarella for a different take on the classic Caprese salad. 

Makes 1 Cup 
2 cups packed fresh basil 
1/2 cup grated Parmesan cheese 
1/3 cup packed tomato leaves 
1/4 cup toasted pine nuts 
3 garlic cloves 
1/4 teaspoon kosher salt 
1/4 to 1/2 cup olive oil 

Add the basil, Parmesan, tomato leaves, pine nuts, garlic, and salt to a food processor and pulse until crumbly, scraping down the sides of the bowl with a rubber spatula as needed. Continue pulsing and add the oil in a steady stream until well blended. Use 1/4 cup oil for a thicker paste or up to 1/2 cup oil for a thinner sauce.

I am a member of the Amazon Affiliate Program.

Tuesday, March 11, 2014

Lemon Croquettes with Cilantro Pistou

I love looking at photos of beautifully presented food and learning a chef's interesting techniques no matter how complicated, but beyond all of that, it was an absolute joy to spend time with Daniel Boulud’s latest book. The book is Daniel: My French Cuisine, and I received a review copy. This is a big, heavy, serious-looking book with serious-looking recipes. But, from the beginning on the How to Use this Book page, the reader is put at ease. You’re invited to prepare components of dishes or whole recipes as you wish. There’s no expectation that you’ll jump in and prepare everything in the book just as it’s shown. The book is made up of three sections. The first is a delightful tour of dishes from Restaurant Daniel. The photos are stunning, and all the instructions are right there for you to experiment with as you please. Sprinkled throughout this section, you’ll find bits of the story of Boulud’s career and upbringing in France. The second section is a group of essays written by Bill Buford about iconic French dishes. He spent time in the kitchens at Daniel to learn about some classic preparations that aren’t often mentioned these days. These are mostly grand, dated dishes like Tete de Veau en Tortue and Carnard a la Presse, but the writing is all entertainment. Buford shares the comical moments of learning these dishes along with their histories and how Boulud came to know them. The last section includes four dinner party menus that Boulud prepares at home inspired by different regions of France. The three sections are very different, but together they give you a clear picture of the kind of chef that Daniel Boulud is, the level of quality of what he produces, and his love of food. 

In the restaurant recipes section, there’s a Warm White Asparagus Salad with Poached Egg Dressing dish that looks like spring itself. I might try it with just one of the three accompanying sauces. Then, there’s the Hazelnut-Crusted Maine Sea Scallops with Nettles and Swiss Chard that’s gorgeous with the nettle foam and sauteed morels. And, there are parts of every dessert that I really want to attempt like Sauternes-Rhubarb Ice Cream, Apricot and Lavendar Clafoutis, and Coffee Cremeux and Espresso Ganache. So far, I’ve made two parts of the Striped Bass in a Cilantro-Tapioca Pistou with Artichokes and Lemon Croquettes. In the book, a shallow bowl is shown with the tapioca sauce in the bottom with a pretty mix of chopped artichokes and fava beans centered in the sauce, a piece of striped bass perfectly coated with cilantro pistou sits on the vegetables, and lemon risotto croquettes are perched on top with a tangle of micro cilantro and shaved artichoke slices. The risotto croquettes are perfect, and I do mean perfect, little, crispy cubes. They looked like fun to make. To start, a pretty standard risotto was made with onion cooked in melted butter. Arborio rice was added, and warmed chicken stock was ladled in a little at a time in the usual fashion. When the rice was fully cooked, shredded parmesan, a tablespoon of mascarpone, lemon zest, and lemon juice were added. It was tasted for seasoning and adjusted before the risotto was poured into a parchment-lined 8 1/2-inch by 4 1/2-inch loaf pan and left to chill in the refrigerator overnight. The next day, the risotto was unmolded and cut into one-inch cubes. The cubes were dusted with cornstarch and fried until crispy. The cilantro pistou was easy to make by pureeing lots of cilantro which is filling my herb garden right now with a couple of tablespoons of toasted pine nuts, some olive oil, and salt. 

I served the crispy, lemony croquettes with a dish of cilantro pistou for dunking. The bright, herby sauce was a light and lively contrast to the savory risotto pieces. There’s so much I’ll be turning to this book for in the future. There are plating arrangements to try and copy, flavor combinations to taste, sauces to attempt, and parts and pieces of recipes to use. Right now, I’m looking at one of the desserts from the last section of the book, the Fig Pine Nut and Mascarpone Custard Tart, and I can’t wait for fig season to get here. I’ll be glad to have this book on the shelf when it does. 

I am a member of the Amazon Affiliate Program.

Thursday, April 18, 2013

Roman-style Artichokes

I imagine when the day comes that I’m living on that quaint, scenic, stretch of land in rural Italy, this is the kind of thing I’ll have for lunch every day during artichoke season. And, there will be wine from nearby and olive oil from my neighbor of course. I do live a rich fantasy life. Until then, I can now get locally grown artichokes right here at home, and I’m very excited about that. The other day, I went on a bit about our local Austin food scene and incredibly fresh asparagus, and then we received artichokes for the first time ever from our CSA. I was beyond thrilled to find them in the box, and I just happened to have a good idea for how to use them sitting in my stack of recipes to try. In the March issue of Living, Roman-style braised artichokes were shown served with hard-boiled eggs with pine-nut sauce. I followed the recipe almost exactly for the artichokes and delighted in the aroma of garlic and wine from the oven as they cooked. For the eggs, I took a turn from the exact suggestion in the magazine since I had some arugula in my herb garden that I was planning to turn into pesto. I topped my eggs with the arugula pesto and a few extra toasted pine nuts for garnish. 

I used to live in fear of cleaning artichokes. It seemed like the most daunting task in the kitchen. I think I’m finally getting used to it somewhat. I’ve learned to work quickly, have lots of lemons at the ready, and focus on how delicious the finished dish will be. Having a bowl of acidulated water ready for the trimmed artichokes is key, and having a cut lemon to rub on each artichoke while you’re trimming it is helpful too. I pulled off the loose outer leaves, cut off the top, trimmed the stem and peeled it, cut them in half, and spooned out the choke before dunking them in the lemon water. A plate is useful to keep the cleaned artichokes submerged in the water. From that point on, this dish couldn’t be easier. The halved artichokes were placed cut side up in a Dutch oven and topped with white wine, olive oil, red pepper flakes, minced garlic, salt, and herbs. I used parsley, oregano, and basil from my garden and skipped the mint since I didn’t have any. The liquid was brought to a boil on top of the stove and then the dish was transferred, covered, to a 350 degree F oven to continue cooking for about 45 minutes. The eggs were simply hard-boiled, peeled, halved and arugula pesto was spooned on each with a few toasted pine nuts. 

The artichokes were completely tender and flavorful from the wine, olive oil, and garlic. With the eggs with pesto, some crunchy, toasted bread, and a glass of wine, it made an almost perfect, light meal. The only thing missing was a view of the rolling, Italian countryside. Some day. 


Thursday, February 2, 2012

Pomegranate-Glazed Salmon with Armenian Rice

I've been thinking about this dish for a long time. I made it for the first time ages ago, but I failed to take any photos. I don't remember why, but I must have been rushed. Since then, I kept remembering the citrus and ginger in the salmon marinade, the tart pomegranate molasses in the glaze, the buttery rice, and the pretty edamame and pomegranate seed garnish. It was time to make this again and this time with a camera in hand. The recipe is from the December 2009 issue of Food and Wine, and it's available online. Now, fresh, wild salmon and pomegranates are not in season at the same time, but this dish works well with previously frozen salmon. Whole Foods must have read my mind because just when I pulling out this recipe again, there was a special on wild salmon that had been frozen at the peak of the last season. The thawed and portioned salmon fillet does need to be marinated for about an hour, but then finishing the dish goes quickly.

For the marinade, soy sauce, olive oil, lemon juice, lime juice, agave nectar, smashed garlic cloves, grated ginger, and salt and pepper were combined. The salmon pieces were placed in a shallow dish, covered with the marinade, and refrigerated for an hour. While the salmon marinates, you can make the glaze which is a mix of pomegranate molasses, agave nectar, soy sauce, minced garlic, grated ginger, and lime zest. Next, you should start the Armenian rice. The rice recipe makes a huge quantity, and I cut it in half. To start, butter was melted in a large saucepan, and then vermicelli broken into small pieces was added with pine nuts. That was cooked until everything was golden brown, and long-grain rice was added. Chicken stock was added and brought to a boil before reducing the heat to low, covering the pan, and cooking for 25 minutes. When cooked, the rice was fluffed and chopped mint was added. The salmon was placed on a baking sheet, brushed with half of the glaze, and cooked under the broiler for a few minutes. The rest of the glaze was brushed on the salmon, and it finished cooking for a few more minutes. To serve, the salmon was set on the rice, and the plate was garnished with edamame and pomegranate seeds.

The big, fresh, tart, and savory flavors carried by the salmon were highlighted by the pop of the pomegranate seeds, and the mild, nutty, herby rice was a great contrast. It's not all that often that I circle back and make the same thing twice, and I was thrilled to find this dish was definitely as good as I remembered.


Tuesday, January 17, 2012

Broccoli with Burrata, Pine Nuts, and Warm Vinaigrette

I usually associate burrata with summer, but that's only because it goes so perfectly with ripe tomatoes and basil. It's available at any time of year though, so I changed my thinking about it after trying this warm, wintry broccoli salad. I've had the page with this dish marked in Sunday Suppers at Lucques since I first read the book, and I knew it was going to be good. How could it not be with blanched broccoli which happens to one of my favorite vegetables, creamy, fresh burrata, a warm vinaigrette with garlic, chiles, anchovies, lemon, and butter, and a crunchy, toasted breadcrumb and pine nut topping? This is a filling salad. So, if you're serving it as a first course, you'll want to follow it with something on the lighter side. Or, it also makes a great lunch all by itself. As usual with dishes from this book, there are a few steps involved, but the result is worth every bit of chopping and every dirty dish.

The first step is to toast the breadcrumbs and pine nuts, and the suggested procedure involved using two baking sheets to toast them separately. I tossed the breadcrumbs with some olive oil on one side of a big sheet pan, and let them get a head start in the warm oven. Then, I added the pine nuts to the other side of the same sheet pan, and toasted them in the oven for a few minutes while the breadcrumbs reached a good level of toastedness. Once removed from the oven and cool, half of the pine nuts were chopped, and they were combined with the whole pine nuts, the toasted breadcrumbs, some chopped parsley, and salt and pepper. I left all of that on the sheet pan to avoid using a bowl for the mixture. Next, broccoli was blanched and drained. I let mine drain in a colander rather than spreading it out on yet another sheet pan as was suggested. The warm vinaigrette was supposed to have been started in a saucepan and then finished in a saute pan. I skipped the saucepan and used the saute pan from start to finish. The recipe calls for seven tablespoons of olive oil and six tablespoons of butter which seemed like way too much of both to me. I used maybe three tablespoons of olive oil and two of butter. They were combined in the saute pan over low heat, and a minced anchovy and chopped dried red chile were added. Once the anchovy had melted into the oil and butter, minced garlic and thyme leaves were added followed by chopped shallots and lemon juice. The drained broccoli was then tossed in the warm vinaigrette in the saute pan. Last, the burrata was sliced and the salad was plated with the total number of pots and pans used reduced by one half.

This was a bit of a process even after simplifying a few steps, but because of the contrast of the fresh, cool, mild cheese with the robust flavors of the warm vinaigrette and broccoli, I wouldn't change anything else about it. Happily for me, burrata isn't just for summer anymore.


Friday, August 19, 2011

Bulgur Salad with Arugula, Zucchini, and Pine Nuts

Lately, whatever it is that Russ Parson writes about for the LA Times is what I want to cook. There was the story about eggs for dinner and then the one about comparing vegetable dishes from Plenty and A Year in My Kitchen. Most recently, it was a story about grain salads. I know, that might not sound terribly exciting, but he went about describing ways to put vegetables and grains together and how to cook different grains for salad use, and I was hooked. It helped that I already really liked grain salads, but the three specific recipes included in the story were all great for light, summer meals. I picked the bulgur salad because it was a chance to do something new and different with zucchini. Here, that new and different thing was actually leaving the zucchini raw. It was chopped, salted, allowed to drain, and then rinsed, dried, and added to the salad. Another new and different thing in this recipe was toasting the bulgur wheat. I usually use bulgur for tabbouleh, and I always just add boiling water and let it soak. Parsons suggested toasting the bulgur in a dry pan first and then pouring water into the hot pan and leaving the bulgur to soak. The flavor difference was big, and I’ll be toasting bulgur from now on.

So, toasting the bulgur only takes about five minutes and is probably easier than boiling water. The bulgur was placed in a dry saute pan over medium-high heat and was left for about five minutes. Cold water was added to the hot pan, the bulgur was stirred, and it was left to soften. It could take about an hour for the bulgur to soften, but mine was ready in about 35 minutes. Meanwhile, a couple of zucchini were chopped into big chunks and placed in a colander. The zucchini was liberally salted and left to drain. After 30 minutes, it was rinsed and dried. To make the salad, the bulgur was placed in a big mixing bowl with minced onion, the zucchini, lemon juice, olive oil, arugula leaves, and toasted pine nuts. Once combined, the salad was ready.

It’s a fresh and light salad, but the bulgur and pine nuts give it some heft. And, don’t think for a minute that this is just a boring, whole grain, healthy dish. The onion and lemon give it zing, the zucchini and pine nuts bring crunch, and toasting the bulgur added even nuttier flavor from the grain. The flesh of the salted and rinsed zucchini had become a little softer than when raw but it mostly retained its texture. I’m looking forward to getting creative with more toasted grain and fresh vegetable combinations or maybe whatever Russ Parsons writes about next.


Friday, January 22, 2010

Ancho Pine Nut Brownies with Cinnamon Ice Cream

A couple of weeks ago, we had some of the coldest weather this part of Texas has experienced in many years. We get a little uneasy around here with near-freezing temperatures, and when it dipped into the 20s (F) we were confused and concerned. So, what was I doing to prepare for this weekend of serious winter weather we were about to have? I was making ice cream. The ice cream was going to be served on warm brownies, but still, it was 20 degrees in Austin and I pulled out the ice cream maker. Maybe I should start by telling you about the brownies because that might make more sense. I wanted to mix up a southwest, chile powder-infused kind of brownie, and I found the perfect recipe in Nuevo Tex-Mex. The recipe was created by Rebecca Rather, and it includes ancho chile powder with semisweet chocolate, chocolate chips, and pine nuts. I thought big squares of those brownies warm from the oven would be great topped with a generous scoop of cinnamon ice cream. The cinnamon ice cream is from The Perfect Scoop.

The brownie recipe makes a large batch, so I cut the quantities in half and baked it in an eight inch square pan rather than a nine by thirteen inch pan. Still, the halved quantities included a half pound of semisweet chocolate, half a pound of butter, four eggs, and a cup and a half of sugar along with flour, ancho chile powder, chocolate chips, and pine nuts. These were kind of serious brownies. The batter was very easy to stir together without a mixer, and they went into 325 F oven for about 35-40 minutes. The recipe suggests a baking time of 20-25 minutes, but my brownies were nowhere near done at that point. The cinnamon ice cream was started by steeping broken cinnamon sticks in warm milk with sugar and a pinch of salt. Then, a custard was made with egg yolks and the warmed milk, it was strained, and cream was added. The custard was churned after being chilled.

The ancho chile powder in the brownies accented the chocolate in the same way espresso would. There was clearly something more than chocolate happening, but the chile flavor was just a supporting role and not obvious at all. The texture of these brownies was delightfully lighter than I expected and definitely not dense. The crackly top gave way to an almost cakey but near-fudgy interior. They were somehow the best of both worlds, and the pine nuts were a nice addition too. While I don’t think cinnamon ice cream would be a bad choice to set atop any brownie, I was especially happy with it on top of these. I’m also convinced this dessert was a good distraction from our freakishly cold weather at least for a little while. And just for the record, it's 75 degrees (F) today, and that's my favorite kind of January weather.


Monday, December 21, 2009

Chive, Mascarpone, and Pine Nut Dip

In the middle of a cookie baking frenzy, I needed to think of something in the appetizer category to take to a holiday party. I had some mascarpone in the refrigerator that I bought for another purpose and ended up not using, so my search started with that ingredient. I found this dip on Epicurious and was won over by the swirl of chive oil in it. I had high hopes that the bright green oil would make a festive-looking dip, and it sounded delicious. The chive oil was actually folded into what was a rather thick dip instead of simply being drizzled and swirled as I imagine. The marbled look I had in my mind's eye didn't really come to fruition, but I got over that as soon as I tasted the dip.

First, chopped chives were pureed in olive oil with a pinch of salt. That puree was left to sit in the refrigerator for an hour before it was poured through a sieve to remove the chive solids. Then, pine nuts were toasted in the oven while crostini crisped. The pine nuts were chopped once cool. Mascarpone and cream cheese were to be whisked together, but given the thickness of that mixture, I opted to use a hand mixer instead of a whisk. I changed the recipe by adding a minced shallot to boost the onion flavor, and that was incorporated into the mascarpone mixture. Next, the chopped pine nuts were added. Last the chive oil was poured over top and not too thoroughly folded into the dip so that splotches of green were visible.

This was well-liked at the party, even Kurt let me know that it was really good, but sadly, I only had a small taste of it. That's why I'm already planning on making it again just for us to enjoy at home. The flavor of the chive oil is lovely, but I was glad I added the shallot as well. I'll definitely repeat that addition when I whip up another bowl of it.


Friday, July 10, 2009

Chicken Salad with Yellow Squash, Lemon, and Pine Nuts

No, I’m still not done with salads. It’s only July, and all those salads I see in books and magazines continue to catch my eye. In the April issue of Food and Wine, there was an article about wine country recipes in which chefs from four different wine regions around the world presented dishes that pair well with their local wines. The regions represented were northern California, Mediterranean France and Spain, coastal Chile, and south Australia. This salad is from Armand Arnal of La Chassagnette outside Arles. Some interesting ingredients and flavors are combined in the salad, and I made one substitution but probably shouldn’t have. As you see in the title, my version of the salad included yellow squash, but zucchini was used in the original. As it happened, I had a yellow squash in the refrigerator but I had used all the zucchini. I thought it would be pretty much the same difference. The problem, however, was the color. You see, this salad also involves the use of preserved lemon, and once the lemon rind was sliced, it looked very much like the sticks of yellow squash. In fact, as Kurt was eating his salad, he started pushing the yellow things to the side of his plate and said that he didn’t require that much lemon. I had to explain that all that yellow stuff was squash which he then ate while realizing the actual quantity of lemon was just right.

The first step in preparing this salad was marinating the zucchini or squash in olive oil with thinly sliced garlic, cumin, lemon zest, lemon juice, salt, and pepper. Plumped currants were added to the squash, and it was left in the marinade for two hours. At the same time, chicken was marinated in olive oil with minced shallots and lemon juice. Then, pine nuts were toasted, the chicken was sliced and sauteed, arugula was cleaned, and the preserved lemon peel was slivered. All of those items were then tossed in the marinade with the squash and currants. It came together very simply once the marinated items had been prepared and allowed to sit.

For a simple salad of some chicken on some leafy greens, there was actually a lot going on here in the flavor department. The pinch of cumin added an interesting hint of earthy spice, and the sweet currants balanced the peppery arugula. The lemon juice and preserved lemon peel were bright notes in the mix, and the marinated chicken made it all deliciously more substantial. This was a thumbs-up meal, and it’s going into the permanent file with one note: don’t willy-nilly substitute yellow squash for zucchini. My lesson of the day was to always remember that color can matter more than you might think in a dish.


Friday, May 15, 2009

Greens Tart with Goat Cheese, Currants, and Pine Nuts

When I read Sunday Suppers at Lucques, there was a handful or so of recipes that I wanted to experiment with as soon as possible, and this was one of them. This tart is the second item I’ve tried from the book so far, and the greens we’re getting from our CSA were the inspiration for it. Now, Kurt is perfectly happy with a vegetarian meal here and there, but the deluge of greens we sometimes have can make him want to be a strict carnivore. At some point, he begs for a greens-free meal, and that means I have to get creative with how they’re incorporated into dishes. This tart worked perfectly and happily was not an eat-your-vegetables experience. Instead, this was an oh this is good, and oh by the way, those are greens aren’t they kind of meal. In other words, this tart combines great flavors that work really well together.

In the book, it’s described as a swiss chard tart, but I had beet and collard greens to use. Those were cleaned and chopped and sauteed in olive oil with shallot and thyme. I’ve used Whole Foods’ all butter puff pastry with good results a few times now, and that’s what I used here. The puff pastry was thawed and then just unfolded onto a baking sheet. No rolling was required. That was topped with a mixture of ricotta, egg yolk, olive oil, creme fraiche, and salt and pepper. Goat cheese was crumbled on top of that. Then, the cooked and cooled greens were squeezed to remove liquid and then spread on top of the cheese mixture and were topped with more crumbled goat cheese. It was baked for 25 minutes while the relish was assembled. The pastry with cheese and greens was a great start, but what really made this dish was the currant pine nut relish. Pine nuts were toasted and set aside. Olive oil was heated in a saute pan and a rosemary sprig and a dried chile de arbol were added. Minced onion went into the pan, stewed for 10 minutes, and then was transferred to a small bowl. The saute pan was then used to reduce a quarter cup of balsamic vinegar down to one tablespoon. Meanwhile, currants were plumped in hot water and then drained. The bowl of sauteed onions was mixed with the toasted pine nuts, plumped currants, and reduced balsamic, and chopped parsley was added.

The richness of the ricotta and creme fraiche was fanastic with the greens. And, this could, of course, be made with milder spinach, but let me tell you about the relish first. The currant pine nut relish with the sauteed onions and reduced balsamic vinegar was such a perfect complement to the greens, I would recommend using the boldest flavored greens you can find. The layers of sweetness and spice and the hint of acidity mingled with the bitterness of the greens in amazing ways. Instead of making this to use up some greens, in the future, I’ll be making this because it’s really delicious.


Blogging tips