Showing posts with label mascarpone. Show all posts

Thursday, February 14, 2013

Cornish Game Hen Cacciatore with Mascarpone Polenta

Winter, and I use the term loosely, might be over here. Since I’ve put that in writing, we could still get hit with a nasty cold day or two out of nowhere, but for now, it’s already starting to feel like spring. So, before the warm weather fully settles in, I wanted to show this hearty, wintery dish. That day when I was flipping through Stir: Mixing It Up in the Italian Tradition, I came across this version of chicken cacciatore. I liked that it was a little different since it’s made with Cornish game hens; it’s a little spicy with some hot pickled peppers included; and there’s no pancetta which I would have left out anyway. There are also no mushrooms, and I like mushrooms very much, but I appreciated the more pointed-up flavor of this cacciatore sauce without them. The game hens and sauce are served with my favorite version of polenta. I’ve mentioned this same recipe for it before, and it’s luscious and rich with butter and mascarpone. A very similar cacciatore recipe, which is also from Barbara Lynch, is on the Food and Wine site. The vegetables and sauce are exactly the same, but in that version, chicken thighs are used rather than game hens and farro risotto is suggested for serving rather than polenta. 

In the book, it’s suggested that the game hens be cut into six pieces each. I decided to make it a bit more rustic and just cut the hens in half by removing the backbone and cutting between the breasts. The split hens were then browned in olive oil for about eight minutes on each side before removing them from the pan. Over lower heat, onion, bell pepper, hot pickled Italian peppers, and garlic were added and cooked until tender and starting to brown. Then, tomatoes, and I used canned, and red wine were added and allowed to simmer until the liquid was reduced by half. The chicken was returned to the pan, the wine was reduced a bit more, and then chicken stock was added. It was left to simmer until the chicken was cooked through, about twelve to fifteen minutes for halved Cornish hens. Once cooked, the chicken was removed from the pan so the sauce could continue to simmer and reduce for another 30 minutes. Meanwhile, the polenta was stirred and lovely mascarpone was added. Since I had Kurt’s preference for a crispy, seared surface on chicken in mind, I popped the halved hens under the broiler to re-crisp the skins just before serving. Last, I finely chopped more pickled hot peppers and parsley for garnish. 

As the sauce simmered and I tasted from time to time to check the seasoning, I knew this was going to be good. Once it had reduced, and all those flavors from peppers, tomatoes, and wine had worked their magic, I had one last taste and did a little kitchen-happy-dance. This was an ideal match for the mascarpone polenta, but it would also be delicious with farro risotto, pasta, or a nice hunk of bread. And, it's perfect for a chilly night if you're still having winter. 

I am a member of the Amazon Affiliate Program.

Wednesday, October 31, 2012

Pumpkin Roulade with Ginger Buttercream

I feel like I’m holding tryouts for Thanksgiving dessert. I love planning the Thanksgiving menu every year, and there are always about fifty desserts I want to make. And, that means that every year several things I really want to bake get lost in the shuffle. So I thought, why not try a few things in advance to increase the number of autumnal desserts I get to taste this year? The only problem will be if everything turns out as good as this dessert, I’ll still have a hard time picking one, or two, for the big day. This cake is from Ina Garten, and it appears both in Barefoot Contessa Back to Basics and on the Food Network site. I learned awhile ago that roulades are much easier than they look, and they tend to store really well. This tender, sponge cake has pumpkin puree and spices, and the filling is made with mascarpone and crystallized ginger. It’s everything you could want in a dessert for fall, and you can make it the day before you plant to serve it.

The thin cake is made in a big sheet pan lined with parchment that is buttered and floured. Flour, baking powder, baking soda, cinnamon, ginger, nutmeg, and salt were sifted together. Eggs and granulated sugar were mixed in a stand mixer, and pumpkin puree was added. You can use canned pumpkin puree or homemade. I had just brought home a cute, pie pumpkin which I roasted and used for a few different recipes. After the pumpkin is mixed into the eggs, the flour mixture was slowly added until just incorporated. A spatula was used to finish folding the flour into the batter. It’s always a good idea to fold a batter with a spatula few times after taking the bowl off the mixer to be sure there are no unmixed, dry ingredients at the bottom of the bowl. The cake was baked for a mere ten minutes, and then it was turned out onto a towel dusted with confectioner’s sugar. It’s a scary moment to just plop the hot cake right out of the pan, but don’t even worry. With the parchment, it comes right out. The parchment was peeled off, and the warm cake was rolled with the towel rolled into it, into a spiral starting at a short end. If the edges look uneven, they can be trimmed later. Rolled into the towel, the cake was left to cool completely on a rack. The filling was made with mascarpone, confectioners’ sugar, and heavy cream. Once those ingredients were well-mixed, finely chopped crystallized ginger was added. To finish the cake, it was unrolled, the filling was spread over the top, and then it was rolled back into a spiral without the towel this time of course. The edges were trimmed, it was placed on a platter, and it was dusted with more confectioners’ sugar.

This pumpkin roulade will be a serious contender for a spot on the menu this year. I have a few more weeks to keep testing desserts which is starting to seem like not enough time. There are so many great things to make with pumpkin, and then there are cranberries to consider. Do you try new desserts every year for Thanksgiving, or do you have favorites that are expected on the menu?

I am a member of the Amazon Affiliate Program.

Tuesday, February 7, 2012

Espresso and Mascarpone Semifreddo with Homemade Mascarpone

I frequently say things like “homemade is always better,” and I will attempt to make just about anything from scratch at least once. So, I was curious about what made the “make it” rather than “buy it” list in Make the Bread, Buy the Butter by Jennifer Reese. I received a review copy of the book, and it’s an entertaining read. It’s not so much a piece on precise calculations of whether it’s less expensive to make things from scratch or buy them; although, there are cost comparisons for each recipe in the book. Instead, it’s an honest and humorous account of what the author did make, whether the process was enjoyable or not, and if she thought the result was worth the trouble. Reese’s experiences included raising chickens, ducks, turkeys, and goats, curing bacon, salmon, and prosciutto, baking hamburger and hot dog buns, and making homemade yogurt and cheeses among many other things. Speaking of those buns, she recommends making hot dog buns because the store-bought variety is so flavorless, and the homemade ones are better-tasting and less expensive. However, with hamburger buns, she found the homemade options she tried to be too firm and not fluffy enough and recommends buying them. I had to disagree with this conclusion because I’m very fond of homemade hamburger buns, but forming your own opinion is part of the fun of this book. The author shares her experiences and her reasons for choosing to make or buy each item. It gets you thinking about your own priorities with things like time versus money and control over ingredients versus convenience.

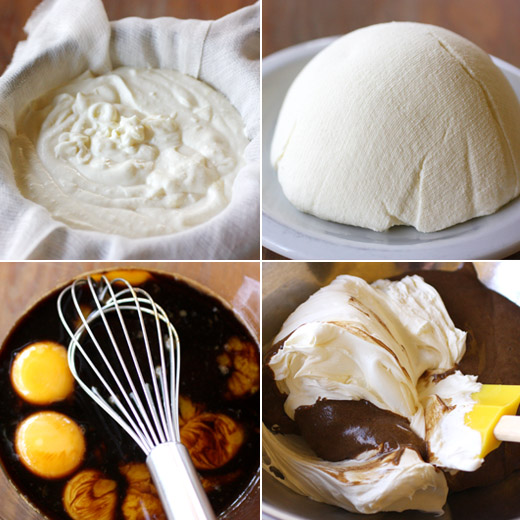
The cheese chapter was especially interesting to me. I’ve been toying with the idea of attempting cheese making for a while, but so far, I’ve only made ricotta. Mascarpone seemed like a good next step. It’s an easy process, and the cost, even starting with organic cream, is considerably lower than store-bought mascarpone. You heat a quart of cream in a double boiler, and you want the top bowl of the double boiler to be well inside the pan of simmering water. The temperature needs to come up to 196 degrees F, and that will take forever if your bowl is too far from the simmering water. Once it comes to temperature, you add a scant quarter teaspoon of tartaric acid. Now, it’s important that you use exactly tartaric acid and not cream of tartar. Cream of tartar is derived from tartaric acid, but chemically, they are not the same. I found tartaric acid locally at Austin Homebrew Supply, and it’s also available online. After adding the tartaric acid, remove the bowl of cream from the heat, and stir and stir until the cream thickens. Let it sit to come to room temperature, and then line a sieve with fine-weave cheesecloth and place it over a bowl. Pour the thickened cream into the lined sieve, cover with plastic wrap, and refrigerate for at least twelve hours. Reese notes that sometimes the process just doesn’t work, and the cream doesn’t thicken. You can try adding a tiny pinch more tartaric acid and stirring more, but occasionally it doesn’t become cheese. Thankfully, I had no problems, and like magic, the next day I had a pound of mascarpone which cost about $5.00 for the organic cream plus a few cents for the tartaric acid and natural gas for operating the stove.

Following the recipe for the mascarpone, there’s a semifreddo made with it and flavored with espresso. It’s the kind of dessert that you have to make in advance which would make it perfect for a dinner party. It needs to be chilled in the freezer and then softened in the refrigerator before serving. An espresso-flavored custard was made first, and that was left to chill in the refrigerator. Next, a meringue was whipped in one bowl, and the homemade mascarpone and some cream were combined in a second bowl. The mascarpone and cream mixture was folded into the espresso custard followed by the meringue. I spooned the semifreddo into serving cups before freezing them, and that way, the softening time in the refrigerator was quicker than it would have been with one big bowl. Each serving was garnished with chopped hazelnuts and then quickly disappeared. I’ll definitely be making my own mascarpone from now on, when I have the time to make it. And, I’m going to try making some other cheeses too as well as homemade ginger ale, vermouth, nutella, berry vinegar, and pot stickers to name a few things.


Thursday, September 16, 2010

Crostata with Pears, Apples, and Taleggio

I was flipping tv channels a couple of weeks ago, and I caught the very end of a segment in which Giada was making a rustic crostata with dried apricots, walnuts, and cubes of taleggio. It sounded like such an interesting mix, and it sounded so autumnal, I was sure I could make it seem like fall around here by baking it. By the time I was ready to get baking, we had received some apples and pears from our CSA, so I changed the plan just slightly by using those fresh fruits instead of dried apricots. Now, about that cheese, yes, it is usually a savory cheese. Taleggio is a soft, washed rind cheese that’s relatively mild-flavored, and I was curious about how it would work in a sweet dessert. As it melted into the fruit and nuts, it added richness and interest, and if you weren’t told it was there, you might not realize there was cheese in the filling at all. The crostata was perfect served warm from the oven, and I preferred the leftovers re-heated rather than served cold from the refrigerator.

There wasn’t just cheese in the filling, there was also mascarpone in the crust. The dough was made in a food processor by combining flour, salt, sugar, and butter. It was pulsed until the butter was coarsely mixed into the flour, and mascarpone and lemon juice were added. The machine was pulsed a few more times, and then it was left running briefly while ice water was added. The dough was wrapped and refrigerated for 30 minutes before being rolled out on parchment paper cut to the size of a baking sheet. That was a great tip by the way. By rolling the dough on parchment paper, it was very easy to lift the paper and move it with the dough to a baking sheet in one fell swoop. Then, the dough was topped with a mixed of chopped pears, apples, walnuts, half of the cubed taleggio, a little flour since I was using fresh fruit, lemon zest, cinnamon, sea salt, and honey. The edges of the dough were rolled up and over, and the remaining cubed cheese was scattered on top. The dough edges received an egg wash, and the crostata baked for about 40 minutes.

I will say this is not a dessert for ice cream or whipped cream on the side. It requires no embellishment, but it was delicious with a glass of wine. Nuts, honey, fruit, and cheese were enveloped in a golden, flaky crust, and the warm, sweet flavors were accented by the mildly tangy cheese. It’s still about 95 degrees, so I didn’t make fall happen, but the flavors made it seem like fall should be coming soon.


Wednesday, February 17, 2010

Red Wine Braised Short Ribs with Creamy Mascarpone Polenta

Once a year or so, I experiment with cooking beef. I guess it’s a sign that I really am obsessed with learning more about cooking since I don’t eat red meat. Kurt does eat red meat, and he’s my audience and critic when I attempt one of these meals. This time, I decided I really wanted to watch the transformation of beef short ribs during a long, slow braise. I felt it necessary to stick to an exact recipe, so I presented a couple of options from different books to Kurt. He chose the red wine braised short ribs from Stir: Mixing It Up in the Italian Tradition by Barbara Lynch. It’s a fairly straightforward approach to short ribs as far as I know. For side dishes, otherwise known as my complete meal, I made the creamy mascarpone polenta also from Stir and roasted some broccoli and cauliflower with whole garlic cloves.

Lynch’s approach to the short ribs is to cook them even longer than usual at an even lower temperature. They can definitely be made in advance and simply re-heated for serving. In fact, that’s the best way to deal with the sauce. To start, the short ribs were seasoned well and then seared in a hot saute pan with canola oil. I knew not to crowd the pan, so I seared the ribs in two batches, and to my nose, my kitchen still smells like beef. Kurt doesn’t seem to mind. Once seared on all sides, the ribs went into a large roasting pan, and the sauce was started. In the same saute pan, onion, celery, carrot, and garlic were sauteed. When those vegetables were tender and browned, a bottle of red wine, thyme sprigs, bay leaves, peppercorns, whole coriander, and chopped tomato were added. That was cooked until reduced by half. Then, broth was added and brought to a boil. The whole mixture of liquid and vegetables was poured over the ribs in the roasting pan. The pan was covered with parchment and foil, and it went into a 275 F oven for five hours.

I can’t take much credit for the meat doing what it does in a flavorful braising liquid while being slowly roasted for hours, but it did indeed arrive at the falling off the bone state. I let the meat cool in the roasting pan until touchable and then transferred it to another large baking dish. The braising liquid was strained into a large saucepan, and some of it was poured over the ribs in the new dish. Both the ribs and sauce were covered and refrigerated for a couple of hours. That was just enough time for the fat to congeal on the surface of the sauce, and that makes it much easier to remove than skimming a warm sauce repeatedly. The de-fatted sauce was then brought to a simmer and reduced while the short ribs were re-heated in a 300 F oven. Just before serving, a tablespoon of butter and some thyme leaves were whisked into the sauce.

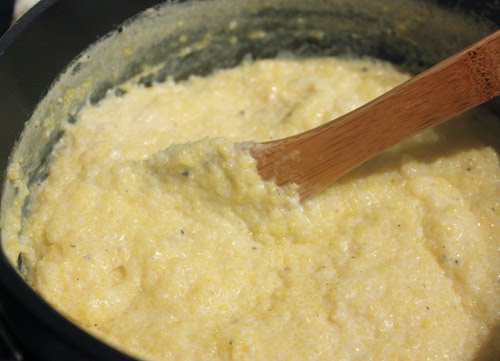
The ribs were well-received, and Kurt confirmed they were cooked to complete tenderness. Yes, they spend forever braising, and beef fat is a crazy thing to smell in my kitchen, but I had a new cooking experience and everything turned out great. That’s not the end of the story though. I have to tell you about the incredibly simple polenta. It was a basic polenta made with coarse ground cornmeal and milk. After the polenta was thickened and fully cooked, butter and mascarpone were stirred into it. That was it, but what a polenta it became. I’m told it worked well with the short ribs and sauce, and I can definitely suggest it along side roasted vegetables. The creamy richness of the mascarpone made it an amazing polenta. For this meal, w
e had slightly different things on our plates, but we both enjoyed a hearty winter meal with great flavor.


Monday, December 21, 2009

Chive, Mascarpone, and Pine Nut Dip

In the middle of a cookie baking frenzy, I needed to think of something in the appetizer category to take to a holiday party. I had some mascarpone in the refrigerator that I bought for another purpose and ended up not using, so my search started with that ingredient. I found this dip on Epicurious and was won over by the swirl of chive oil in it. I had high hopes that the bright green oil would make a festive-looking dip, and it sounded delicious. The chive oil was actually folded into what was a rather thick dip instead of simply being drizzled and swirled as I imagine. The marbled look I had in my mind's eye didn't really come to fruition, but I got over that as soon as I tasted the dip.

First, chopped chives were pureed in olive oil with a pinch of salt. That puree was left to sit in the refrigerator for an hour before it was poured through a sieve to remove the chive solids. Then, pine nuts were toasted in the oven while crostini crisped. The pine nuts were chopped once cool. Mascarpone and cream cheese were to be whisked together, but given the thickness of that mixture, I opted to use a hand mixer instead of a whisk. I changed the recipe by adding a minced shallot to boost the onion flavor, and that was incorporated into the mascarpone mixture. Next, the chopped pine nuts were added. Last the chive oil was poured over top and not too thoroughly folded into the dip so that splotches of green were visible.

This was well-liked at the party, even Kurt let me know that it was really good, but sadly, I only had a small taste of it. That's why I'm already planning on making it again just for us to enjoy at home. The flavor of the chive oil is lovely, but I was glad I added the shallot as well. I'll definitely repeat that addition when I whip up another bowl of it.


Wednesday, August 5, 2009

Mascarpone Ice Cream with Peaches

Sometimes you just know. You see a recipe and you don’t even have to think about it or wonder how it will taste or worry about the technique because you know it will be great. You can already imagine the flavor, and it’s very, very good. That was what happened when I saw this dessert in July’s Food and Wine. Yes, ice cream made with mascarpone and served with peaches floating in a white wine-honey syrup scented with rosemary required no thinking. This was also a good choice for dessert because local peaches are still available, and rosemary is one of the few items in my yard that hasn’t succumbed to the searing, persistent heat this summer. The garlic chives are limply hanging on, the lemongrass is ok but requires a lot of water, and there are still a few green leaves on the sage. The basil isn’t entirely happy, but it’s surviving in containers which are watered daily. Everything else is long dead, but the rosemary doesn’t mind this weather at all, and I was happy to find another use for it.

The ice cream was made with a pretty standard custard including four egg yolks and whole milk. After the custard was cooked and poured into a bowl to cool, mascarpone was whisked into it, and then it was churned in an ice cream maker. For the syrup, white wine, honey, water, and sugar were combined in a saucepan and boiled until reduced by half. Rosemary was added and allowed to steep, and I veered from the recipe at this point. Rather than pouring the syrup over peaches and baking them, I simply sliced the peaches and let them sit in the warm syrup while it steeped with the rosemary. I wanted to keep the peaches a little firmer and closer to their fresh state. They were so fragrant and juicy, I didn’t feel the need to bake them to intensify the flavor.

A big scoop of the ice cream was topped with peach slices and a few spoons of syrup. The interesting thing about the ice cream is that there is no vanilla. The flavor comes entirely from the mascarpone. It was a nice change from the familiar taste of vanilla, and it was as good as expected with the peaches and syrup.


Friday, February 13, 2009

Banana-Caramel Birthday Cake

It’s not chocolate. That’s the unbelievable thing about this birthday cake. For years, every time I asked Kurt what kind of cake he’d like for his birthday, the only answer I heard was chocolate. Until this year. This year, he said he’d like something different. I was too confused to think, so I put some books in front of him and asked him to pick a cake. It took him longer than I thought it would. The lemon curd cake looked good, and so did the coconut cake. But, in the end, he chose this banana-caramel cake from Martha Stewart's Baking Handbook.

The cake batter has lots of butter, some sour cream, and three mashed bananas. It makes a nicely sturdy cake that remains moist. Separating the layers, are three sliced bananas cooked in caramel. That alone would make a fantastic dessert, but it was even better as the glue between these layers. With six bananas in all, there’s almost a full serving of fruit in each slice of cake.

The frosting on the cake was mascarpone whipped cream which I’ll have to go on about for just a bit. First, it was so light and fluffy it seemed like it should be ok to go ahead and eat the entire bowl of it. The mascarpone, heavy cream, and confectioner’s sugar were mixed together all at once. I imagined it would be a little thicker and heavier like cream cheese frosting, but instead, the consistency was like puffy, creamy, light, pillowy stuff that’s really hard to stop eating. The second thing about it is that it’s lightly sweetened. It’s not tooth achingly sugary at all. That’s important because the frosted cake was then topped with caramel sauce. I already loved the frosting, and then it got some caramel. Dear, sweet, beautiful caramel. This cake was a very good choice.

It is a big, special cake, and it was splendid for a birthday celebration. You could simplify it by making one big layer, skipping the cooked bananas, and just frosting it without the caramel sauce. All the parts together, though, are so good. So Kurt’s another year older, and what am I doing with such an old man anyway? I think that every year until I catch up with him in a month and a half.


Blogging tips